
Kubb set
Kubb set
This Kubb set was made using only a table saw, a compound miter saw and a few grades of sandpaper:
Here are the materials you will need for the set:|
One 4"x4"x6' Pressure Treated Pine Timber (for the Kubb and Kung) | |
|
Two 1-1/4" Dia. x 36" dowel (Kastpinner) | |
|
One 1"x1"x4' dowel (Hörnpinner) |
Kubbspel Fabrication:
Building a Kubb set has been one of the easiest projects I have worked on yet. As the steps are so simple, I have chosen not to clutter this page with many snapshots, especially since anyone capable of using the tools needed will understand without them. Next, clamp the hörnpinne against the deck and jig so it's length is running toward the saw rather then perpendicular to it. Again, add another clamp as a failsafe. If the blade catches, the hörnpinne will become a short, fat arrow! Make your first cut. Unclamp the hörnpinne rotate it 90° along its length, place it back in the jig as before and make the second cut.
Repeat this two more times to attain a nice sharp pyramid at one end of the hörnpinne. Finish off the other three hörnpinner and you can move on to the Kung. To finish off the Kung, you simply make one end look like a crown. You can go as simple or elegant as you wish with this part. The easiest thing to do is angle your table saw blade at 45°, set your sliding stop so the edge of the blade cuts down the center of the 3-1/2" square end of the piece, then cut. This step can also be dangerous as well so use caution. Be sure to maintain a strong hold on the wood as well as keeping it firmly against the saw bed and sliding stop as you guide it over the blade. Round off all the edges of your parts to reduce the possibility of slivers and enhance their appearance. Sand them with consecutively higher grit sand paper until reaching 220-grit. Finish your parts by staining them the color(s) of your choice. The Chest: Building a chest to store and transport my Kubb set has was more difficult then the set itself. Not knowing the correct name for this style of chest, I will simply describe it as beveled rather then butted at its corners. By this I mean the mating surfaces of the front, back, sides and top are mitered/beveled to run the seam of the joint down the corners of the chest. The bottom plate is encircled by the front, back and sides so we can add a few pegs to divert the load of the Kubb set throughout the chest. Other then the addition of a drill and two bits, the chest was made using the same tools as the Kubb set:
The first step is to cut a 11-13/16” length off the 4"x4"x6' timber. Set this piece aside to shape the Kung later. Rip the remaining length to measure 2-3/4” square. Cut this resized beam into ten lengths of 5-7/8". These will be your kubb.
Take the 1-1/4" diameter dowels and cut then into six pieces 11-13/16” long to make your kastpinner.
Cut four hörnpinner, 11-13/16”in length, from the 1"x1"x4' dowel. Tapering points need to be added to your hörnpinner. If you want to make then easier to hammer into the ground, I advise forming an angle over the 45° a standard compound saw can cut. Warning: Unless you are very well versed on the use of a compound miter saw, do not attempt the following instruction. What I am about to describe is a dangerous method to cut such an angle! To get an angle over the 45-50° norm, adjust the blade to the angle you desire the point to be off the length and lock it in. Place a squared piece of plywood on the saw's deck with one edge parallel to backing plate and one perpendicular to it. Locate this jig so when the blade comes down it will angle only 1/2 the hörnpinne's width. Clamp it in place firmly, then add one more clamp as a failsafe.
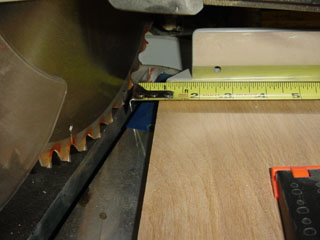
Position Fixture For Cutting Hörnpinne Points
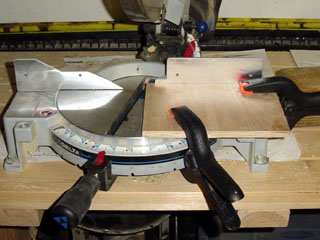
Fixture For Cutting Hörnpinne Points
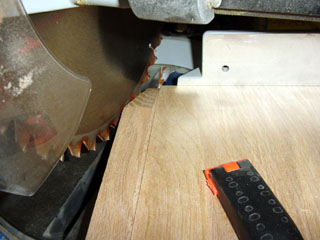
Second Hörnpinne Cut
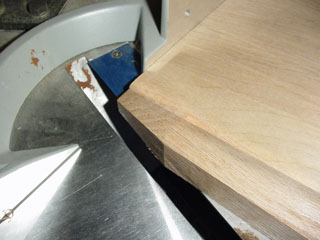
Alternate View
Rotate the Kung 90° about its long axis, make the pass again, repeat two more times and a simple crown will have been formed.
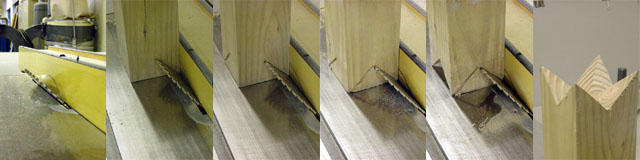
Cutting the Kung's Crown
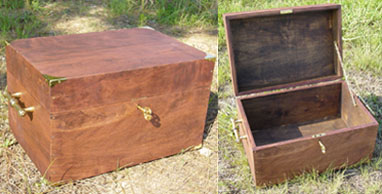
Kubbspel Chest
|
One 2'x4'x1/2' BB/BB finish Birch plywood | |
|
One 1/4" Dia. x 36" dowel (diverting pins) | |
|
Two Handles | |
|
Two Hinges | |
|
A Latch or Mortise Lock | |
|
#16 x 3/4" Brass nails | |
|
Wood Glue | |
|
Eight Corner Protectors (Optional) | |
|
Four feet (Optional) |
Chest Fabrication:
Before you begin we need to look at the math. The most compact layout I came up with is to stand up the 10 kubb in two rows of five, place the 6 kastpinner in three rows of two between them, lay the Kung on its side atop the kastpinner ending by laying the hörnpinner on either side of the Kung (on top of the Kubb). This layout requires a 13-3/4" long by 9-1/2" wide by 6" deep storage area. You now to decide how tight you want your pieces to fit in their chest. Do you want a loose fit or a snug fit. I chose a snug fit so the game pieces would not rattle on the was to an event, but found depending on the humidity, the layout could be effected. Luckily I decide to make my chest 8-1/2" deep for aesthetic reasons. Because of this oversight, I recommend making your chest measure 13-7/8"x9-5/8"x6-1/2" inside. These dimensions combined with the material thickness result in a chest measuring 1" larger in both wide and long and a 1/2" inch higher. It is important to remember to add your saw blade's width to your "deep" dimension on the front and sides. This is usually about 1/8".
Lay out and cut the 2'x4'x1/2' plywood into two pieces measuring 14-7/8"x6-5/8" one for the front and one the back, two measuring 10-5/8"x6-5/8" for the sides, one 13-7/8"x9-5/8" for the bottom and one 14-7/8"x10-5/8" for the top.
Next miter all the parts except the bottom panel. The top panel will have all four edges cut to 45°, while the front, back and side panels are mitered 45° on their right, left and top edges.
Set your saw blade back perpendicular to the table and the rail guide 6" from its blade. With their non-mitered edge against the saw's rail guide, run the front, back and sides through the saw. This will create uppers and lowers of said parts. The smaller of the parts resulting will be here after called upper and those remaining, the lowers.
It takes more then a passing skill to install a mortise lock. Most who know how probably aren't reading this right now. I am not going to delve deeper into specifics as each lock design is slightly different. I will mention, this is the time you would be locating it on the inside surface of your lower front panel. A pocket must be created for the body of the hinge to fit into. This is accomplished using either a hammer and chisels or gouges along with very small (jeweler type) files. Once the body is fit, transfer the mounting hole locations and key hole pattern. Try to drill the screw holes slightly shallower then your screw length, say 1/16" less so you don't drill through the front of your chest. Use an appropriately sized drill bit to make the round of the key hole then use files the form the slot portion.
An effective way to assemble the lid is to use the bottom panel as a template. Place it in the center of your work area and locate the upper front, upper back and upper sides around it with their non-mitered edges against your work surface. Each corner joint should fit smoothly and relatively "seamless" to each other, while butting up to the edges of the bottom panel. Clamp the front, back and sides in place. Next gently place the top panel over the upper frame (like a roof) to make sure it fits in place. After you are satisfied with your temporary assembly, you may want to try a trick I like to use when working with plywood. Pre-drill the nail holes slightly smaller then the nails you will be using. This will help keep the plywood from splitting when nails are driven into its edges. Another benefit is you can align the panels to get a nice crisp joint much easier with pre-drilling. This extra step does reduce the holding power of the nails, but we will be using wood glue as well so don't worry about it. Since we have chosen #16 nails to assemble our chest, I suggest a 3/64" or 1/16" drill bit to make the holes. Locate and mark where you wish each nail to go.
Since we will be using our nails as decoration, the wood needs to be sanded prior to assembly. Sand each drilled panel with consecutively higher grit sandpaper until reaching 220 grit. Don't forget to sand what will be the inside if you plan to stain the interior of your chest.
Test fit your pieces one last time before gluing. Push the nails into the holes enough to hold everything together. This is your last chance to adjust any pieces that do not fit just right. Now that you have double checked everything, pop the panels apart and run a bead of glue on only the mitered surfaces. Assemble the parts as you did above, but this time drive the nails all the way in. Do not glue the bottom panel to the lid assembly!
When the lid has dried enough to handle, shake the bottom panel free. Measure and mark the location of at least six diverting pins, three centered both down the front and back edges of said panel. Locate the aligning points on the inside of the lower front and lower back panels and mark them as well. Accuracy is very important during the diverting pin marking and drilling process. If your holes are off, the chest edges may not be flush or worse, the panels may not fit together at all. Drill the holes in the bottom panel about 1/2" deep. Make those in the lower front and lower back panels about 3/8" deep. Take care not to drill through the panel. It is our intent to hide the load diverting pins. Cut the 1/4" diameter x 36" dowel into six 3/4" long pins. Insert these pins into the holes in the bottom panel edges and snap the lower front and lower back panels in place. Everything should be smooth and flush. If your holes don't line up correctly, and you can not fix them, you can omit them, but you will need to add nails along the bottom of the chest to assure a good bond between the bottom and sides. Continue the encircling, marking, nail drilling, sanding and test fitting steps as you preformed while assembling the lid. Apply a bead of glue to the edges of the bottom panel, and only the mitered edges of the lower panels. Clamp them together and drive the nails all the way in to complete.
After the sub-assemblies are dry, lightly hit the corners with 220 grit sand paper to remove any sharp edges. You are now ready to start the main assembly of the chest. Locate the screw holes for both hinges in the lid and mark them. Pick a drill bit slightly smaller then the core diameter of your screws (the shaft the spiral blades are protruding from). The easiest way to do this is to hold the bit against the screw in the front side and look at it. If you can see too much of the core you bit is to small, if you can't see any of it, your screw is to big. You want to see just a sliver of it on both sides of the bit. Again, try to drill the screw holes to not pass through the panels into the storage area. Screw the hinges to your lid, then set the lid atop your chest's body. Transfer the screw locations onto the body and drill them. Attached the lid to the body and your "chest" will begin to look like one.
Decide where you want to place your handles and latch mechanism. After you mark, drill and affix them you are pretty much done fabricating. All that will remain to do is stain your chest. Simply remove the handles, latch and hinges to prepare it for staining.
Should you decide to use corner protectors and or feet, they would be added after the staining process. Keep in mind there is no limit as to when you can go back later and add them if you wish. If you are not sure if you want them, it is better to start off without them. If you have them to start then decide to remove them down the road, you will have a few extra holes in you chest.
![]()
![]()
Copyright Terms, Copyright Wolfram von Taus © 2002, 2003, 2004