Frequently Asked Questions
Q: What is MP3?
Q: Why do I need MP3?
Q: What is MP3 Maker?
Q: How do I create MP3 files from Audio CD's?
Q: How do I create MP3 files from WAV files?
Q: How do I play (listen to) MP3 files?
Q: How good is the CD ripper of MP3 Maker?
Q: How good is the MPEG encoder of MP3 Maker?
Q: What bit-rate should I use to create MP3
files?
Q: What is VBR?
Q: What do the settings for the MP3 Maker
mean?
Q: What does the 'Priority' option mean?
Q: How do I create my own displays (skins)?
Q: What is MP3?
A: MP3 is a format for compressed audio. The compression algorithm is in
accordance with the MPEG 1 Layer 3 standard.
Q: Why do I need MP3?
A: With MP3, you can compress audio data to 1/10th of its original size with
no or minimal loss in sound quality. This means that you can fit 15 audio
CD's into just 1 CD.
Q: What is MP3 Maker?
A: It is a software for extracting audio data from CD's and compressing them
and creating MP3 files. The software is composed of two parts: a "CD ripper"
for extracting data from audio CD's and an MPEG encoder.
Q: How do I create MP3 files from Audio CD's?
A: Here is a step-by-step process for creating MP3's from audio CD's:
-
Run sMP3m.exe
-
Put your audio CD into the CD-drive
-
Select the "CD -> MP3" radio button
-
Select the directory/path where you want the files to be created. Do this
by 'clicking' the button labeled "Output Path".
-
'Click' the start button (labeled 'Start').
-
Wait for everything to complete
Q: How do I create MP3 files from WAV files?
A: Here is a step-by-step process for creating MP3's from WAV files:
-
Run sMP3m.exe
-
Select the "WAV -> MP3" radio button
-
Select the files that you want the files to be encoded to MP3. Do this by
'clicking' the button labeled "Add".
-
'Click' the start button (labeled 'Start').
-
Wait for everything to complete
Q: How do I play (listen to) MP3 files?
A: To play your MP3 files:
-
Run sMP3p.exe
-
'Click' the 'Files' button. This will open the file list manager dialog window.
-
'Click' the 'Add Files' button and select the files that you want to play.
-
Close the file list manager dialog window using the 'OK' button.
Q: How good is MP3 Maker at extracting CD audio data?
A: MP3 Maker employs a smart jitter correction algorithm which catches errors
with inaccurate CD drives. I've compared this with other CD rippers, and
MP3 Maker seems to create the cleanest CD extraction.
Q: How good is the MPEG encoder of MP3 Maker?
A: The MPEG encoding algorithm is straight out of the ISO referrence code,
so the quality of the resulting MP3 files should be good. This one should
be a lot faster though.
Q: What bit-rate should I use to create MP3 files?
A: 128kbps should be good enough for most PC configurations. If you have
a very good (and expensive) sound card and a very hi-fi system, you might
be able to hear the deficiencies of 128 kbps. In this situation, you might
want to use 160kbps or higher, but the MP3 file will be larger. You might
also want to try VBR for MP3 (see What is
VBR?).
Here are sites that compare the quality of MP3 files at different bit
rates:
http://freeflight.cockpit.be/mp3tech/tests/gb/index.html
http://members.xoom.com/_XOOM/MH01/mp3_war2.htm
Q: What is VBR?
A: VBR stands for "Variable Bit Rate encoding. In this mode, the bit rate
varies on the complexity of each segment of an audio track. My experience
with VBR is that I get a result with the quality of 160kbps but with the
file size of 128kbps. However, encoding is slower. Also see
What bit-rate should I use to create MP3
files?
A good site that explains VBR is:
http://www.xingtech.com/mp3/faq/vbr.html
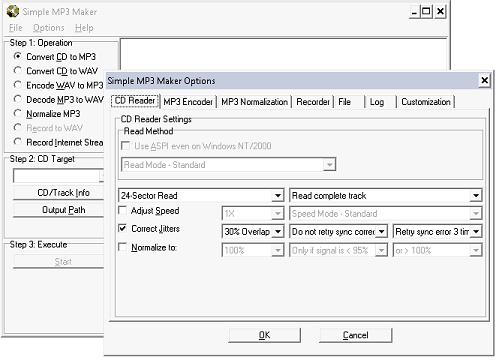
Q: What do the settings for the MP3 Maker mean?
A: The settings for the MP3 Maker are:
-
Sector Read
-
This is the number of CD sectors that will be read as a block. Larger numbers
(larger blocks) results in faster CD reads. However, some CD-ROM drives only
support a smaller number of sectors for each block read. Set this to the
maximum that is supported by your CD-ROM drive.
-
Correct Jitters
-
This options instructs the CD-ripper to employ a mechanism for detecting
and correcting CD-ROM jitter errors. Jitter errors occur with older CD-ROM
drive where the data that is reported by the CD-ROM is not accurate. This
normally results in "noise" ('ticks' and 'pops') in the resulting output
sound file. The CD-ripper will perform overlapping (and redundant) reads
to ensure that accurate data is read from the CD-ROM. This option will slow
down the CD-ripping process but will ensure accurate data. This option is
not necessary in almost all newer CD-ROM drives (which do their own
jitter-correction).
-
Percent Overlap
-
This is the percentage of overlaping CD sector reads that will be used when
doing jitter-correction (see Correct Jitters option). If jitter errors are
present in the output sound file, increase the value for this option.
-
Sync Correction Retry
-
This option specifies the number of CD read re-tries that will be done whenever
a jitter correction is detected (see Correct Jitters option).
-
Sync Error Retry
-
This option specifies the number of CD read re-tries that will be done whenever
a jitter error is detected (see Correct Jitters option).
-
Normalize
-
This option instructs the CD-ripper to normalize (adjust) the signal (volume)
of the output sound to some 'percentage' of the maximum signal (see Normalize
Percentage).
-
Normalize Percentage
-
This option specifies the percentage of audio signal that the output sound
will be adjusted to (see Normalize).
-
Channels
-
This option specifies the encoding of the channels for the output sound file.
"Stereo" results in encoding of separate left and right channels. "Mono"
means that the left and right channels will be combined to produce a single
channel. "Joint-Stereo" means that the left and right channels may be combined
in segments where there is little difference between the two.
-
MPEG Mode
-
This option specifies the MPEG Mode that will be used to encode the audio
data. MPEG1 is valid for input audio that is sampled at 48khz, 44khz or 32khz.
MPEG2 is valid for input audio data that is sampled at 16khz, 22khz or 24khz.
If the input audio data is sampled at 48khz, 44khz or 32khz and MPEG2 is
selected, then the input will be automatically resampled and reduced to half
its sampling rate.
-
Bit Rates
-
This option specifies the number of bits that will be allocated for each
segment of output audio. 192 kbps mean that 192,000 bits will be used to
encode 1 second of audio. Higher bit rates result in better audio quality
but also result in larger output files. Lower bit rates result in lesser
audio quality but smaller output files. 128 kbps should be good enough for
most PC configurations. If you have a very good (and expensive) sound card
and a very hi-fi system, you might be able to hear the deficiencies of 128
kbps. In this situation, you might want to use 160 kbps or higher, but the
MP3 file will be larger. This option may also be used to specify "variable
bit rate" (VBR) encoding. In this mode, the bit rate varies on the complexity
of each segment of an audio track. For complex portions of the audio track,
more bits will be used, and for less complex portions of the audio, less
bits will be used. With VBR, the user specifies the desired quality of the
resulting output audio. Higher-quality VBR results in better audio quality
but also results in larger output files. Lower-quality VBR results in lesser
audio quality but smaller output files. Using VBR normally takes more encoding
time.
-
Fast Mode
-
This option affects the speed of encoding. Thus, at 128kbps, if the "fast
mode" is used, the resulting file size will still be the same but the encoding
time will be faster. The 'fast mode' normally more than doubles the encoding
speed.
Q: What does the 'Priority' option mean?
A: The 'priority' option has to do with how much CPU time will be allocated
by Windows to the application. Higher priorities will make the MP3 encoding
faster, but will make all other Windows application slower (because Windows
will give more CPU time to the MP3 program, other programs will be left with
fewer CPU time). This setting will not affect the quality of the output audio.
Q: How do I create my own displays (skins)?
A: Here is a step-by-step process for creating your own displays (skins):
-
Create an image named main.bmp. This should be the player display. This file is composed of four equally sized bitmaps. The first one is the main image. The second one is the "mask" which defines which portions of the main image will be displayed (to create a floating window). Black pixels will be displayed and white pixels will not. The third one defines the image for buttons when selected. The fourth one defines the image for buttons when not in focus.
-
Create an image named eq.bmp. This should be the equalizer display. This file is composed of three equally sized bitmaps. The first one is the main image. The second one is the "mask" which defines which portions of the main image will be displayed (to create a floating window). Black pixels will be displayed and white pixels will not. The third one defines the image for buttons when selected and the image of the slider buttons.
-
Create a file named display.ini to specify the portions of the display that act as buttons and text displays.
The buttons have the format:
btn_??? = x y w h
where x and y are the left and top co-ordinates in the bitmap for the button, and w and h are the width and height
example:
btn_stop 4 10 15 12
- the stop button is some rectangle at 4, 10 with width 15 and height 12
The text display has the format:
disp_??? x y w h font_size font_color font_name
where you have the usual co-ordinates and width and height followed by the size of the font for display, the color of the font (in hex) and the name of the font.
example:
disp_file 10 30 90 15 12 00ffffff Arial
- the name of the file being played will have the font size 12, white color and Arial type
Note that the color is in the RGB format, so, pure red is 00ff0000, pure green is 0000ff00 and pure blue is 000000ff.
The equalizer tracks has the format:
eq_interval = n
where n is the interval between equalizer tracks
eq_track = x y w h
defines the coordinates and size of the track image
eq_slider = x y w h
defines the coordinates and size of the slider button
|
 |