Reading and Writing Thai in English Versions of Windows 95, 98 and Win Me
 Return to Home
Introduction
Hi,
Welcome to this web page.
These notes are intended as a guide to enable you to read and write Thai in
English versions of Windows 95, 98 (including Win 98 SE) and Win
Me. The method should also be capable of extension to any other non-Thai version of Windows, such as Japanese or German Windows etc.
This discussion is centred on Internet Explorer since this is
the browser I use and am familiar with.
I suggest that you read
through these notes to familiarize yourself with them before you
begin the process. Its really not too difficult. Just carefully
follow the steps outlined below and you should get it to work
without undue difficulty.
The method employed is based on that of Khun Phaisarn Techajaruwong: http://www.fedu.uec.ac.jp/ZzzThai/win95/kbd.html. Unfortunately this site no longer
appears to be available.
Thanks are also due to db_sed_aloha for first alerting me to this method, and his detailed notes on how to use Windows registry editor.
1) Reading Thai
Open up Internet Explorer and from the Menu bar:
- View->Encoding->Thai (Windows)
If your browser already has Thai language support installed, the web page will immediately display any Thai text correctly. If your browser lacks Thai language support, you will automatically be directed to the Windows Update site to download a small file. Once this file is downloaded just set your encoding to Thai Windows (as above) and you should be able to read Thai.
2) Writing Thai
Step 1 above will allow you to read Thai, but not type it in Windows.
To type Thai, you'll now need to follow the steps below.
Begin by downloading some Thai fonts and install them to your C:\Windows\fonts folder.
Now you have done this, I should point out that some versions of Win 98 and Win Me appear to come with Thai language support already built in. If you have one of these versions, things are a little easier for you and you will not have to perform steps 3 and 4 below. To see if you have one of these versions, after you have added the Thai fonts as directed above, just go straight to step 5 below, missing out steps 3 and 4. Try to add the Thai keyboard as outlined there. If 'Thai' is available in the drop down menu, then you can add it straight away and you're set to type Thai.
If, like me, you find that your version of Windows 95/98/Me doesn't have Thai language support built in, then you'll need to perform steps 3, 4 and 5 below.
3) Installing Thai keyboard file kbdth0.kbd
- Click here to download the file entitled Kbdth0.zip. It's a small 453 byte file and only takes a few seconds to download. Unzip it and place it in your C:\Windows\System folder.
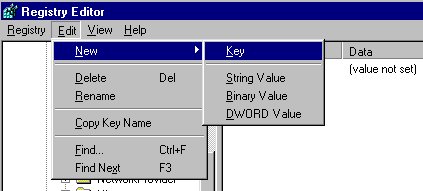
4) Editing the registry
a) Start->Run
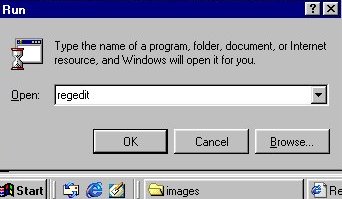
(Note: as a precaution when using regedit, ensure all other programs are closed down. Although it should be alright to have one browser window open to be able to read this webpage!).
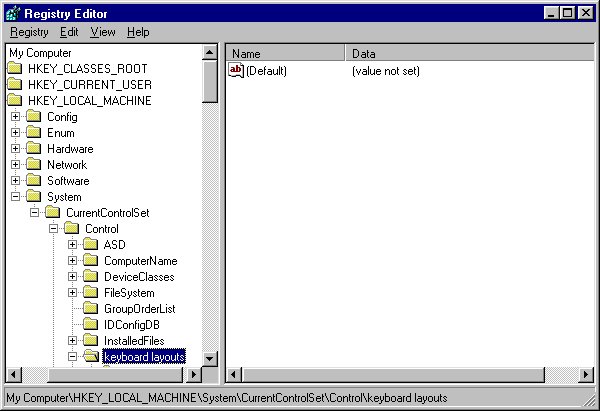
You'll see that regedit looks very similar to Windows Explorer with the screen divided into a left and right-hand pane and a branched tree structure arrangement of files.
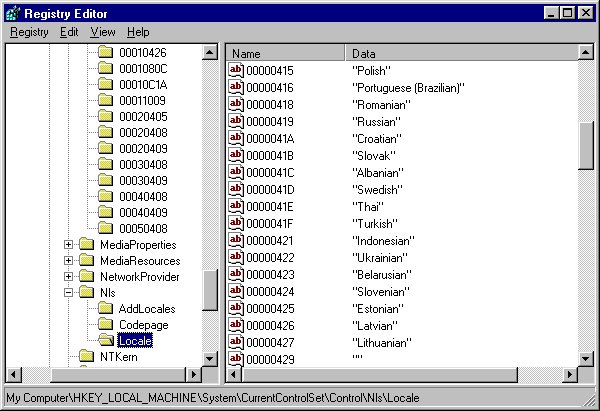
c) In the left-hand pane of the registry editor, navigate to the key HK_LOCAL_MACHINE\System\CurrentControlSet\Control\keyboard layouts by clicking on the plus signs to expand the branches of the file system.
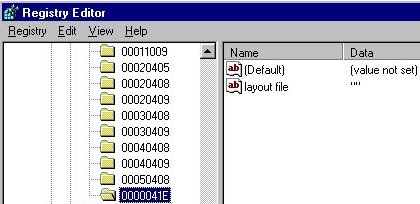
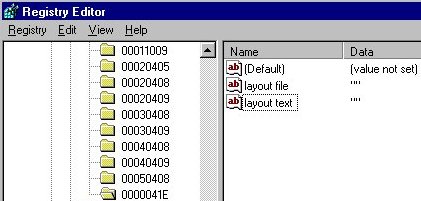
g) At this point in the procedure, in the right-hand pane of the editor, under Name, there will be 3 entries: (Default), layout file and layout text. Under Data there will be just '(value not set)' and some quote marks.
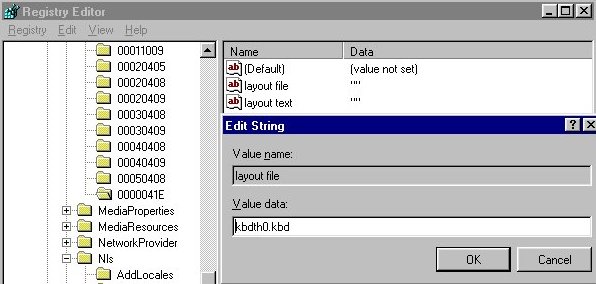
If you have followed steps a. through i. correctly, the appearance of the registry editor should be as follows:
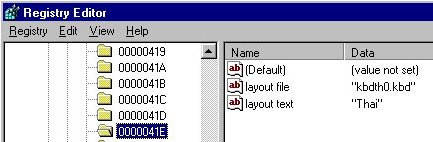
The registry editor should now look as follows:
5) Adding Thai keyboard in Control Panel
Start->Settings->Control Panel->Keyboard->Language Tab and then Add->Thai. Click OK twice.
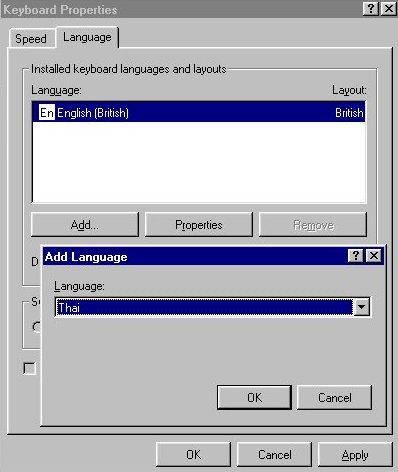
A keyboard indicator will appear on the task bar enabling you to toggle between Thai and English:

That should be it. You will now be able to Type Thai.
Should you require it, see http://www.dcothai.com/software/layout.htm for a picture of the Thai Kedmanee keyboard layout. I have also uploaded a copy of the picture here.
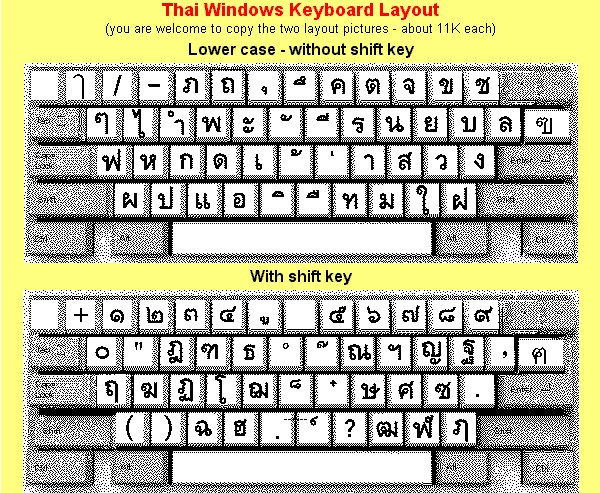
Good luck and enjoy!
Update Aug 2002
Since this page was written, db_sed_aloha has compiled a small program to automate the registry editing process (section 4 on this page).
All you have to do is double-click on the program and it will automatically edit the registry, saving you the bother of editing the registry yourself.
I have used this program successfully for Win Me.
Click here for more details.
Update Dec 2002
Typing Thai in Win 2000:
Win 2000 is very different from Win 9x and hence the above method of editing the registry will most likely not work.
I have not used Windows 2000 before, but have seen the following advice given for adding Thai language support.
"Windows 2000 has inherent support for Thai fonts. There is no need to use some third party program or edit the registry to type Thai, as there is for Win 9x. In Control Panel, go to Regional Options, select the General Tab and in the Language Settings check the Thai checkbox. Then, again in Control Panel, choose Thai Keyboard as an Input Locale from Keyboards in the Control Panel. After you've made these changes, there'll be a little blue box on the task bar with 'EN' or 'TH' displayed, and you can click on it and change whether you want to type in English or Thai."
Update May 2003
I have seen the following advice given for adding Thai language support to Win XP:
1) Go to "Start >> Control Panel".
2) Select "Regional and Languages Options" >> Double-click to open it.
3) Select "Languages" tab and click "Install files for complex..." >> Click "Apply" then "OK".
4) A box will pop up, "Install Supplemental Language Support", click "OK".
5) You need to restart your system after installation, click "Yes".
6) After restarting the system, go back to the "Language" tab in "Regional and Language Options" and click on "Details".
7) Click "Add" to add "Thai Keyboard" into your system.
8) Select "Thai".
9) Select type of Thai keyboard -- Thai Kedmanee or Thai Pattachote and then click "OK".
10) You should be able to see that now Thai keyboard is being added to your system, click on "Language Bar".
11) Make sure that "Show the Language bar on the desktop" and "Show text labels on the Language bar" are checked. The rest are optional.
12) Click "Key Settings" to set the key options when you want to switch languages.
13) The default value is "Left Alt+Shift". If you want to change this option, click on "Change Key Sequence...". Otherwise, click "OK".
14) You should be able to see the "Language Bar" on your desktop, as well as "English" and "Thai" languages.
15) Test "Thai language" by opening any text editor program. Change fonts to "Thai fonts". Normally they are "Angsana New" (as seen from this image), "Browalia New", "Cordia New", etc.
16) This "Thai keyboard" can be used to type "Thai" on the Internet such as e-mail (Outlook, GroupWise, free-based email, chat room, discussion board, etc.)
(The above method for Win XP is taken from here).
Disclaimer
The help provided here for Win 9x is given on an as is basis and no responsibility is accepted for any problems that may subsequently occur. I have used this method with English versions of Win 95, Win 98 SE and Win Me and its worked fine for me.
Please send any comments and corrections here.
Page last updated Oct 2006
Copyright Boo Boo (c)