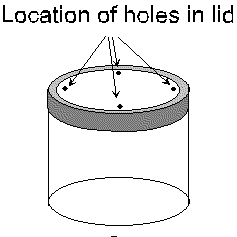
| Mushrooms are grown on a substrate of nutrients. Just as a common house plant is grown in a pot of soil, mushrooms can be grown on a cake of substrate material. The big difference is that the substrate must be free of competing bacteria and molds in order for the process to be successful. Any contamination of the substrate will result in failure of the process. Materials needed: 1/2 pint canning jars Adaptation-1 Vermiculite (from any garden department. K-Mart, Target, etc.) Where to find Brown Rice flour Adaptation-22 (from a health food store --- No Preservatives!) Where to find Large pot with lid Adaptation-2 Measuring cups Mixing bowl Hammer and small nail Spore Syringe (Where to get a spore syringe) The canning jars need to be tapered. This means that the opening of the jar is wider than the body of the jar. This is important because the fully colonized rice cake needs to be removed intact from the jar. You simply want the cake to slide out when the time is right. If you use a jar that is not in the following list, check to make sure the box says it is a tapered jar. The following jars are acceptable: Ball 1/2 pint jelly jars. Kerr wide mouth 1/2 pint canning jars. Ball regular mouth 1/2 pint canning jars. Step 1: Prepare the tops of the culture jars so that they can be in place, on the jars when inoculating the jars with the spore syringe. Part of the reason this system works so well in the non-sterile kitchen environment is the fact that the sterilized substrate is never exposed to air born contaminates. Get a small nail and use the hammer to poke 4 holes in the lid of each canning jar. See the following figure: Example Step 2: Decide in how many jars you are going to initiate cultures. The average terrarium that is built will hold 6 rice cakes but you may have some jars destroyed by contamination and some jars colonize quicker than others. It is unlikely that every jar you prepare will be ready to be placed in the terrarium at the same time. The rice flour and vermiculite are cheap enough that it makes sense to do a dozen jars. For each 1/2 pint jar mix 2/3 cup vermiculite and 1/4 cup brown rice flour in a mixing bowl. Adaptation-23 When these ingredients are well mixed, add 1/4 cup of water for each 1/2 pint jar you plan to prepare. If you are using 1 pint jars you need to double the recipe. Mix all of this stuff up well. This mixture is the substrate material that the fungus will consume and use for growth. Step 3: The next step is to fill each jar with substrate material. Adaptation-20 This document used to suggest gently packing the substrate into the culture jars. It has been found that keeping the substrate as loose and full of air as possible is the best way to fill the jars. The jars will colonize faster this way. Incidentally, the faster the jar colonizes, the lower the risk that some competitor contamination will get a foot hold and take over the substrate. Adaptation-3 Fill each jar to within 1/2 inch of the top with substrate material. If you run out of substrate material, either mix up enough for one more 1/2 pint jar or cannibalize a jar to fill up the rest of the jars. This is important because you need to make sure the substrate is high enough in the jars for the spore syringe to inject spores into it. Step 4: The top 1/2 inch of the glass on each culture jar needs to be cleaned. No substrate material can be left on the glass above the compressed cake. First wipe it with your finger to get the bulk of the material off of it and then do a thorough job with a moistened paper towel. The glass needs to be spotless. The reason this is necessary is that bacteria and mold can use any material left there as a wick to infect the main substrate body. Step 5: Next, fill the top 1/2 inch of the each culture jar with vermiculite. This layer is pure, simple, dry vermiculite. Nothing else. Fill the jar level with the glass edge. This layer is a break through pioneered by Psylocybe Fanaticus. What this layer does is insulate the sterilized substrate from any air borne contamination. This layer gets sterilized with the substrate later and air borne molds and bacteria can not (usually) get through it to contaminate the substrate. At the same time, it allows some gas exchange to occur. The fungus needs oxygen and gasses can filter through the vermiculite. Step 6: Now, place the jar lids in place. Normally, the jar lids have a rubber seal that is placed in contact with the glass of the jar. Traditionally the rubber seal is not placed in contact with the glass. It was placed on the upper side of the lid. The reason was that people thought it would make too tight of a seal. This does not seem to be an issue. If you wish to follow tradition, place the rubber on the upper side of the lid. Screw the lid down tight. Note that you need to have the four holes poked in the lid in Step 1. Otherwise you can have real problems when you heat these jars up! Steps 7-11 |
| Preparation and Colonization of the Substrate. |
 |