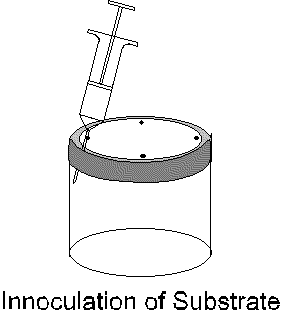
| Step 7: Next, place a piece of tin foil over the top of each jar and crumple it around the sides of the jar. This is to keep water drops from going in the four holes in the lid while the jar is being sterilized. If you poked your holes in the lid such that the sharp edges are pointing up, be careful not to rip or puncture the tin foil. If you need to, you can add a second or even a third piece of tin foil to make sure water will not drip into the holes in the lid. Step 8: Now the culture jars need to be sterilized. Place the jars in a large kitchen pot and add water so that water comes half way up the side of the jars. Bring the water to a slow boil and place the lid on the pot. From the time the water starts to boil, the jars need 1 hour to be sterilized. Water should not be bubbling and splashing all over the place. The jars should not be floating around in the water. The substrate in the culture jars has the right amount of water in it already. You do not want water leaking into the jars and changing the ratio. The jars should not sit flat on the bottom of the pan. Too much heat can transfer directly to the jars and cause a loss of moisture. You can place a wash cloth inside the pan and set the jars directly on the wash cloth to help prevent too much heat from transferring to the jars. Step 9: Let the jars cool slowly. Leave them covered in the pan that was used to sterilize them. Let them cool completely. The jars need to be at or close to room temperature in order to inoculate. The spores will be killed if the jars are not cool enough when they are inoculated. It will take several hours to cool sufficiently. You may hear sounds as the jars cool. This is normal. Step 10: Now comes the good part. Inoculation of the culture jars. Assuming you have a viable, sterile spore syringe, you are now in a position to inoculate the cultures and start the first phase of the growing cycle. The needle of the spore syringe must be sterile. If your fingers or anything other than the lid or contents of the culture jars comes in contact with it, assume it is no longer sterile. If there is any doubt about its condition, use a cigarette lighter to heat the entire needle. Heat it until it glows red. Let it cool for a few minutes and squirt some of the solution out of the syringe. Shake the syringe. Make sure the spores are mixed well within the syringe. This can be accomplished more easily if you pull the plunger back on the syringe to get a little air into the syringe. Remove the tin foil from each culture jar as you prepare to inoculate it. Insert the needle of the syringe as far as it will go into a hole in the lid of the culture jar and get the needle to press against the glass. Examine the next figure for a simple diagram of how things should look. Inject 1/4 cc of solution at a site under each hole in the lid. Adaptation-4 A total of 1 cc of solution for each jar. A 10 cc spore syringe is sufficient to inoculate a dozen jars if you inject slightly less than 1 cc in each jar. Example Step 11: This is the easy part. Put the culture jars in a dark place and wait. The fungus will first appear as little splotches of white fuzzy stuff at the inoculation sites. Adaptation-6 Example of Germatation: [ 5 Days ]-[ 10 Days ]-[ 20 Days ] As the time goes by, the fungus will spread throughout the jar. Eventually, the entire surface of the glass will be covered with fungus. Typically, the bottom of the jar is the last area to be colonized. Be on the look out for any contamination. Any odd colors that might appear are contamination and the jar must be thrown out. Do not take any chances. If you think the jar might be contaminated, throw it out!. Some molds and bacteria produce toxins that can kill you. Just because a mushroom is growing on the opposite side of the cake from the contamination does not mean you are safe. The mycelium network carries nutrients and moisture to the mushrooms from far away and can easily pick up the toxins and bring them to the mushroom. The fact that you are using this guide means you are not an experienced mycologist. You do not know which molds and bacteria are deadly. Do not take a chance. The one exception to the previous statements is the mycelium will some times change from a bright white to a very pale yellow if it has water droplets touching it on the side of the glass. It is very unusual for any area that is colonized by the mushroom fungus to become infected while in the jar. The uncolonized areas of the substrate are usually significantly more prone to infection. The above pictures show a typical germination and colonization cycle. If your spores are old, or the temperature is not optimum, or you did not mix the substrate very accurately you can easily add a week to the above time frames. The cake must stay in the jar until the entire surface area is covered with mycelium. As the substrate gets more colonized, the growth slows down. This is a result of CO2 building up and less oxygen being available for the fungus to consume. Adaptation-7 The cakes can not be taken out of the jars while there is still uncolonized substrate. Adaptation-8 Steps 12-13 |
| Preparation and Colonization of the Substrate. |
 |

![[ 5 Days ]](germ5.gif)
![[ 10 Days ]](germ10.gif)
![[ 20 Days ]](germ20.gif)