


Other
Current projects
Painting
Modelling
Scenery
Other Miniatures
My collection
About me
Guestbook and E-mail
You can find materials everywhere, from toothpicks, treebark, pebbles and sand from the garden to static grass, modelling putty et cetera from Games Workshop for example.
Green Stuff is called so because when you mix it, it's green (if you mixed it well). You can do wondrous things with Green Stuff, from filling up gaps and adding little features to your characters, to creating entire miniatures (though I would suggest a cheaper kind of putty for that). There's an article about working with Green Stuff here. Remember to always use enough water, so you won't get fingerprints on your models.
Water is fairly easy to do. You can use either PVA glue for water effects, or Games Workshop's Water Effect.
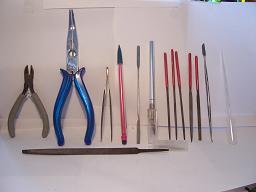
You will need a lot of tools: files, pliers, clippers, a modelling knife, a sculpting tool...
All these can be bought from Games Workshop. Though they may seem a bit expensive, you have to know that they're one-time investments if you treat them well. Here's an article about caring for your modelling tools.
Well, anything may be a bit of an overstatement, but there are lots of things that you can still use later on, even if you don't see a purpose for it right now. For example: If you cut up the sprues, you can make excellent bricks, not for building, but for adding to a pile of rubble on a ruin or base of a miniature.
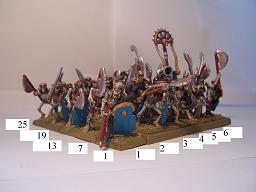
The units will have to rank up, as it is called. Fit together. It's great to have all these extravagant and cool looking poses, but that won't do you any good if your models won't fit in a unit so you can play with them. I usually make one rank at a time, and one model per rank, starting with the middle one (the standard bearer if the unit has one). Then, because I don't know the poses of all 20+ miniatures in my units by heart, I put a number under their base, counting from left to right (facing the unit), rank after rank. Sometimes, I also put a dash on the inside at the side which is facing forward. See the pic for more details.
I use laundry pins for holding small parts to entire miniatures, to let them dry and to give you a better handhold for painting. For drying, you don't have to clamp them per se.
Even though Games Workshop has an excellent range of miniatures, it's alwyas nice to give your own personal touches to your minis. This can be done by painting emblems on them or so, or by cutting them up and putting them back together in different poses, or even creating a whole new miniature from scratch. Start out with simple conversions, weapon swaps and so, to get the hang of it. Then you can do more interesting projects. The sky's the limit...
So, now you've got all these miniatues, but they still need to be stuck together. For plastic miniatures, I use plastic glue. It 'melts' two parts of the model together. For metal parts, I use super glue, sometimes mixed with Green Stuff (see above). Finally, for terrain projects and finishing bases, I use PVA glue.