 |
|
|
|
|
|
|
|
|
|
|
|
|
|
|
|
|
|
|
|
|
|
|
|
|
|
|
|
|
|
|
|
|
|
|
|
|
|
|
|
|
|
|
|
|
|
|
|
|
|
|
|
|
|
|
|
The Construction |
|
|
|
 |
|
|
|
Sandy's dollhouse was started in May, 1999. We needed a hobby that we could both have fun with and this became the perfect one. Sandy concentrates on furnishings and decorating while I do all of the construction. Sandy spends a lot of time looking for that perfect chair or table, or the perfect pie to go on her bakers rack in the kitchen.
Even if it is small, it's almost like building a real house. The following photos show the consturction phase. The mansion has a kitchen, parlor, dining room, music room, bathroom, master bedroom, a childs bedroom, a nursery, and a sewing room. It is fully electrified with working lamps and fixtures in every room. The kitchen floor is aged brick, the bathroom floor is tile, and all the other rooms are walnut hardwood. |
|
|
|
 |
|
|
|
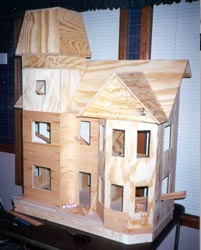
This is the shell as it appeared in May, 1999. The basic construction is all 3/8" plywood with dado joints where the floors and walls connect. After the shell was completed, I mounted it on a separate base with a turntable so it would be easy to work on and also to view the inside when it was complete. The next step was to apply siding. |
|
|
|
|
|
 |
|
|
|
|
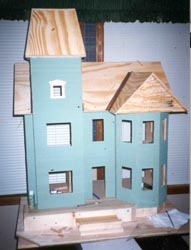
The siding has been applied and painted. There are over 800 separate pieces of 3/4" wide x 1/16" thick siding, all applied one at a time. Sandy chose a nice sage green for the main body color. The trim will be an off-white while the windows will be burgandy with a light mauve accent. The burgundy and mauve will be carried thru some of the prch trim and gable end fascias. |
|
|
|
|
|
|
 |
|
|
|
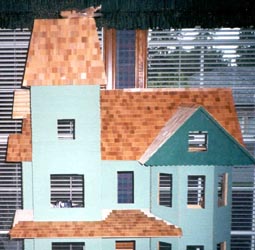
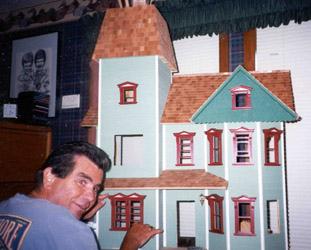
Roofing the dollhouse was a treat! Most of the shakes are applied as they came out of the package, but there were still quite a few that needed to be cut to fit the valleys and the mansard roof. In all, there are over 2000 shakes, all applied one at a time. The fish scale shingles on the gable end are painted a contrasting green to go with the sage color of the siding. |
|
|
|
|
|
 |
|
|
|
|
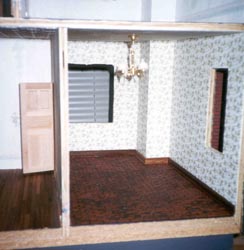
Once we got this far, we decided to go ahead and finish the inside so Sandy could start furnishing the rooms. We used the Cir-Kit wiring kit for the electrical system, but even though we bought the largest kit, we still needed more tape wire. These kits make electrifying the interior a snap, but you still have to plan out where you want chandeliers and wall sconces. Table lamps can be plugged in anywhere in the rooms since the tape wire goes around the entire perimeter. |
|
|
|
|
|
|
 |
|
|
|
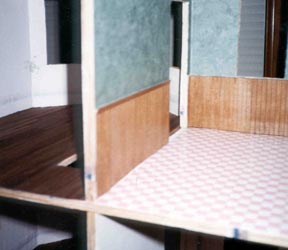
Flooring was applied after the electrical. The kitchen floor is a precast aged brick with a rubberized backing, no need for grout. Very realistic looking and very easy to apply. I did make a paper pattern first, just to be sure there were no mistakes in cutting. The bathroom tile floor is also one piece. |
|
|
|
|
|
 |
|
|
|
|
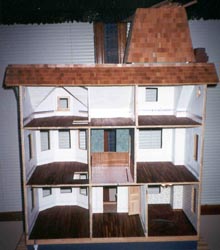
The hardwood flooring was a different story. We decided to use pre-packaged walnut strips rather than sheet flooring. Both Sandy and I felt that it looked more realistic. These strips are applied one by one using glue, sanded after they dry, and then oiled. I used Watcos Natural Oil Finish to bring out the color and grain of the wood. We think it looks great, even if we do say so ourselves! |
|
|
|
|
|
|
 |
|
|
|
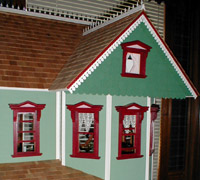
This shows some of the window detail. It's hard to see in the photo, but the triangular insert at the top of the window is a light mauve, while the main window trim is burgundy. About half of the single windows actually open. |
|
|
|
|
|
 |
|
|
|
|
More window detail. There are four double windows, all of which are operating windows with sashes that open. There are 10 single windows, 2 attic windows, and 2 octagon windows in the gable ends. |
|
|
|
|
|
|
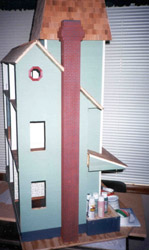
This shows the chimney after it was attached to the house. I used "Magic Masonry" by Magic Systems for the brick. The kit has an adhesive grid that you apply to a prepainted surface, in this case a piece of 2" x 3" wood. The painted surface actually becomes the grout lines between the brick. I chose a dark gray. After the grid is applied, the red powder is mixed with water and applied over the grid. Peel off the grid, let dry, sand off to the desired texture, and you're done. Looks and feels exactly like real brick! |
|
 |
|
|
 |
|
|
|
|
|
|
|
|
|
|
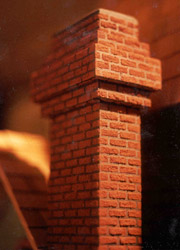
This is a close-up of the chimney. You can see the texture of the brick. This stuff works great!. I used the reaminder of the package on the foundation walls and front steps. You can see that in detail in photos futher on. |
|
|
 |
|
|
|
|
|
|
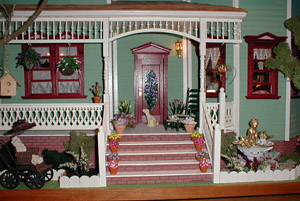
Here is some of the front porch detail. The ceiling is bead-board and the porch floor is individual 1/16" thick x 1/4" wide basswood strips, all painted the same color as the trim. |
|
|
|
|
|
The stair treads have the same wood as the porch floor. Sandy added the potted lilies and Impatiens on the front steps for a touch of color. Almost all of the potted palnts came from Vickey's Miniatures, including the spider plant in the picture below. To the right of the front porch is a beautiful Victorian fountain. |
|
|
|
 |
|
|
|
This photo shows more of the porch rail detail and the foundation wall. I used the same "Magic masonry" by Magic Systems for the brick work. The railing is a laser cut product that has been spraypainted the same color as the house trim. In this picture you can see the individual porch flooring boards a little more clearly. The downspout for the rain gutters is 1/8" brass tube that I got at a local model train store, then spraypainted to match the trim. The hanging fuschis baskets came from the Seattle Dollhouse Show. I made the trees from twigs from our yard and lichen that I got from a model train store. The dark green shrubs are made from a material called "ground foam", also available at the model train stores. |
|
|
|
|
|
That pretty much wraps up the construction phase. Now we hope you will enjoy the rest of the tour thru all the individual rooms of this beautiful Victorian mansion. |
|
|
|
Back to Main Dollhouse Page |
|