| The Suitcase Organizer: Making "THE GRID" |
| THE 7 DAY SUITCASE Copyright@2003 Sancre, Inc. |
| This is just a quick explanation of how to make the suitcase organizer, �THE GRID�. If you are interested in the why�s and wherefore�s, read that section of the article titled �HOW TO MAKE �THE GRID�. Supplies needed: two large sheets of heavy corrugated cardboard or one large box made of heavy cardboard (like a large moving box) A widget or box cutting knife Heavy masking tape Step 1. Measure and write down the following measurements of the inside of your suitcase. The example shown is for a 26 inch pullman with the dimensions 26 x 18 x 9. You will need the following calculations and measurements:: 1. Length=26 inches 2. Length adjusted length x. 3/4 or 26 x .75=20 inches 3. Width = 18 inches 4. Width adjustment: Width - 4 inches 18in �4 in = 14 inches 5. Depth = 9 inches 6. Depth adjustment= 9 inches depth 1 = depth -3 in= 6 inches, depth 2 = depth -2 in= 7 inches Step 2. Beginning measuring and cutting out the following retangular shaped flat pieces from your cardboard: 1. one �A� piece 26�x 6� (the vertical center of the grid (length x depth 1) 2. two �B� 2 pieces 20� x 6� (the vertical side pieces---(adjusted length x depth 1) 3. eight-ten �C� pieces 14� x 7 (the upper horizontal pieces adjusted (width x depth 2) 4. three �D� pieces 18�x 7 (the lower horizontal pieces (width x depth 2) 5. one �E� piece 25 � � x 17 � � (the cover for the grid which is optional) Label each piece with it�s item or piece letter for easier identification later. Step 3. Notch "C" and "D" cutouts. All �C� and �D� pieces or cutouts will need to be notched/slits cut in order for these pieces to fit over the A and B cutouts. See Diagram below for cutting notches in "C" pieces. For "D" pieces, cut the center notch only: |
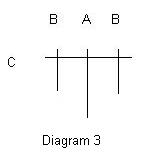
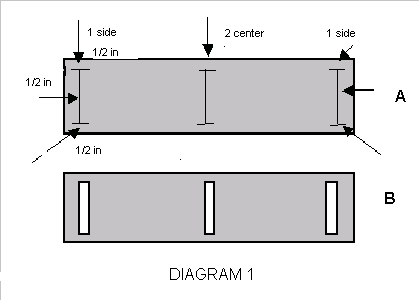
| Begin by placing a "C" piece on a table or flat surface. The 14 inch length of the piece should be horinzontal to you. Make a mark at the top of the piece 1/2 inches from left hand side and 1/2 inches from the top. (see diagram 1 above exhibit A.) Do the same from the the bottom. Draw a straight line between the two marks. Do the same on the right side. Then measure 7 inches from one side to the center and make a mark. Make a mark 1/2 in from top and 1 /2 in from the bottom. Draw a straight line between those line to form a line in the center. Take your box cutting tool and make 3 vertical slit one on each side and one in the center. Once the slits are cut, make a larger notch by cutting out some of the cardboard around the slit. (See diagram 1 exhibit B). Do all "C" PIECES the same way. On all "D" Pieces, only make a center notch. Step 4: Beginning forming the grid. Place a "C" piece or cutout on a flat surface or table. Hold upright with the longer length of 14 inches horizontal. Then take a "B" piece and slide into the notch on one of the sides, do the same with the other "B" piece for the notch on the other side. The B pieces should be perpendicular to the C pieces. Then take the one "A" piece and slide into the notch in the center of the "C" piece. You should have something that looks like the following in Diagram 3. This is an overhead view showing the pieces crossing each other. Push the "C" piece as far as it will go along the other pieces, leaving about 1/2 in sticking out. |
 |
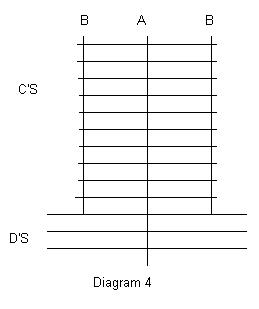 |
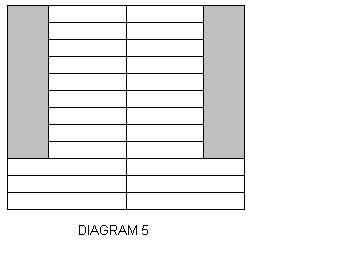
| At this point the easiest way to complete the grid is to turn it around and slid the rest of your C pieces on over each of the B,A, & B pieces. (You may have to remove some of these later depending on how thick your clothes are). Once you have the C pieces in place, space them out about 2-3 inches. The last "C" piece should be about 2-3 inches from the bottom of the shorter "B" pieces. Finally, place the "D" pieces over the center "A" piece at the bottom. Move that 1st "D" piece snuggly to the bottom of the "B" pieces. Fit the last two on the center piece, moving them about 2-3 inches apart, with the final "D" piece about 1/2 from the bottom of the center "A" cutout. Your final grid should look something like Diagram 4 above on an overhead view. Step 5. Carefully place the grid inside the bottom of your suitcase. The "C" pieces should be on the end that the handle of your suitcase in on. Adjust the horizontal pieces to fit. The final overhead view, looking down into your suitcase should look something like Diagram 5. Note the gray areas are empty spaces formed by the shorter "C" pieces, and the "D" pieces are at the bottom. If you have measured correctly, this will fit snug into your suitcase. You have completed the steps of making and fitting your suitcase organizer. |
 |
 |