 |
 |
| BSRT G3 Tips |
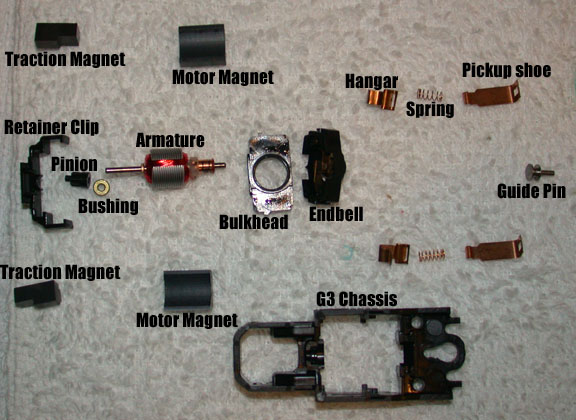
| These are copied from internet chat postings... G3 Mod Set Up Tips This is the Modified Class set up for the Western States winning car. The race was on a Buck Scorpion. 2002 Western States Winning Polymer Car Car Owner: Gary Beedle Body - BSRT Nissan NPT90 painted by Dan Cooney Chassis - BSRT G3 Medium - long wheelbase (BSRT #966) Armature - BSRT 37G Spinner Spud (BSRT #167) Motor Magnets - BSRT G3 Polymer (BSRT #984) Traction Magnets - BSRT G3 Polymer Wide (BSRT #986) Pinion Gear - Tomy 7T Delrin (BSRT #831P) Crown Gear - BSRT 22T Delrin (BSRT #422) Gear Spacer - BSRT Delrin Gear Spacer (BSRT #HT302) Rear Tires - BSRT G3 AST .360 (hubs) Narrow Tires - .454 diameter (BSRT #HT330N) Front Tires - BSRT Delrin Rims/Neo Front Rubber - .335 diameter Rear Axle - BSRT Splined Rear Axle (BSRT #HT220) Pickup Shoes - BSRT Qualifier Pickup Shoes (BSRT #246) Pickup Springs - BSRT Pickup Springs (BSRT #222) Guide Pin - BSRT Pro Guide Pin (BSRT #HT167) Endbell - Standard Tomy Endbell (Tomy #8820) Pickup Holders - Standard Tomy Pickup Holders (Tomy #8804) I have made some additions to this set up. The use of "Helper Springs" in the endbell where legal helps quite a bit. Also the use of BigFoot motor springs inside the pickup shoe springs give incredible speed. If it is too much, try the long Tyco motor springs. Also, one could try something in the 34,34.5 range Gear to suit your driving style and ZOOM, ZOOM! Slottech bushings or Quicker can be an option. The car was "off" the rails. Also, plated parts may be a good bet if the car sits idle for a while. Do NOT worry about the Endbell "helper springs" as I have found these to be more problimatic than helpful IMO. I have found that the stock endbell is sufficient for making enough power to be competitive without the added tension. More often than not the car will have too much power causing the car to be a handful even with the the proper tire adjustments and high gaussed traction mags... Ski shoe tension is a very important, BSRT is now offering different tensions for more adjustment. Motor Brush Break-In SG+/G3 will get better as they run if you did not break the car in first... What you are noticing is the brushes "seating" I suggest breaking them in first with no load between 6-9 volts on a separate power source. Motor Spacing Check the motor position and check bearings for "binding". Make sure that the rear bushing is all the way seated and that the magnets are in their right position. I always shake the car back and forth (with the rear axle removed) to see how free the armature is, If I hear the arm "clicking" faintly (moving for and aft) I know that the arm is free and there is no binding. Then double check all of the electrical stuff mainly the buss to endbell contact. Lastly check the pick up shoe contact on the track, see what the wear pattern is. Rear Tires One thing about the G3 is that it likes high rims and thin tread. We're using .360" hub AST tires. Even the hubs on the G3 rollers are fairly high (around .290" or so-I think.) Using a higher rim hub will help performance greatly. G3 tips from FSMRA BBS 1st tip- Matched magnets this is a must. both sets traction and motor Make sure to check the ends of traction magnets and the top and bottom of the motor magnets. strong side down for motor mag, and the strongest end toward the motor for Traction magnets. When setting up an arm for a G3, measure the distance from the very front of the arm bushing to the back arm bushing. This is a small brass collar. This should read .685 +-. You want the arm to be able to just wink in the motor box. Too much play and you lose power. Too little play and the car heats up. I usually shim from the front. This keeps the teeth engaged at the crown/pinion. Just as in T-jets a balanced arm,,,,, but in this case a TOTALLY stock arm, is much desired. Also, with you dial indicator, check the roundness of the com. We can't true them so this is an important sorting practice. I get arms 30 at a crack. That way if you run into a good run you can smile,,,,, if it is a run that isn't as good, then you don't get hurt as much.. The next step would be selecting the chassis. There is Flexible, Medium, Firm I prefer medium for S/S some prefer Flexible. Ream out the holes with a .059 reamer to make clearance for axles. Don't hog out to much, then you will get slop and lose handling. Make sure your axles spin freely. The next step would be to set your pick up holders in place. This is important because this is where the electricity comes from and to the motor to run the car. Protech is the best choice for this item. Before you install bend over the small hook where the pick up goes in. This will help from your shoes popping out. Now you will be ready to install your motor. While on the subject of installing the arm..... take a look at the gap in the stack vs the tabs on the com. Some of those will favor one side or the other. That means that in some cars the arm will run better "backwards". You can always switch the crown gear around to get the car to move forward. Always save the bushings when you change arms......period. You will also want to bend the tabs on the endbell to get maximum contact with the shoe holders. measure the front magnet holder. Some will get the mags a touch closer to the rail..... motor mags that is. We know that the magnetic field is strongest at the corner of the mag. Measure the rail width of the track you will race at. Then measure the corner of the motor mag in its relationship to the rail. Look for the best match up. Yes, check for strength, weight, and alignment above the rail. Weight is the enemy. Also do this with the traction mags. Wider is better here in back. Use the longest guide pin that the slot will allow. Ok, the chassis, motor and mags are almost ready to go. By now, every one knows how to mark the bottom of the chassis. We want to see the faintest line from the front magnet retainer to the back of the traction mag. Tire size is not that important. The chassis/car will dictate the final ride height. Remember the tall tire will give a slightly better top end. Is there really a difference in Gold, Silver, stock endbells? Only if you wait for a long time to change them! In fact, take them out when not racing the car! The springs will lose tension if just left in a compressed state. But for a high speed track try this: Try putting in one magnet with the strong side down and one with the strong side up. Install them so that the armature is turning into the weak side of the magnet -- exiting the strong side. By doing this, you have increased the timing of the arm by shifting the magnetic field. Ok, on to the shoes. Many racers notice that one side of the car has a shoe that "turns black". There are a number of reasons for this. For this discussion, and until the the tracks we race on have 1000's of laps on them, we can adjust the springs and shoe to get this to a minimum. On the "burn side" we need to increase the tension on the spring. The burn marks are from arcing on the rail. This also holds true for T-jets. Not a lot mind you, just keep getting a stiffer spring till the burn mark goes away. Of course there is a trade off. More tension is more speed, but less handling. We want to see a trail across the whole length of the shoe......front to back. The shoe should sit square in the hanger. Most people now use the BSRT short window show. Again, they come in Gold, Silver and "stock",,,,,, the performance is very close..... longevity is the issue here. The plating process makes the gold shoe a little harder. On a routed track, very little travel is required,,,,, just a wink. This will also be determined by the front tire size. That "size" will be correct when the car is set up so the front magnet holder sits just above the rail. We are only talking a few .001's above, but above. Springs can be just as important. Too little tension results in a lot of sparks and no speed. Too much, and the car will not go around a corner. There are several spring rates available. We want to be able to duplicate the set up. So for starters use the spring as it comes. Later, you might be able to stretch, cut, fold, spindle or even mutilate them and still get the car to run. Different tracks will require different spring sets. We are closing in on the completed car. We can now get to the rear end of the car. The gear sets we use contribute much more than speed to the car. First, lets look at the gear mesh. This must be smooth as silk. Any bind here creates heat, and a lack of efficiency. We need to stabilize the mesh by either spacing the gear from the chassis or by using a gear boss. The easiest is to use a gear boss. This keeps the teeth from getting chewed up in a wall shot. Some people use both methods. You will want about.002" lash when using a BSRT gear set. In fact you can get by with that measurement using most gears..... Zone2 and Slottech can get a bit closer. In all cases run the car a few laps with a fall off to establish a baseline for the gear mesh. After that, is when the final mesh is set. There are several gears that work well. What about ratios? Well, its easy to tell that a high number of teeth on the crown gives more "grunt" out of a corner. Fewer teeth gives a better top end. However, sometimes if a car seems twitchy, gears can tame the beast so that it can be driven. If you are de-slotting coming out of the corner,,,,, try fewer teeth. Your car should reach terminal velocity before the end of the main straight.....whatever track you run on. If you are still picking up speed, get more teeth on the gear! You will be rewarded when its time to brake for the corner. More teeth usually means less heat. Less heat usually means you can adjust the ride height a bit...... Remember, that being too low creates too much heat. It also takes the compression of the tire out of the handling arena. We want our tires to really work. They are designed to have some flex in them. There are many different compounds available,,,, super soft to rock hard. You can never have too many tires. In an over view, that is how to build a good G3. To describe what to do to an endbell is an adventure in frustration when using a keyboard. Some parts just work better than others. We ARE dealing with toys here. With ohm meters costing as much as a Grand, gauss meters as much as 1500, and other tools that cost a bit, each of us will find a comfortable "cost of racing". The most important tip that can be understood is that common sense, sometimes isn't. Attention to detail is critical. Of the items mentioned, TRACK TIME is THE KEY to winning. 1,000's of laps You can take the A Main with a C Main car if you know the track. It usually doesn't work the other way around. One of those areas concerns the small tabs on the endbell. Bend these so that they contact the shoe holder as much as possible. Then depending on the track and the raw speed of the arm, experiment with the addition of pick up shoe helper springs. They should only contact the shoe when the car is as low as it gets. We do not want to add tension, just get better contact. Index the gears and rear wheels as well. GET A JIG! The items MUST still be balanced. For those looking for the right spacers for arms axles and gears, Rabbit Racing Products is an excellent source. When ever possible, try to use the aluminum fronts by BSRT. Lets take a closer look at the shoes these guys wear. Put your car on the test section and watch the action of the pick up shoe. It depresses till the car sits on all the tires. It is vital that you establish the correct ride height before we get to this point. GET TO THE TRACK AND TEST! Most rails are only accurate to +- .010 Guess what? That would be about the correct amount of shoe travel needed! Ok, lets be safe..... conservative if you will. Set your shoe travel at .020" from the bottom of the ride height. That means you can pick up the front of the car by about .020" More than that will allow the car to de-slot easier. But when you do this, remember that there is a shoe spring to deal with as well......You used to set a Tomy shoe so light you could blow on it to make it deflect. That was great for handling, but sometimes speed suffered. With the new G3, that is not the issue. I take the G3 chassis and soak it in break free to give me a nice slippery coating on the plastic. It seems to work because one car I tried didn't need oil right away it just hummed. Once you do that make sure you clean out the chassis so it safe to put the pieces in. The holes are where the breakfree needs to be. There is a process that can be used to get the front end of the car in a better ride position that has nothing to do with tire sizes, springs, or pick up shoes. It has to do with the way the TOP of the shoe hanger is bent. We have already read about what to do with the bottom of the hanger. With the right slots filed in the shoe hook, we can create an extra guide pin. When you set up a car, do it by sections of the track. For example,,,,, after marking the bottom, just drive the main straight and then check it. Maybe go another corner or two and check it again. We are trying to find the spots where the rails are high. If we find a rail that is high and its on a corner, the tire will unload ao that corner and may cause us to lose it. Ok, so you have a stack of magnets laying around. Some are destined for the refrigerator and jr's pictures. Some may be pretty good. You read of matched magnets and other such items. There is a very nice Gauss Meter available through SlotKing that does everything! It measures the inside and outside of the T-jet magnet as well as the top, bottom and everywhere in between. And its only about 350 smacks! Some may say, " who cares". But if you are looking for the ultimate speed machine, then its an item that is a must. Magnets lose strength over time. Dragging a rail, or heat or simply time itself has an affect on them. But they can be re vived! A quality Magnet Zapper will bring them back to top performance. Most of you by now have noticed that the "white" or "marked" magnet is always stronger. Welllllllll with a Zapper you change the polarity of that mag and get a better set! And you wondered why some cars have two whites and still run. Now you know. Some guys run grooved mags,,,,,, by the time they are grooved, they have lost a lot of strength. Zap 'em Danno...... And presto they work like Sampson with long hair again. I wonder if someone will take on another " speed tip" topic? After the race and I when I got home, I opened the little speed car up and noticed one thing that stood out. I had no brushes! The rushes were wore out and were not making contact. This is what happens when a car slows down. So now I check all my brushes in every car before I go to a race. We are all supposed to be in recycling. Ok, slotcar parts can be recycled as well. Many guys hate to pin axles. It is a little frightening the first 12 times you do it, and you will trash out a few chassis. However don't throw away your old pick up shoes! Use them as your rigged retainer! Slip the slot over the axle...make a "U" .bend at the top of the chassis. Trim off the excess. Repeat on the other side. It woks just fine, is CHEAP and is almost idiot proof. There is a big difference in the performance a different body makes. As big a difference in bodies, there is a substantial boost or drop in performance in the way a body is mounted. There are times when a car is so loud that you think it must be dragging! That body mount job is CRAP! The body does need to float a little. But not so much as to negate the aero advantage it provides. It also protects the chassis to a degree. It can create some cooling if done correctly, or add just a touch more down force. Ok, we all clean our pick ups shoes often. Its time to take that to the next step. With the cloth wheel on the Dremel, and just a trace of Semi Chrome polish, hit the shoes agin until you can read newsprint in the reflection. Shine them like a mirror. The results are amazing. CA SLOT CAR BBS I put a flanged rear bushing in my CS last week with good results. The "low Pro" pick ups really seem to be the ticket for more power. They have a much better wear pattern than the old shoes. mod tip from Mike: run 462 to 466 rear tire Club Stock Starter Order: 901 Standard G3 Roller $34.95 148 Super G+ Hot Stock Arm $10 optional PT8800S Protech Silver Electrical Kit $7.50 247 Short Ski shoe $1 optional HT169 Extended Guide pin $2.50 HT164 Body pins $1.50 can make your own HT161 Body posts $3.50 HT201 Delrin Independent front $6.95 HT220 Splined axle $6 HT257 .250 rims $3 390 tires $1.50 392 tires $1.50 393 tires $1.50 394 tires $1.50 412 Crown gear 22T $2 HT302 Gear spacer $1 605 Lexan body $2 548 Tyco pinion $.75 Total: $88.65 ZIPPS SLOT CAR BBS he had older traction mags in a car and suffered handling problems. He installed new ones and raised it up so the mags just touched the rails very lightly. Instant 2 tenths off the times. He explained that the design of the G3 seems to hit the chassis when the mags groove and the car is lowered to compensate. Running on just the mags is cool because the rails can work similar to a flux collector and don't upset the handling. So, I dropped in new tractions in my stiff chassis and raised it up 2 thou and boom, instant monster car. It was very fast and handled great, I qualified 6th only .075 behind the TQ. Something to try if you feel you're having trouble getting a handle on a G3. I am using a medium chassis, stiff mag clip, short window pick up shoes, heavy shoe springs, gold endbell, reamed bushings(.0610), 7/23 BSRT gears, stock arms that I check for balance on the blades, close to matching motor mags, BSRT rear tires, BSRT neo front tires, BSRT aluminum inde front hubs, Long wheel base, long guide pin, Courage C-32, or Nissan body and less than 10 minutes breakin. I want to be able to duplicate the spring rate as much as possible. That is why I don't stretch or crush the spring. I use them "as is". I select them from the heavy, medium,stock, gold, silver,,,,,etc....... When you are done racing for the day, remove the endbell. The "spring" will last much longer! Also, once you have built the car as best you can, let it set for a day or two. This allows the magnetic fields to stabilize. MaDDman told me of that......I must say that it does work! |
 |