| Suspension, Steering & Brakes - Part 3 - Poly Bushes and Better Braking |
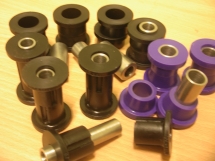
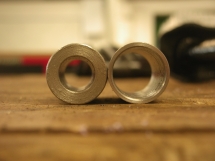
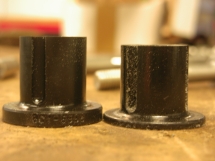
| Polyeurathane Bushes Poly bushes have many advantages over their rubber counterparts, principally in their stiffness - equating to more responsive transfer of forces allowing more responsive suspensiona nd more predictive handling. Poly bushes also tend not to persish as badly as rubber. Powerflex can supply a set of bushes that will fit the 96 with some mods. They helped me out an awful lot so help them out and try their bushes! Lower Wishbone Bushes - Big stubby black ones at the back,in the photo. Part# PFG9001 - Gaz Shock Mount Bush Supply Sleeve 37.5mm long Metal sleeve comes with 11mm ID, to be drilled to 16mm ID. The bushes do not need any modifications. Upper Wishbone Bushes - Purple ones in the photos PFF19-402 - Ford Outer TCA Bush Supply Sleeve 33mm Long Metal sleeve comes with a 12.5mm ID, needs to be drilled to 13mm ID 1.5mm to be trimmed from outside flange of bush Inner bevel to be removed slightly. Rear Axle Link Arm Bushes - the long thin black ones. PF99-108 - Universal Bush Supply Sleeve 46mmLong The inner bush dimensions fit fine, you will need to take some width off the flanges. Metal sleeve comes with a 9.5 mm bore, a shade too tight, try filing with a rats tail file or 9.75mm drill if you have one. I changed my link arm bolts to M10 metric. If you are doing the same you will need to drill the sleeve to a 10.5mm ID Drilling out the sleevs is best done on a pillar drill to ensure that the ID is opend up in line with the sleevs i.e. you are drilling perfectly vertically striaght down. Set the drill to a fairly slow speed and introduce the drill to the sleeve even slower! My inner slleves came with the above mentioned ID, is is always worth asking Powerflex if they will drill them out to your required ID for you. Trimming the bushes is best done on a bench grinder. Using a hacksaw or sharp knife will simply hack lumps off and leave a very unsatisfactory and uneven finish. A bench grinder works very well at 'sanding' down the bushes due to their fairly firm nature. |
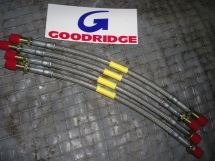
| Braided Brake Hoses Here we have a lovely set of Goodridge Stainless Steel braided brake hoses. The benfits of which are two-fold. Firstly, the steel overbraid prevents widthways expansion of the hose under harsh braking, meaning more power transfered to the brakes and a more responsive (and less squishy) feel. Secondly, the stainless steel overbraide protects the rubber hose from the elements, hence the Lifetime Warranty- a real 'fit and forget' piece of kit. I got mine from Stevson Motors, the cheapest I found on tinternet at �48.76 posted. Part Number SSB0100-4 |
 |
| Hub convertion - you'd think it would be cheap and simple... This is something I am toying with. Technically it is not that tricky, but I have yet to fully commit myself. Ideally I want hubs with a 114.3 / 4 pcd to accept the Saab 99 or 900 Minilites, being much more common than the 96 Minilites - this would also allow me to run the drilled and slotted 900 discs. There are several problems which beset this mission. While I have not yet solved the riddle there a re a few avenues I have explored and can help save other people some time to avoid wasting time trying what does not work. 1) Saab 99 and early 900s are front handbrake only. This means swapping the hub carrier would mean re-routing the handbrake cable, fitting a reverse action handbrake and having to plumb in the brake lines infront of the drive shaft as they also have leading calipers, not trailing. The steering arm is not in the same place to a funky steering rack with 4 univeral joints would be needed. Not a quick solution. 2) Early Saab 900 outer drive shafts have a differnet spline, so 900 hubs do not fit on 96 drive shafts. 3) Early 900 calipers do not fit on 96 hub carriers. 4) I am machining a spare pair of 96 front hubs to accept 99/900 rear discs infront of the hub, as opposed to 96 discs behind the hub. Being only 2mm wider diameter an 1mm thicker, I am fairly confident the 96 caliper will accept the rear discs on the front. If not, an adaptor plate for the 99/900 caiper to the 96 carrier or 3rd party caliper like Willwood or AP Racing. All asssuming the machining on the 96 hub works, of course... 5) The rear drum is cast iron so cannot be welded. The 114.3mm pcd I am after is awkwardly in the chanel around the middle of the drum meaning any drilling would be at an angle and through a weak spot on the drum. This is clearly not desirable. Options here are a) find an alternative 203mm drum and machine the drum so that bearings can be found to mate it to the 96 rear axle or b) machine a new drum. a) could prove expensive if it does not work. b) will be expensive regardless. 6) A third option for the rear is to convert the rear to disk. An adapter plate would be mounted to fit where the backing plate goes. A rear handbrake caliper will be needed and a sleeve machined to slide over the axle stubs to accept the 900 rear hub. I will let you know how things go but done expect an answer soon! |
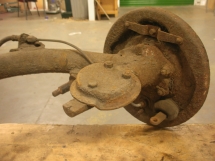
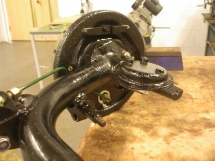
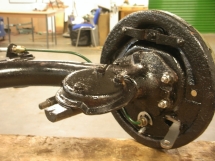
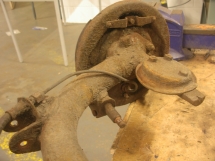
| Handbrake Cable Assembly As well as replacing the handbrake actuators with stainless steel ones, I have replaced the handbrake cable assembly as well as the pads, rear drum springs and rear cyclinders. The whole rear axle assembly has been stripped, wire brushed, rust treated and painted. |
 |
 |
 |
 |
 |
 |
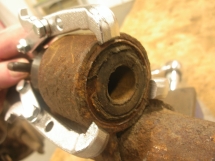
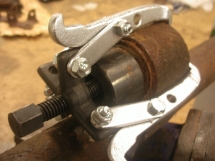
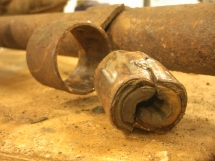
| Rear Axle Centre Bush I have replced the rear axle centre bush with NOS rubber, not poly as the general concensus is that this should stay rubber because of the amount of flex that it experiences - poly would be too hard for this purpose. Rear Axle Centre Bushes are available from Rolf Jensen in Swenden. Remvoving them is something of an issue. My first attempt involved using a Gear Puller as a Pusher. Theoretically this would have worked fine but the threaded bolt was too thin and bent. If you ahve a beefy puller this might work. You will need to fit something flat and round between the puller and the bush otherwise you will end up just pushing out the bush inner sleeve. The Bearing has an outer metal sleeve of 47.7mm diameter. Anything larger than this will not fit down the sleeve mounting. I lucked upon a 45mm disk from some sort of press, I found lying about. Be careful that the legs of the puller only 'grab' on the outside edge of the bearing housing, it they protrue too far inwards they will engage with the bearing you are trying to push out, and obviously stop it! Failing this - as I did! - the next stage is to make two V-Shaped notches opposite one another running down the entire length of the bearing to remove strips of rubber. To do this, disasemble a hacksaw and reasemble it with the blade threaded into the bearing. This will be easier if you can push out the inner sleeve first. When you have removed the two strips of rubber you will be able to saw through the outer sleeve, but stop once to get to the bearing housing! With the rear axle centre bearing effectively cut in half but still jammed in the housing, use a screw driver to pry a gap between the bearing outer sleeve and the housing. When you have the edges bent inwards and lifted away from the housing, keep whacking the screwdriver down between the bearing outer sleev and the housing. Alternate side to side and end to end and eventually to will have to gaps between the nearing and the housing. At this stage I had compressed the bearing outer sleeve so much that the whole lump came out whic a couple of taps in the middle with a bug hammer. Not easy and not delicate but it works. Now go and have a sit down and a cup of tea! |
 |
 |
 |
 |
 |