| FlyfishingPA.com |
|
|
|
|
|
The Fly Fishing Loop is sponsored by flydepot.com [ Home Waters | Next | Random | List | Search ] |

|

|
|
| Copyright � 2001 Warren Albert |
| This is the first installment in a series of articles designed to help the beginning fly tier make a successful start into the sport. The information provided is based on years of experience both good and bad. I feel if you use this series as a guide, you will make a successful start into the sport of fly tying and shorten not only the learning curve, but the buying curve as well. I only wish there was a series like this years ago when I was getting into the sport. The first article in this series deals with The Tools of the Trade. Without the proper tools, it is almost impossible to be a successful fly tier. The problem today with selecting the right tools for the trade is that there are so many out there to choose from. It can be intimidating and frustrating to choose the right tools, especially if you�re on a budget and want to get the best buy for your dollar. In this first installment, I will go into detail about the tools that are necessary to the beginning fly tier. I will explain what is important to look for in a quality tool and some brand names that market these qualities. The tools I mention are brand names with the budgeted fly tier in mind. They are tools that I have tested to be of a good quality at a fair price. There are more expensive products out there, but I am not convinced that they are worth the extra money to the beginner on a budget. If money isn�t that big of a factor, then by all means purchase the best you can afford. Otherwise, spend the money you save on tools to purchase quality tying materials. VISE A good quality vise is first and foremost the most important piece of equipment the aspiring fly tyer will purchase. There are many different makes and models out there to choose from and frankly it can be an overwhelming process to pick the right vise. There are two factors that I look for in a vise. The first is will it hold a wide variety of hook sizes firmly in its jaws. This might sound simple, but having tried just about every vise out there I can tell you that there are vises produced (some being very expensive) that simply don�t hold a hook. The second factor I look at in a vise is the warranty provided by the manufacturer. For most novice tiers, the first vise they purchase will most likely be the last vise they purchase. It�s good to know that if anything wears out or breaks, it�s covered. Those two factors are in my opinion the two major things to look for in a new vise, as a vise with those two features will give you years and years of enjoyment. This is as far as I recommend to the novice tyer because anything more in terms of features and styles are in my opinion personal preference. I suggest trying out a few vises that fit the basic requirements stated above and purchase the one that fits your needs. I would recommend not spending an arm and leg on a new vise. There are many inexpensive models out there that meet my minimal requirements. Griffin and Thompson are two examples of quality vises that won�t cost you a lot of money. They both have a lifetime warranty and are U.S. made. SCISSORS The second most important purchase for the new fly tier is a good quality pair of scissors. Actually I usually suggest purchasing two new pairs of scissors, one for fine work and one for rough work. This is a tying tool that you simply cannot skimp on. A good pair of scissors is essential to the fly tiers success. Pick scissors in the price range you can afford and test them out. The scissors should fit your fingers and be comfortable in your hand. The ends should come to a point and should be sharp all the way to the tip. Some of the leading manufacturers that produce a good pair of scissors include Anvil and Dr Slicks. I have used both of these brands and find them some of the best. Another model I use often is made by Fiskars, and is sold in most craft stores. They have an orange plastic handle and cost less than 10 bucks. They are very sharp all the way to the points, and fit very comfortable in my hand. I feel they are the best scissor sold for the money and would be a worthwhile purchase for the beginner tyer. It is important to emphasize that your scissors for fine work should ONLY be used for this purpose. Cutting wire, tinsel or even using them for household chores will only dull them, leaving you very frustrated at the tying bench. The second pair of scissors you should purchase if for rough work. They should be used to cut wire, tinsel, and larger materials that would dull your fine scissors. The make or brand for this pair is not important. I use a pair of general-purpose scissors made by Fiskars and they have given me many good years of service. BOBBIN Probably the third most important tool for the fly tier is the bobbin. A bobbin is a simple tool made out of wire and tubing with its functions being to hold a spool of thread and provide tension to the thread. There are many bobbin manufacturers out there today and with the simplicity of the tool, they are all ok. I have bobbins that I paid two dollars for and others that I paid twenty dollars for and they both work. The problem with the cheaper ones is that the thread tubes will wear in time and produce small grooves that will cut your thread. The way to avoid this is to spend a little more money and purchase a ceramic lined bobbin. These will not wear and will provide you years of good service. I have several of these that I have put many spools of thread through and they still perform like new. I suggest looking into Griffin Bobbins as they are of a good quality and not over priced. BODKIN A bodkin is an invaluable tool to have at the tying bench and is one you shouldn�t go without. Fortunately, it is such a simple tool that they can be purchased for very cheap or you can even make one yourself for less. The one I use came out of an old dissecting kit I had laying around from college. Before that, I used a darning needle stuck into a cork handle that I made for less than a dollar. You can purchase a bodkin at any fly shop for less than two dollars. The advantage of a purchasing a bodkin in a fly shop is that many also function as a half hitch tool. HACKLE PLIERS If you�re going to be tying dry flies or any hackled fly for that matter, a set of hackle pliers is a must. I know tiers that never use one and tie nice looking flies, but frankly I don�t know how they do it. A quality hackle plier has only one function, to grip a hackle tip so it can be wound around the hook. It sounds simple enough and really it is, but with the wrong plier, it can be a nightmare. Like everything else I have mentioned here, there are many different makes and models of hackle pliers. My suggestions are to pick a pair that you can adjust to different tensions, and select a pair that fits your fingers and feels comfortable in your hand. Many hackle pliers come out of the package with too much tension and will need some adjusting to work properly (a proper working plier should hold a hackle securely without cutting into the hackle tip.) I personally use a rotating hackle plier made by Griffin. It is the easiest to use in my opinion and comes right out of the package with a proper adjustment. Standard English style pliers are very popular and work well. Another inexpensive plier can be found at Radio Shack and is sold under the name �mini clip�. They are designed for the electronic industry but fly tiers have adopted them years ago as a hackle plier. A good quality hackle plier will cost anywhere between two and ten dollars depending on style and brand. WHIP FINISHER A whip finisher may not be considered an �essential� tool by many, but I wouldn�t leave home without it. (I can�t emphasize enough the importance of learning to whip finish by hand also.) I use a whip finisher because I find it much easier to make a neat finish to a fly with one as opposed to without one. I have short fat fingers that don�t work well in tight places so I appreciate the results of a whip finisher. There are a couple different �looks� to whip finishers, but they all follow the same basic principles and in the end form the same finish to a fly. There are again many brands and models out there and one works as good as the other. I personally use a Griffin rotating whip finisher, it is the easiest I have used and has some give to it that allows a constant tension throughout the whip finish. I think the Griffin would be nice choice for the beginner who would have the tendency to be heavy handed. One other thing to understand with a whip finisher is that despite the fact that they sell them in different sizes, the standard size is the only one needed. The only exception to this would be the saltwater tier that ties on very large hooks. This tier would benefit from a larger whip finish tool. HAIR STACKER The last tool that I feel is essential to the beginning fly tier is the hair stacker. The hair stacker�s main function is to even the tips of the different types of hair used in fly tying. It is a must for patterns like the Elk Hair Caddis, the Royal Wulff and any of the various hair wing patterns out there. When choosing a quality hair stacker, make sure that it is big enough to accept the amount of hair you will be using. Also, check to make sure that the countersunk area on the outer tube is deep enough so when you stack the hair and pull out the inner tube, the hair is sticking out far enough that you can get a good grip on it without destroying the integrity of the hair tips. Also, make sure that the tolerances are small enough to allow the inner tube slide into the outer tube easily, but with not too much slack. Lastly, make sure that the flare on the inner tube is large enough to allow you to place the hair into it without any problems. I personally suggest purchasing a medium size hair stacker. This will allow you to tie a wide range of patterns with one purchase. Cortland and Griffin are two brand names that make a quality hair stacker for a decent price. This is a rundown of the tools I feel are essential to the beginning fly tier. With the tools I mentioned above, you will have a quality core of tools that will give you every opportunity to become an experienced fly tier. In the next article, I will discuss materials, what you need, what you don�t need, and what to look for in your purchases. TOP |
| The Tools of the Trade By Warren Albert |
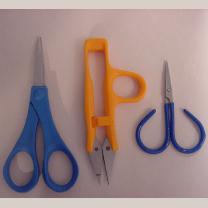 |
Left- Fiskars general- purpose scissors Middle- Orange Fiskars, great for fine work Right- Anvil Scissors, also good for fine work |
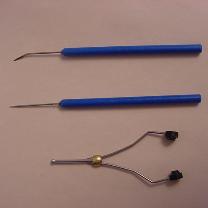 |
| Top- Curved Bodkin Center-Standard Bodkin Bottom- Griffin Ceramin Bobbin |
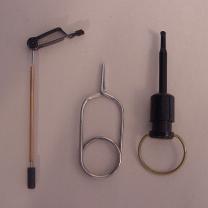 |
| Left- Griffin Rotating Hackle Plier Middle- English Style Plier Right- Mini Clips, found at Radio Shack |
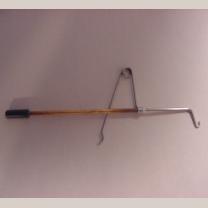 |
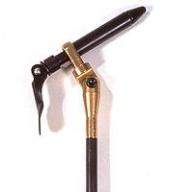
| Griffin Whip Finish Tool |
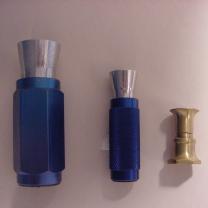 |
| Left- Griffin Magnum Hair Stacker Middle- Griffin Standard Hair Stacker Right- Cortland Brass Hair Stacker |

 |
| Thompson Model A Vise, Good choice for the beginner |