|
|
|
Page 2
|
|
18. Create new file 200 х 200.
19. Choose Preset Shapes tool: Octagon Line Width = 1 Antialias - checked Colors- the same.
20. Press and hold Shift and draw octagon of any sizes.
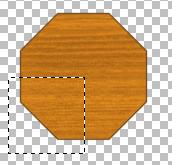
21. Choose Selections tool (Rectangle, Feather = 0). Select the lower fourth part of the shape:
|
|
|
|
22. Selections/Invert. Press Delete.
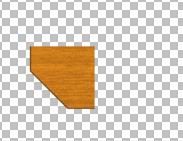
23. Edit/Copy. Edit/Paste as New Layer.
24. Move the new layer as shown on picture below.
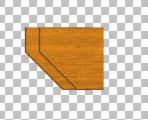
25. Colors/Adjust/Brightness & Contrast: Brightness = -30 Contrast = 0
|
|
|
|
26. Layers/Merge/Merge Visible.
27. Edit/Copy.
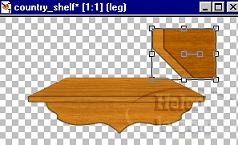
28. Open file with shelf image. Edit/Paste as New Layer.
29. Rename the new layer as "leg".
|
|
|
|
30. With Deformation tool change the sizes of leg image on new layer according to sizes of the shelf and move the shelf leg as shown on picture below:
|
|
|
|
31. In layers`palette (Layers Palette) move layer "leg" below layer "shelf".
32. Layers/Duplicate.
33. Image/Mirror.
|
|
|
|
34. Layers/Merge/Merge Visible.
Knobs:
35. Create new layer "knobs".
36. Choose Preset Shapes: Ellipse Line Width = 1 Antialias - checked Colors - the same.
37. Press and hold Shift, draw a little round shape (see below):
|
|
|
|
38. Selections/Select All. Selections/Float.
39. Effects/3D Effects/Inner Bevel. In Presets options choose Soft edge. OK.
40. Edit/Copy. Edit/Paste as New Selection (2-3 times). Position knobs as you wish.
41. Layers/Merge/Merge Visible. Tube the image.
|
|
|
|
|
|
|
|
|
|
Optimized for resolution 800 х 600, IE5 Graphics and Design are: Country City © Copyright 2002
|