|
To reproduce color and continuous-tone images, printers usually separate artwork into four plates—one plate for each of the cyan (C), yellow (Y), magenta (M), and black (K) portions of the image. When inked with the appropriate color and printed in register with one another, these colors combine to reproduce the original artwork. The process of dividing the image into two or more colors is called color separating, and the films from which the plates are created are called the separations.
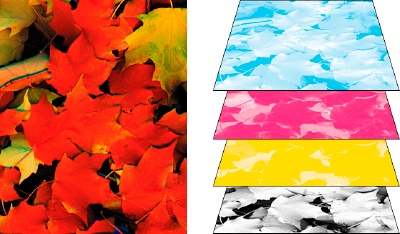
Composite (left) and separations (right)
Properly prepared source files always improve a color separation and result in a better print. Image preparation should be done prior to color separation in the RGB mode. The checklist below outlines some basic elements of an image file prepared for separation.
-
Host-based separations
- In the traditional host-based, preseparated workflow, Photoshop, Illustrator, InDesign creates PostScript information for each of the separations required for the document, and sends that information to the output device.
-
-
- In-RIP separations
- In the newer RIP-based workflow, a new generation of PostScript RIPs performs color separations, trapping, and even color management at the RIP, leaving the host computer free to perform other tasks. This approach takes less time for Photoshop, Illustrator, InDesign to generate the file, and minimizes the amount of data transmitted for any given print job. For example, instead of sending PostScript information for four or more pages to print host-based color separations, InDesign sends the PostScript information for a single composite PostScript file for processing in the RIP.
Prepare your document for color separations
- Correct any color problems in your artwork.
- Set overprint options.
- Create trapping instructions to compensate for misregistration on press.
- Preview color separations on your screen.
-
Choose File > Print to display the Print dialog box.
-
If you’ve created a printer preset with the appropriate separation settings, select it in the Print Preset menu at the top of the Print dialog box.
-
Choose a printer or PostScript file in the Printer menu.
-
If you’re printing to a PostScript file, choose the PPD for the device that will output the separations.
-
To view or change existing print options, click a section name on the left side of the Print dialog box.
-
Before you deliver your document to a service provider, or perform color separations directly first proof the separations.
-
Print or save separations.
Outputting spot colors
You can use custom inks, called spot colors, in addition to, or in place of, process colors. For example, instead of using the four process colors to reproduce artwork consisting of black text and bluish-green line drawings, you could use two spot colors—one of black, and one representing the exact shade of green. You can also use spot color inks to produce colors not reproducible by CMYK inks, such as varnishes or fluorescent and metallic colors. In addition, you can mix two or more spot colors together or mix spot colors with process colors to create mixed inks.
You can color artwork with process colors, spot colors, or a combination of both. When printing separations, you can convert spot colors to their process color equivalents so that they will be printed on the CMYK plates.
View the process color equivalents of a spot color
- Select the spot color in the Swatches panel.
- Choose CMYK in the Color panel menu.
The CMYK equivalent values for the spot color are displayed in the Color panel.
You can also hold the pointer over the spot color in the Swatches panel. The formula for the color will appear in the tool tip.
Print an object on all color plates
If you want an object to print on all plates in the printing process, including spot color plates, you can apply registration color to the object. Registration color is used for crop marks and trim marks. For composite output, objects with registration color applied will print as C 100, M 100, Y 100, and K 100. For separations, these objects will print as 100% on each plate.
- Select the objects to which you want to apply registration color.
- Choose Window > Swatches.
- In the Swatches panel, click the Registration color swatch
 . .
Printing gradients as separations
Consider the following when producing separations for documents with gradients:
-
A gradient created in InDesign that contains a combination of spot and process colors will be separated onto both the process and spot plates.
-
A gradient that contains process colors will be separated onto the process plates.
-
A gradient that contains two tints of the same spot color will be separated onto a single spot color plate.
-
To create a gradient that separates on one piece of film between a spot color and white, create a gradient fill between the spot color and the Paper swatch in the Swatches panel.
-
If you create a gradient between two spot colors, you should assign different screen angles to those spot colors. If two spot colors have the same screen angle, they will overprint each other. If you’re not sure what the angles should be, consult with your prepress service provider.
Printing a composite
You can print a color or grayscale composite proof to check colors in your document. A composite image can help you design and proof your layout before you print final (and costly) separations.
When InDesign prints a composite, it prints all of the colors used in the file on one plate, regardless of whether any individual colors are selected.
Consider the following issues when printing composites:
-
While no proof will give you an exact representation of your final output, you can greatly improve its accuracy by calibrating all the devices you use to create a document (such as scanners, monitors, and printers). If the devices are calibrated, the color management system can help you get predictable and consistent color.
-
Any overprinting options that you’ve selected in the document will print correctly on a printer that supports overprinting. Since most desktop printers don’t support overprinting, you can simulate the effects of overprinting by selecting Simulate Overprint in the Output section of the Print dialog box.
Important: Selecting Simulate Overprint will convert spot colors to process colors for printing. If you intend to use a file for separations on a RIP, or for final output, do not select this option.
-
When you print to a black-and-white printer, InDesign produces a grayscale composite version of the pages. If the document contains color, InDesign prints visually correct grays to simulate that color. For example, the gray that simulates a 20% tint of yellow is lighter than a 20% tint of black, since yellow is visually lighter than black.
-
When you print a book with chapters containing conflicting spot inks or trap styles, you can instruct InDesign to synchronize settings with the master document.
-
If you’re using color management with the Book feature, make sure that each document in the book uses the same color management settings in the Color Settings dialog box.
Note: Remember that, like monitors, color printers vary greatly in color reproduction quality; thus, proofs from your service provider are the best way to verify how the finished piece will look.
Preview color separations
You can preview color separations, ink coverage limits, and overprinting using the Separations Preview panel. for Adobe CS 4 onwards only. Previewing separations on your monitor lets you check the following:
- Varnishes and other coatings
- Since varnishes are transparent, they can be difficult to preview on screen. When you preview a varnish separation by itself, the varnished areas appear in black.
- Rich black
- Previewing separations lets you identify areas that will print as rich black, or process black (K) ink mixed with color inks for increased opacity and richer color.
- Ink coverage
- Too much ink on the paper can cause drying problems. Ask your commercial printer for the maximum ink coverage of the press you will be printing on. You can then preview the document to identify areas where ink coverage exceeds the press’s limit.
- Overprinting
- You can preview how blending, transparency, and overprinting will appear in color-separated output.
-
Note: You can also see overprinting effects when you output to a composite printing device. This is useful for proofing color separations.
While previewing separations on your monitor can help you detect problems without the expense of printing separations, it does not let you preview trapping, emulsion options, printer’s marks, and halftone screens and resolution. Work with your commercial printer to verify these settings using integral or overlay proofs.
Screen Variations Guidelines:
- VERY FINE SCREEN FOR ARTBOOK & HI-QUALITY PHOTOS MAGAZINE: 200 LPI
- HIGH QUALITY AND FINE SCREEN FOR ANNUAL REPORT: 177 LPI
- STANDARD HIGH QUALITY SCREEN FOR FOUR COLOR MAGAZINES: 133 - 150 LPI
- AVERAGE SCREEN FOR NEWSPAPER : 85 - 110 LPI
- NEWSPRINT/GROCERY COUPONS: 65 - 71 LPI
|