|
| |

With the price of gasoline and insurance skyrocketing today, you might want
to consider doing a do-it-yourself LPG project like this one. Often, when a person picks a
car, they don't often consider the operating costs (fuel, insurance,
maintenance, depreciation, etc.). As an example of a vehicle cheap to own
and maintain, let's look at a used General Motors full-size (B-body) car.
They are durable (see how many are still being used in taxi service) and they
are still plentiful and cheap in the used car market. Besides, replacement
parts
are readily available and are dirt cheap. These cars are also easy to
repair by any backyard mechanic. With it being large, utilitarian, and not new,
these cars are about as cheap to insure as you can get. An added benefit
is that, at least in Ontario, cars older than 20 years are not required to be
emission tested. Other
manufacturers' full-size cars would be similar. Of
course, you will still need to visit a mechanic who can certify that your
DIY conversion meets provincial or state safety standards. This certification
will allow you to fill your vehicle with fuel. Do NOT drive the car until
has been certified to be properly converted.
Now these cars don't seem to be very fuel-efficient running on gasoline but
are actually similar to modern minivans. They carry a family of four
comfortably and have enough trunk room to carry plenty of stuff.
Obviously, minivans can carry a more due to their blobbier design but we are
looking to save money. If you have to do any towing, full-size rear-wheel
drive cars are a
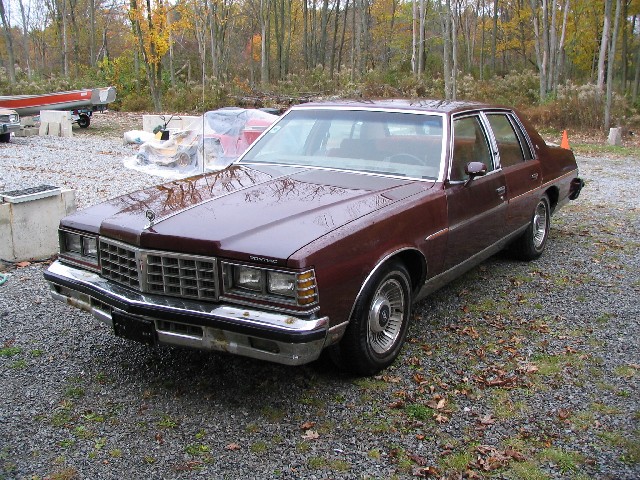
better choice than most minivans. For this example, let's look at how we
can convert a 1977 Pontiac Parisienne (Bonneville in the USA) to straight propane.
The car in this project was already converted to propane years ago but is a good
example of what components are required and how they are installed.
Luckily, General Motors provided this car with a Chevrolet 350 engine, which
makes replacement engine parts even cheaper and more readily available. Dual fuel is another option but, since for this example we live in an urban area with readily
available refueling stations, we will replace the gasoline tank to maintain our
trunk space and optimize our conversion for maximum fuel efficiency.
You will need the following major components for this conversion:
 | tank |
| filler valve |
| fuel lock-off device |
| evaporator |
| propane carburetor |
| fuel lines |
The easiest and cheapest way to get these components is to scour the
junkyards for a complete vehicle. Since junkyards don't often get calls
for these parts, you can get everything you need for $100 to $200. If the donor car was from a northern area, the fuel line fittings
may be corroded which will mean you will need to buy new ones. You
will need to check the tank for the expiry date. If the tank has expired,
you will need to have it recertified which could may or may not be cheaper than buying a new
tank. Your chances are much better obviously if the tank is in good
condition and not too rusty.
You will need to check with your certifying authority if your planned
conversion will meet their requirements. Newer vehicles may require a electronically
controlled feedback system to pass local emission requirements.
If you can't find a suitable donor car, the other option you have is to buy
new parts:
| Description |
Manufacturer |
Part # |
Current MSRP (C$) |
| Fuel Tank - 99 litres (26 USG) |
Sleegers |
10x10x10x36 SEUW |
$1250 |
| Filler Valve |
|
|
|
| Under License Plate Filler Valve Bracket |
|
|
|
| Fuel Lock-Off Device |
Impco |
VFF30-2 |
$89.05 |
| Evaporator |
Impco |
EB-2 |
$366.14 |
| Propane Mixer |
Impco |
CA425M-2 |
$312.27 |
| Quadrajet Throttle Body to Mixer Adapter |
Gann |
AT9-8 |
|
| Quadrajet to Impco CA-425 Throttle Body Assembly |
Gann |
AT9-13 |
|
| Converter Mounting Bracket |
Gann |
GB87 |
|
| Fuel Pump Block Off Plate |
Gann |
622 or 622N |
|
| Fuel filler line |
|
|
|
| Fuel line from tank to Lock-Off |
|
|
|
| Fuel line from Lock-Off to Evaporator |
|
|
|
| Water Hose "H" adapter (5/8" x 3/4") |
Gann |
H4-5 |
|
| Water Hose "Y" adapter, nylon (combination
5/8" x 3/4") |
Gann |
6655-YN |
|
| GM distributor governor weight springs |
Gann |
2056 |
|
| GM HEI distributor advance limit plate |
Gann |
HEI |
|
DIY propane conversion kits are not generally readily available for
most cars. LPG is a very common conversion in Europe so newer European
cars would be the most likely vehicles for which to find a DIY kit. Other
gaseous fuel suppliers may be able to put a kit together for you but this would
probably done on a case by case basis. I may start putting kits together
for propane conversions some time in the future depending upon the feedback I
receive.
 There are not many automobile tank manufacturers and we are aware of two: Manchester and
Sleegers. Sleegers has tank drawings
available on-line you can
use to determine which would fit best. They also ship direct to the
customer and have a tank recertification service. Manchester will
give you a recommendation after you send them the particulars of the
application. There are not many automobile tank manufacturers and we are aware of two: Manchester and
Sleegers. Sleegers has tank drawings
available on-line you can
use to determine which would fit best. They also ship direct to the
customer and have a tank recertification service. Manchester will
give you a recommendation after you send them the particulars of the
application.
You will have to fabricate some brackets to mount the tank to the vehicle if
the donor car is different from your project car. You will also need to
remove the gas tank if you are placing the propane tank in its position. The tank should be securely mounted to the car so that it cannot
come loose in the event of a collision. The tank must be secured
to the frame with high strength bolts. The mounted fuel tank
must have adequate ground clearance or you will end up scraping it or (worse)
bumping it on the ground. A good way to determine whether your tank will
have adequate clearance is to first draw an imaginary line between the place
where the rear tire meets the ground and the bottom of the lowest part of the
back of the car (usually the rear bumper). If all parts of the new fuel
tank fit above this line, your tank installation will be OK. If not, you
will either have to look for a different tank or move the bottom of the the
lowest part of the back of the car even lower. This lowering could be done
with a new class III trailer hitch but you will need to check with your
certifying mechanic.
Since the tank is the most expensive part of the installation, it would not
hurt to protect your investment with rust-preventative coating. Do this
after you have done the trial fitting and just before you are about to make the
final installation. Brand new tanks will usually have a fresh coat of
white paint from the factory but you can still improve upon the finish with an
additional coating of rust-inhibitor paint or rubberized stone-guard. The
white color is to reduce the adsorption of solar heat and is completely
unnecessary for an under-car tank.
 To design the brackets, you will need to trial-fit the tank to the car
and this will be much easier if you put the entire car up on blocks. The
car should be as close to level as you can make it and only high enough for you
to easily work under the car. Put the tank on a board and then place the
tank and the board on a floor jack. You may need to use leveling blocks if
you are using a manifolded tank with different cylinder diameters. Lift
the tank into position with the jack. The brackets you need to fabricate
will securely connect the tank to the car so use cardboard as a template for
your design. Once you have a design that will securely connect the tank to
the car, go to a machine shop and have it fabricated. To design the brackets, you will need to trial-fit the tank to the car
and this will be much easier if you put the entire car up on blocks. The
car should be as close to level as you can make it and only high enough for you
to easily work under the car. Put the tank on a board and then place the
tank and the board on a floor jack. You may need to use leveling blocks if
you are using a manifolded tank with different cylinder diameters. Lift
the tank into position with the jack. The brackets you need to fabricate
will securely connect the tank to the car so use cardboard as a template for
your design. Once you have a design that will securely connect the tank to
the car, go to a machine shop and have it fabricated.
Bolt the brackets onto the tank and again fit the tank to the car. Mark
the frame rails with the location of the new brackets' bolt holes. Remove
the tank and drill the holes. Finally, put the tank back in position and
install high strength bolts long enough to pass through the brackets and the
frame rail with enough thread showing to install a washer and a nut. The
new brackets will probably not meet the frame rails so you will have to use
washers to take up the clearance between the bracket and the frame rail.
Use the same number of washers on each side of the tank if possible.
If you decide to go with a trunk-mounted tank, you must have a way to sealing
off any leakage from the fittings to the interior of the car.
Trunk-mounted tanks normally are equipped with an enclosure to contain any
leakage and direct it outside of the car. It is possible to retrofit a
tank with an enclosure but this may require a recertification, which could add
considerably to the cost. I did do such a thing to a trunk-mounted tank
and this turned out quite well. Sleegers Engineering did this work and
this tank will be used in Project 2 (look for this later).
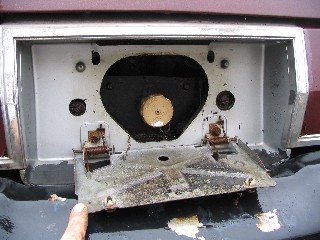 |
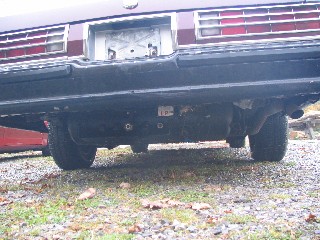
Tank Filler Nozzle. With your tank in place, you need to mount the other hardware in place.
The tank filler nozzle can be mounted in a number of positions but on this type of
vehicle, the location of the gas tank filler behind the license plate is
probably the best. |
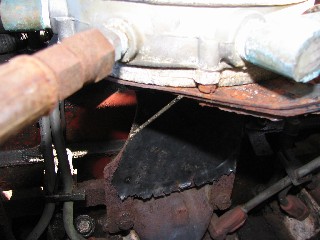
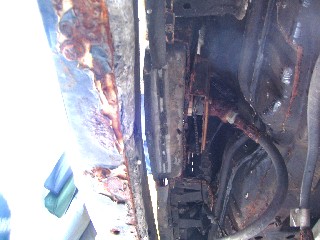 |
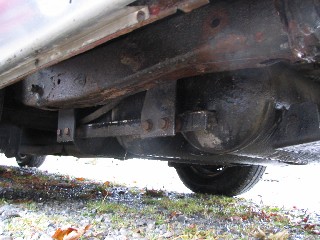
Tank filler nozzle looking up from below. The long thing
running from the top to the bottom of this picture is the rear
bumper. You can see that there is a mounting plate bolted onto an
offset bracket. As this car was used throughout Canadian winters,
there is a bit of corrosion on the connections due to road salt. |
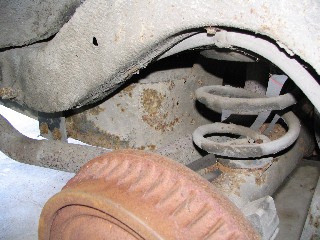 |
Tank Heat Shield. TSSA
in Ontario requires that a heat shield is placed between the tank and the
tailpipe when the clearance between the two becomes tight. |
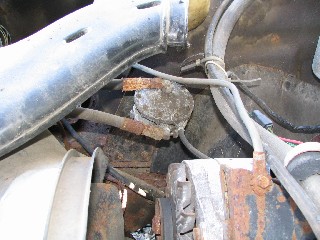 |
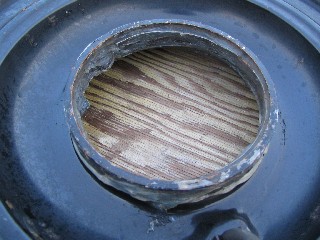
Fuel LockOff. The fuel lockoff device receives LPG from the
tank. A fuel shut off valve inside this device opens the valve with
manifold vacuum from the engine. A felt-type filter within this
device removes any contaminants that may be carried with the fuel. |
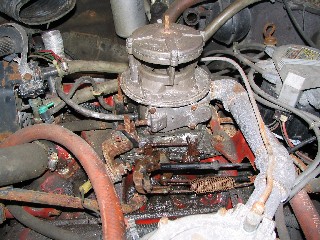 |
Impco 425 Mixer. This mixer bolts onto a Rochester
Quadrajet throttle body to become a propane carburetor. When the
Chev 350 engine first starts, it runs a bit rough so the AC throttle kicker
solenoid is used to provide a fast idle. On this car, the defroster
switch inside the car automatically starts the air conditioner to ensure
that dry air is used to clear the windshield. Turning the
defroster on when first starting the car provides the engine with a fast idle
to
help the warmup. Usually, by the time I have the snow cleared off
the car, the fast idle is no longer required for the engine to idle
smoothly. |
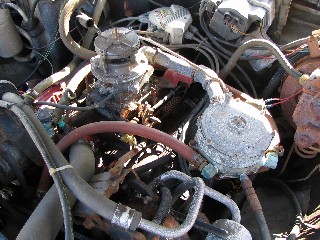 |
Mixer & Converter. Impco Model 425 mixer and Model
E converter. I installed a balance line to connect the mixer to the
converter to ensure that any restriction in the air cleaner assembly won't
affect the fuel mixture.
To ease cold starting, an enrichment valve was added to the
converter. This is the black device barely visible on the back side
of the converter with two red wires coming out of it.
|
 |
Converter Bracket. Because the converter was moved so
far away from the mixer to allow for the use of the OEM air cleaner, a
bracket was used to support the converter. The bracket was attached
with the exhaust manifold bolts.
Because the converter is installed horizontally, there is no way for
heavy ends to drain from the converter and they will have to be
periodically cleaned out. Heavy ends are the liquids that are always
present in propane fuel and appear when large amounts of fuel are
evaporated. Some respected gaseous fuel experts feel that converter
temperature has an effect on the appearance of these heavy ends.
|
 |
Converter Hoses - Converter supplied by blend. As an
experiment, I tried to supply the converter with as cool a water supply as
possible. For the summer AC operation, this car has a
vacuum-operated hot water shut-off valve to eliminate any heat from
reaching the heater core. This presents a problem for the propane
system because piping the converter water supply inline with the heater
return hose will not allow any water flow in the summer. With the propane system,
an EGR system is not required so the EGR-TVS (Exhaust Gas Recirculation - Thermal Vacuum
Switch) was eliminated and that port was used as a hot water supply.
A globe valve was installed and cracked open slightly in the summer to
always ensure water flow to the converter. |
 |
Converter Hoses - Converter supplied only by hot engine water. I
found that my fuel consumption was higher (lower fuel economy) than expected with the above
arrangement. I suspect that the fuel mixture was richer than
required because the fuel temperature was too low. I rearranged the
heater hoses so that the converter always receives hot water from the
engine from the valve mounted on the old EGR port. The water exiting
the converter returns to the water pump through the 3/4" heater
return hose and is connected with a wye. I will have do some driving
to know if this hose arrangement works as well I think it should. |
 |
Converter Water Supply. This is a brass globe valve that
is mounted on the old EGR-TVS port. In GM's infinite wisdom, the TVS
does not use NPT threads so I had to weld a NPT coupling onto the remnants
of the old switch to make an EGR-NPT adapter.
You can see the EFE-TVS (Early
Fuel Evaporation - Thermal Vacuum Switch) to the right of the converter
water supply valve. It is the green and black vacuum switch mounted
on the thermostat housing. The EFE is also known as the heat riser.
|
 |
Air Cleaner. As propane engines have more power when
supplied with air as cold as possible, the original air cleaner and intake
snorkel was reused. The 425 mixer has a 5-1/8" air cleaner base
so the OEM air cleaner fits properly. However, the air cleaner is a
low profile design so the air cleaner lid hits the top of the mixer.
A spacer was installed to raise the height of the air cleaner. To minimize the effect of carburetor icing, I reused the EFE-TVS
to control the Thermostatic Air Cleaner (TAC). Until the
engine reaches operating temperature, the heat stove on the exhaust
manifold supplies warm air to the air cleaner. When the engine
attains its operating temperature, the valve shuts off the vacuum and only cold air from the front of
the car reaches the engine.
The small green thing on the raised part of the base is the TAC sensor,
which controls the air temperature reaching the engine.
|
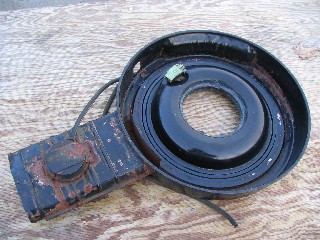
 |
Air Cleaner Spacer. Since there was no way to keep the
spacer centered on the mixer, I had to attach the spacer to the air
cleaner base. Using a bit of sheet metal, I made a ring that kept
the spacer centered under the air cleaner base. Some silicone sealer
glues the whole thing together.
Raising up the air cleaner caused the tube connecting the PCV filter on
the air cleaner to the valve cover to be too short. I had to cut the
metal tube and extend it with some hose.
|
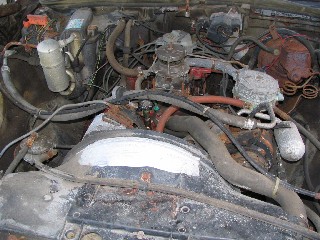 |
Engine without air cleaner. |
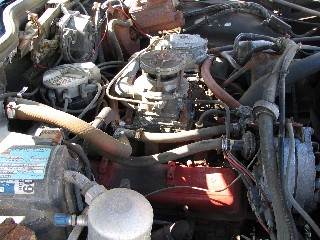
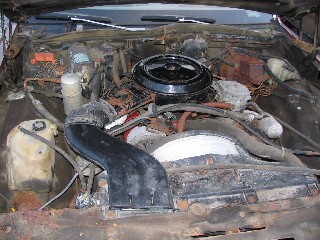 |
Engine with air cleaner. Most people would be hard
pressed to know that this is a propane engine when the hood is raised. |
If you find this project interesting and you would be interested in
doing something similar, please visit the Raso
Enterprises Alternative Energy Systems Forum. You can find other
like-minded people there who can answer your questions and give you good advice.
|


