Jmol to MPEG: a tutorial.
This page describes the procedure I follow to generate MPEG movies and animated GIFs from results of quantum chemical calculations.
Contents
- Software needed.
- Generating the *pov file
- Setting up the animation
- Generating MPEG video
- Generating an animated GIF
- Making life simpler
Software needed.
The links will take you to the homepage for the program.- Jmol, this procedure has been tested with versions 5 and 6.
- POV-Ray version 3.5. Version 3.1 might work too, but I haven't tested it.
- netpbm utilities. Specifically, ppmtogif, ppmtoquant, ppmtompeg. These come installed in RedHat 7.3
- An mpeg player. I use plaympeg (also called smpeg), partly because it comes with RedHat 7.3 and partly because, for some reason that escapes me, I cannot get satisfactory loop playback with mplayer, and xine seems to chop off the last few frames of my movies.
- gifsicle. Neat program for creating animated GIFs.
- Last, but not least, some quantum chemistry package to generate the results you want to visualize. Non-commercial (some free, some may require a nominal fee): ACESII, PSI3, GAMESS . Unfortunately, Jmol does not have a reader for PSI3 files, but it is possible to reformat some types of results into a form readable by Jmol. Commercial option: Gaussian03.
Generating the *pov file.
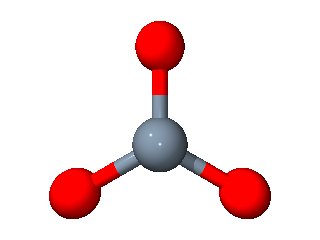
So, let's say that you want to generate a MPEG movie of a vibrational mode for the carbonate ion. After doing the calculations with some quantum chemistry package, we open the file containing the results with Jmol and we see our molecule:
Then we select File -> Export -> Render in pov-ray
We really don't need to do the rendering, we just want to generate a pov file that contains the geometry of our molecule. So, we check off the options for display while rendering and Run pov-ray directly. Clicking on "Save" generates only the pov file. Jmol will translate the molecular geometry, and put it into a basic scene adding a camera and light sources. Make sure the "Working Directory" is the one you want, otherwise it may be difficult to find the pov file.
Now we have a pov file. After opening it with your favorite text editor, we see the following declarations:
/
/******************************************************

// Jmol generated povray script.

//

// This script was generated on :

// Thu, June 19, 2003 at 10:48 AM

//

// Frame comment:SCF Done:  E(RHF) =
-262.282442230     A.U. after   12 cycles

//******************************************************


//******************************************************

// Declare the resolution, camera, and light sources.

//******************************************************


// NOTE: if you plan to render at a different resoltion,

// be sure to update the following two lines to maintain

// the correct aspect ratio.


#declare Width = 320;

#declare Height = 240;

#declare Ratio = Width / Height


#declare zoom = 2.9692285;
The specific values you see most likely will be different. If you are working with Jmol v5, the Ratio declaration is missing a semicolon at the end (just like in the example shown above). This problem has been corrected in Jmol v6. You should set the Width and Height to the resolution you want for the image.
It would be convenient to run a test render on this pov file, just to make sure everything works.
Setting up the animation.
You'll notice that the background in the previous image is white and only the molecule is present. At this point we no longer use Jmol and focus only on POV-Ray. There are a few things to take care of to work with POV. We have to define a povray.ini file, this will come in pretty handy when doing the animation. You should have a povray.ini file in your working directory with at least the following variables:
Antialias = on
Jitter = on
Initial_Frame = 0
Final_Frame = 0
Initial_Clock = 0.0
Final_Clock = 0.0
Height = 240
Width = 320
Output_File_Type=P
Library_Path= (your path to povray's include files)
The Jitter, *_Frame and *_Clock variables will take different values when we are ready to do the animation. Notice the Output_File_Type = P, specifying a ppm type file. We need ppm files to feed to the netpbm utilities later on.
You can leave the white background like that, or you could add things like a sky sphere or a checkered plane, if only to give the eye a few more reference points. In my case, I wanted to illustrate how the movement preserved symmetry elements, and that meant adding mirror planes. To make it evident that I had a mirror plane, I needed to add more reference points, thus the sky and the plane. See an example:
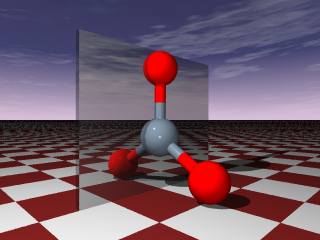
This image is in PNG format, because raytraced images generate many more colors than the GIF format can store. It is possible to generate GIF images, but you have to quantize the colormap (see "Creating an animated GIF") and then you would see color banding in the final GIF, like this:
The banding is evident mostly on the red atoms and a little bit in the sky above the horizon.
The next step is to add movement to the molecule. Remember that we are animating a vibrational mode. For this, we need the atomic x,y,z displacements calculated by our quantum chemistry package. They are usually provided in a form like this:
Frequencies -- 718.8697
Red. masses -- 15.6686
Frc consts -- 4.7707
IR Inten -- 0.4908
Raman Activ -- 0.1228
Depolar -- 0.7500
Atom AN X Y Z
1 6 0.00 0.29 0.00
2 8 0.00 0.48 0.00
3 8 -0.48 -0.35 0.00
4 8 0.48 -0.35 0.00
We only need the numbers under the X, Y and Z columns. We know that atom number 1 (the carbon atom) has a displacement of 0.29 Bohr along the Y axis in this vibrational mode. So the first thing we do is open our pov file, locate the carbon atom coordinates, and add that displacement to the y coordinate:
/***********************************************

// List of all of the atoms

//***********************************************


make_C_atom( 0.0, -0.3+(SineTime*0.153), 0.0)

[snip,snip]
Do not forget that Jmol exports distances in angstroms, but the displacements are in Bohr, so we need to convert the units. You can see that 0.29 Bohr = 0.153 Angstrom. We do the same for all the coordinates for all the atoms. But... hold it! What is this "SineTime" factor that multiplies the displacement? This is actually the heart of the animation. POV-Ray defines a "clock" variable to do animations. For more details, see the POV-Ray manual.
To animate things, we need to couple the change in coordinates to the clock variable so we have a full displacement in one clock cycle. The way I do this is by defining SineTime:
#declare SineTime = sin(clock*2*3.141592);
This way, the displacement is applied gradually in a cyclic fashion, and the end point is the same as the starting point, yielding a smooth movement.
Now, to produce the frames for animation, we need to change a few things in the povray.ini file:
Antialias = on

Jitter = off

Initial_Frame = 0

Final_Frame = 30

Initial_Clock = 0.0

Final_Clock = 1.0
Of course, the number of frames is your choice. Notice the assignment "Jitter = off". This is to avoid an annoying effect due to part of the antialiasing process. See the POV-Ray manual for details.
After running povray <pov filename>, we end up with 30 ppm files that we want to put together as a MPEG video or an animated GIF. It is a good thing that POV-Ray generates the filenames automatically, by appending the frame number to the input file name. So, if my pov file is named 718.pov, POV-Ray generates 31 files named 71800.ppm to 71830.ppm
Generating MPEG video.
To generate the MPEG video, we need ppmtompeg. Use of ppmtompeg is fairly complex, because it requires a parameter file that defines the frames to take, how to encode them and a bunch of (to me) esoteric algorithms for video processing. After some net surfing and trial and error I defined my parameters file as follows:
PATTERN IBBPBBPBBPI

FORCE_ENCODE_LAST_FRAME

OUTPUT 718.mpg

INPUT_DIR .

INPUT

718*.ppm [00-30]

END_INPUT

BASE_FILE_FORMAT PNM

INPUT_CONVERT *

GOP_SIZE 5

PIXEL HALF

IQSCALE 10

PQSCALE 10

BQSCALE 10

RANGE 2

PSEARCH_ALG LOGARITHMIC

SLICES_PER_FRAME 10

BSEARCH_ALG SIMPLE

REFERENCE_FRAME DECODED

ASPECT_RATIO 1.0

FRAME_RATE 29.97

BUFFER_SIZE 20
You can copy and paste the previous code into a *.par file. Do not leave a blank line at the beginning of the file. I usually name the file "anim.par" for all my animations, and the only things I have to change are the value of OUTPUT, and the line after INPUT. 718*.ppm [00-30] means "take all the files from 71800.ppm to 71830.ppm for making the video". BASE_FILE_FORMAT is PNM, because PPM is a subset of PNM. You may also consider altering FRAME_RATE.
Checklist
Now, let's see a checklist before we attempt to make the video:
- Calculate vibrational modes with a quantum chemistry package.
- Read your molecule with Jmol and export a *pov file.
- Open the *pov file, add the declaration for SineTime and the displacements for the atoms generated by the quantum chemistry program.
- Define your povray.ini file to include Initial_Frame, Final_Frame, Initial_Clock, Final_Clock and Jitter=off and the other things specified previously.
- Run povray to generate the images in PPM format.
- Define your anim.par file to specify the images for the video frames.
- Run ppmtompeg
There you have it. Now you should have a nice *mpg file.
Generating an animated GIF.
Let's assume that we have all the ppm files generated by POV-Ray and we want to make an animated GIF. The first thing we need to do is reduce the number of colors present in the colormap for the image. GIF images can store up to 256 colors, but raytraced images can easily generate thousands of colors (POV-Ray uses 24-bit color depth, so it has a maximum of 16,777,216 colors). Reduction of the number of colors is also called "quantization" of the colormap. We use "ppmquant" to accomplish this and the command line is as follows:
ppmquant 256 infile.ppm > outfile.ppm]
the output file will be a ppm file with 256 colors, at most. Then using ppmtogif will translate the quantized ppm images to GIFs:
ppmtogif infile.ppm > outfile.gif
and finally, gifsicle puts all the GIFs together in an animated GIF:
gifsicle --loopcount --colors 256 infile*.gif > outfile.gif
Making life simpler.
To make my life simpler, I wrote a little shell script (named "makeanim"), that simplifies things considerably:
#!

povray filename.pov
ppmtompeg anim.parforeach i ( 01 02 03 04 05 06 07 08 09 10 11 12 13 14 15 16 17 18
19 20 21 22 23 24 25 26 27 28 29 30)
ppmquant 256 filename$i.ppm > temp$i.ppm
ppmtogif temp$i.ppm > filename$i.gif
end
gifsicle --loopcount --colors 256 filename*.gif > output.gif
rm temp*.ppm
rm filename*.gif
rm filename*.ppmBack to my homepage
Page maintained by Victor M. Rosas-Garcia
Last update: 30/Sep/2005
Page created on: 19/Jun/2003