| Procedure: 1. You will need to raise one side of the car on jack stands to allow better access to the bolts and make for an easier install. Which end you start at depends on you, but I went from Point 1 to Point 7. |
| 2. Point 1 is directly behind the front tire at the end of the curve towards the engine. It�s hard to see the bolt but it�s there. Remove the bolt and washer and install the bolt and new pink bushing with no washer and tighten to specs. |
| 3. Point 2 is a foot down from Point 1 right at the elbow of the frame. Remove the washer and bolt and install the bolt and new pink bushing with no washer and tighten to specs. |
| 4. Point 3 is a little harder to spot because the hole isn�t as large as the others.(Figure 1) It is in the middle between the doors. You can actually look around the edge of the frame to see the bolt. Remove the bolt and washer and replace with a new pink bushing and no washer and tighten to specs. |
| 5. Point 4 is right in front of the rear tire. Remove the bolt and old bushing and reinstall with a new pink bushing and tighten to specs. |
| 6. Point 5 is above the rear tire in the bend but requires no lower bushing. You may not be able to see it. I wasn�t able to. 7. Point 6 is behind the rear tire. Remove the bolt and old bushing and replace with a new pink bushing and tighten to specs. 8. Point 7 is at the end of the frame. Remove the bolt and old bushing and replace with a new GREEN bushing and tighten to specs. 9. After finishing one side, move the jack stands to the other side and repeat procedure. |
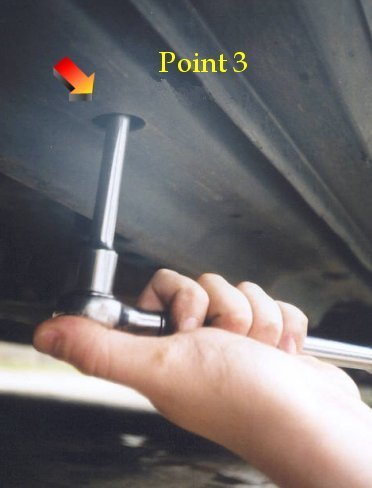 |
| Figure 1 |
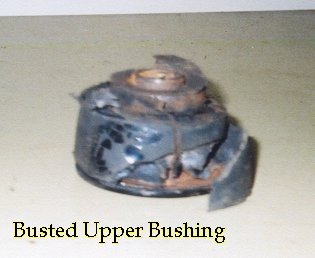
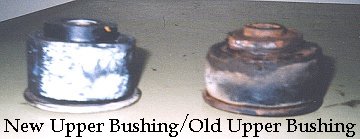
| The whole procedure takes around an hour. Mine took longer because I replaced 2 upper bushings at Point 7. See Figures 2 & 3 for my busted one and new/old comparison. If you are planning on replacing any of the upper bushings. Think again unless you have big lift because simply removing the bolts and jacking up the body DOES NOT work. There are too many connections at other places to lift it all at the same time. I had to remove all the bolts and pry the end up enough to �slip� the old ones out and the new ones in. The modification is the best money I have spent on suspension. It mainly removed some squeaking I had and prevents �nose-diving� into curves and gives the car an overall �tight� feel. It also helped remove the clunky feeling the car had when hitting a bump. The difference is very noticeable and well worth it. Thanks Scott!! Please email me and let me know if I missed anything or how it helped you. Thanks for reading. Good Luck and Happy Hauling!! Karl D. Frost Millbrook, AL 1995 BBB Impala SS [email protected] �QaloSS� � N.A.I.S.S.O. Forum �QaloSS�- Impala SS Forum |

|
 |
 |
| Figure 2 |
| Figure 3 |