| Lower Body Bushing Install I referenced Scott Mueller�s website at http://www.theherd.com/articles/bushings.html for most of this information. Read his site for more information on the reason why this mod is needed. I heard about this modification many times before I decided to do it. The one thing I found out was that I should have done it earlier! After calling Dal Slabaugh to get the parts I needed I checked around and gathered all the information I needed to get it done. I have always been mechanically inclined but this procedure is even easy for someone is isn�t. To begin you need the proper parts. The pink bushings you will need are slightly thicker than the stock ones (Figure 2)to allow a better cushion to the frame with the exception of the Green ones (Figure 3) which fit better at Point 7.. There are 14 total points on the frame but Point 5 requires no lower bushings so you will only need 12 total bushings; 10 pink, 2 green. People have mentioned the need for different bolts for position three. The stock ones are fine and you will not need new ones unless your old ones have deteriorated or rusted or you are replacing the upper bushings as well from the 9C1 package. Part Number Description Price 377801 Stock 5/8� thick soft rubber (Black) $7.16 457917 New 3/4� thick firm rubber (Dk Green) $4.24 457915 New 7/8� thick firm rubber (Pink) $5.41 You will need ( 10 ) of the Pink ones (p/n 457915) and ( 2 ) of the Green ones (p/n 457917). Total price should be around $ 62.58 from Dal. There may be somewhere else you can get them cheaper, but if not I suggest getting them from Dal |
| Tools you will need: 15 mm socket wrench w/ 6-inch extension. Torque wrench. (optional) Breaker bar or pipe to slip over you wrench to help break the bolts loose Car jack and jack stands (optional). And of course, your bushings |
| Notes: Points 1-3 do not have any lower bushings, only a washer and bolt. You will not need to use this washer with the new bushings. When installing the bushings from Points 1-4 be sure not to catch any wires or cables. Points 4-7 (minus Point 5) will have the old bushing and bolt with no washer, simply discard the old bushing and re-install a new one. Points 1,2,3,4, & 6 use the pink bushings, and Point 7 uses the green ones. All Points have a large opening in the frame (Figure 1)with the exception of Point 3 that has a small hole to insert your socket wrench.(See in Procedure) When installing the bushings, the cupped end goes against the frame. Each bushing has a washer inside it on the flat end. The bolt head should go against it. Torque the bolts to 30 ft/lbs. I agree with Scott rather than the factory 50 ft/lbs. When removing the bolts, Use a breaker bar or pipe to slip over your wrench. I broke my Craftsman socket and could see the wrench bending removing mine. When installing the new bushings, the bushing will not sit snug against the frame. The upper bushing fits into the lower bushing with metal tube with rubber around it so there will be a small gap between the lip and the frame so don�t get mad or keep tightening the bolt thinking they will or you�ll strip the hole. |
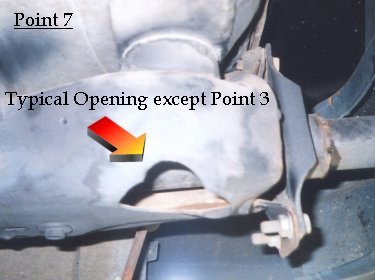 |
| Figure 1 |
 |
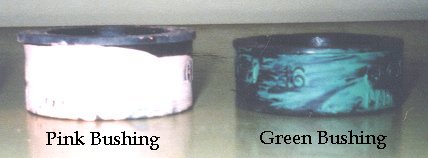 |
| Figure 2 |
| Figure 3 |

|