| d) Fans & Relays |
| Through the years technology has improved the cooling system components. On area is the change from pusher fans (blowing air into the front of the radiator) to sucker fans (pulling air through the radiator). The stock fans and their shroud are not as efficient as they could be. The cross-sectional area of a radiator is 25� wide by about 15.5� tall or 387.5 square inches total. The stock fans are about 12� inches in diameter including the shroud, and cover about 75 square inches, or just 20% of the total surface area of the radiator. I recently upgraded to dual sucker fans. The full shroud (covers 100% of the radiator face area) ensures the fans pull air through the core, versus around the core. These 12� fans draw no more current at peak use (start) than the stock fans did. They are rated at 2,000 CFM total, more than double (Triple ?) the stock fans. More airflow suggests more efficient use of the radiator. |
| According to SPAL, the difference in efficiency between pushers and suckers is slight. Their fans are designed specifically to push or suck. Some others are �reversible� and may not be optimized for pushing. Also, a shroud can help efficiency, but only if designed properly and the effect may not be that dramatic. For a given CFM fan, if the shroud doubled the effective area, the velocity of the air would be about 1/2 (not quite since the resistance will be lower due to the slower speed, the CFM actually moved would increase). Since the heat transfer rate is roughly linear with air speed, it�s almost a wash. A properly designed fan shroud can increase the fan efficiency by getting the fan blades away from the radiator for one, and, of course, shrouds will lower high-speed efficiency by restricting flow. |
| It is worth checking that the fans are blowing in the right direction. One of mine was backward and I was sure I�d hooked them up right. There were several ways the factory wired the fans. In some cases relays were not used to isolate the switch(es), and over time the switch built up resistance, limiting the power actually supplying the fans. I have seen stock fans spinning much less when wired this way. You can test this situation by adding a power wire from the battery (+) to the fan directly. If it speeds up, your wiring is limiting the fan�s ability. On the early cars, one fan was controlled by the thermostat in the radiator, and the second fan was manually controlled by the bottom switch on the console. Later cars had both fans activated by thermostats in the radiator. In the 1971/1972 electrical wiring diagram, one thermostat was set to trigger at 158 degrees, the other at 192 degrees. When the second thermostat activates, the fan light in the speedometer would also illuminate. The fan light could be wired to come on when the first fan runs, or when the second fan is activated. |
 |
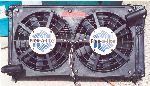 |
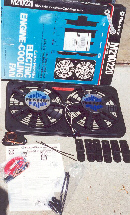
| Here you see the Flex-a-Lite dual sucker fans as delivered. Note the zip tie looking fasteners at the bottom. DO NOT use these. Several people have experienced these zip ties sawing through the core with normal car vibration. In the next image the fan shroud assembly has been mounted onto my radiator by studs that have been welded to the radiator frame. |
| This fan system can be installed behind the (stock) radiator in the original position, or one can choose to lay forward the radiator to gain additional clearance. To the far right is the radiator of Bill Santos, in the stock (vertical) position, and also a radiator in the lay forward position. |
 |
 |
| Upgrading to dual sucker fans is a common modification, and of all the methods, I currently favor this one as one of the more effective modifications for the money. |
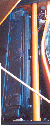
| A final note: Insure that airflow to the radiator is not blocked, and the triangle panels (which do not appear in the parts books) mounted on the side of the radiator that direct air thru the radiator and not around the sides are in place. |
| airdeflectorsc.jpg |