


![]()


|
I can’t tell you how many star wars nerds are out there. I am not one of them, and this light saber trick is one of the oldest, easiest and most well known special effect out there most any video paint program can handle. Yet so far, no one has written one for Discreet Combustion 3, so here is my own. I hope it serves you well. You will need the actors to have dummy sabers. Combustion can produce some very shocking results with the right tinkering, in my opinion, the best program for saber fights, since it has every tool you could possibly want in one program. |
|
1. Open combustion, and go FILE->Open and navigate to the video file you wish to add your light sabers to. Double click it, and when combustion asks to open as, click “Composite 2D”. |
|
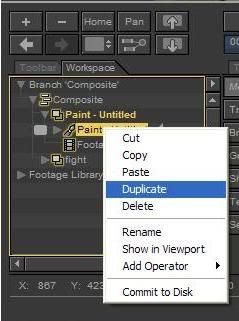
2. Once you have opened the video file, it should be sitting under “Composite” in the workspace. For the sake of this, mine is named “Fight.avi”. Right click the video file, and go to Paint. See figure 1. |


|
3. Combustion will give you a confirmation box. Make sure you have transparent checked. This is very important. |
|
Figure 1 |
 width=318 height=335 src="combustiontutorial1_files/image005.jpg" v:shapes="_x0000_s1050">
width=616 height=284 src="combustiontutorial1_files/image007.jpg" v:shapes="_x0000_s1051">
width=318 height=335 src="combustiontutorial1_files/image005.jpg" v:shapes="_x0000_s1050">
width=616 height=284 src="combustiontutorial1_files/image007.jpg" v:shapes="_x0000_s1051">
|
4. If done correctly, our composition now displays a black screen. Don’t worry, this is what we want. Also, paint MUST be above Fight.avi, but below composite. It WILL NOT work any other way. Now, expand “Paint– Untitled” and click footage. Go to Footage Controls and click the box that says “Solid”. Select Main, and browse to the same fight file that we loaded before. Also, see the box that says “End Frame”? Slide that all the way to the end. Otherwise, the paint will only show until the frame number in that box. |
|
5. After selecting our fight scene in the paint operator, we are ready to rotoscope. Be prepared, this process SUCKS. It will take you many hours for a few minutes of footage. First, go to paint controls, then Settings. This is crucial, change the duration from current frame to end, to 1 Frame. Also, select a round brush. For testing purposes I used square, and select white as our color. For a better glow, use a brush that is far larger than your fake saber. We will shrink it later on. |
|
6. Click Toolbar, which is right next to workspace Select the line tool. Now the boring part begins. Go get some pop, que up winamp or your iPod, its going to be awhile. Draw over your prop saber. If the prop saber blurs, fill the whole thing in with other lines. After you’ve completed a frame, press PAGEDOWN. PAGEDOWN/PAGEUP will advance you 1 frame forward or backward. This will save you time moving the mouse to the forward/backward frame buttons. If you have a graphics tablet, this will be 10x easier. Also, after about 500 or so frames, combustion may begin to lag Make sure you get every frame, press page up/down a few time and be sure all frames are covered. NOTE: ONLY DO ONE CHARACTERS SABER AT A TIME. In this scene, we are only doing our Obi character first. If you do both characters at once, they will end up having the same colored sabers, and well for this scene, that’s just not right. |
 width=576 height=431 src="combustiontutorial1_files/image011.jpg" v:shapes="_x0000_s1056">
|
7. Many hours later, you should arrive at this step. Its all downhill now. Right click our paint operator, and select “Duplicate” |
 width=239 height=321 src="combustiontutorial1_files/image012.jpg" v:shapes="_x0000_s1058">
|
8. Remember step 4? Yea, well, go back and reverse it. You should now have a black screen, with your white saber blade. *MULTIMONITOR USERS SKIP THIS STEP* 9. Now, see the box under the word “Pan”? For those of you not running dual monitors, this button will give you 2 views. A view of what your working on, and the final output. Click it. |
|
10. You can see the light at the end of the tunnel with this step. You should now expand the paint untitled, and see Paint and Paint(2). Expand paint(2). You will have a ton of lines drawn. Take your mouse, click, and drag a selection box around the lines. Most computers WILL FREEZE/CRASH if you try to do too many. This can cripple a dual G5 in a second. So, simply, select about 100 lines, or 50 to be on the safe side. Combustion will draw and outline box around every line. Give it some time. Once its done thinking, and while your lines are highlighted, click Modes, then change the color to your desired color. For simplicity sake I used blue. Once done, go back, and highlight 100 more lines. Do so until you’ve changed ALL of them to blue. |
|
11. Once you’ve duplicated the paint and turned it blue, its time to make it glow. Expand your paint operator, and rearrange it, so that Paint untitled is above paint(2). Right click on Paint (2) and select Operators->Blur/Sharpen->Gaussian blur. Change the level of Gaussian blur very slightly. Your saber should slightly glow, but this is not good enough is it? So, duplicate Paint (2) about 2 more times, and add Gaussian blurs to both. |
 width=688 height=258 src="combustiontutorial1_files/image016.jpg" v:shapes="_x0000_s1063">
|
12. Now, go back, expand your original paint operator, select all the lines (the every 100 or so method) and change the brush size to about 4 or 5 sizes larger than what you used. This causes the white line to be slightly smaller and the blur to have a better effect on the beam. Alternatively, we will do this the other way. Also, you can use a box blur, which in my opinion produces just as good, if not a better effect. CONGRATULATIONS you made the first saber. Now we get to repeat this process for the other guys in the fight. To make things easier, turn off all the blue and white paint operators we just worked on. Go back and create another paint layer (for simplicity sake) and start all over again. Repeat the process, only change the color in step 10 to what you want. |

