|
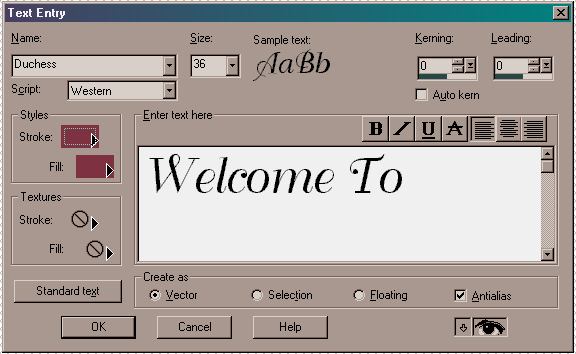
Now We Need To Add Our Text. Click on your Text Tool and Choose A Font That You Like. I used the Duchess Font, but if you don't have that one you can use any font that you want to. Remember, putting our own touches on an image are what makes it our own!
Make Sure That Your Stroke and Fill Options are on Solid Color. Your Font Size Needs To Be 36 and the Color That We're Using for our font is #7E3141. Kerning and Leading should both be 0. Click on the Vector Button because we want to be able to Resize this as Shown Below in Screenshot 10. Type In Welcome To.
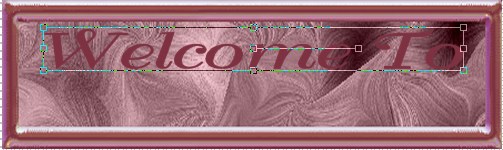
Ok, Now We've Typed In Our Text. While It Is Still Selected, Move Your Curor Over It Until You See The Mover Arrows. Move The Text To The Upper Center Of Our Image. Leave Selected. While It Is Still Selected, We Are Going To Resize Our Text. Our Image Should Now Look Like The One Below.
Now, Right Click To Deselect The Text. Go To Your Layer Palette and Right Click on the New Layer. Go Down The Menu Until You Select Convert To Raster Layer and Left Click on Your Mouse.
Now Go To Effects/3D Effects/Drop Shadow. Set Vertical And Horizontal To 1, Opacity 100, and Blur 3. Click on the Color Tab and Change Your Color To #7E3141. Click OK on Your Color Palette and Then Click OK On Your Drop Shadow Screen.
Go To File/Save.
Now We Are Going To Add Our Next Line Of Text Using Exactly The Same Settings As Above in Screenshot 9, except we are going to change our Text to My Home. Click OK.
While The Text is Still Selected, Resize and Center Your Text Until It Looks Like What Is Shown Below in Screenshot 11.

Now, convert that Layer To a Raster Layer exactly like we did with the First Text Layer and Add a Drop Shadow with The Same Settings That We Used Above.
Go To File Save...we do not want to lose all of the work we've done thus far.
Now, Click on your First Text Layer and Make Sure It Is Selected. Go To Effects/3D Effects/Inner Bevel and Use The Settings Shown Below in Screenshot 12.
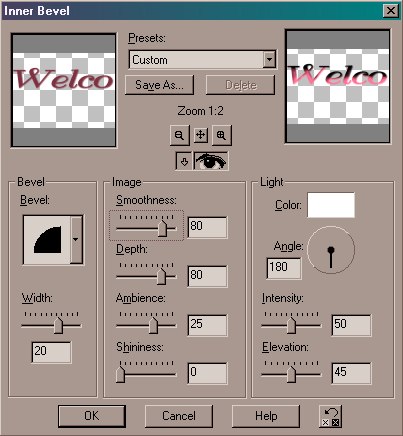
Click on your Second Text Layer to Select it and Apply An Inner Belvel Using The Same Settings as in Screenshot 12.
This is How Our Button Should Look Now.

Now, Go To Layers/Merge/Merge All (Flatten) and then Save.
Now We Have Our Welcome Button, but We Need To Add Our Stars.
Now, We Have Added Our Text To Our Welcome Tag....to Continue to Part 3 of Our Tutorial Click The Next Link Below.
Next
|
|