|
Click on your Picture Tube Tool.

Find your Sparkle White Tube that We Downloaded Earlier. Set Scale to 40 and Step to 200.
Make A New Layer and Name It Star1.
Put A Star On Your Button at The Upper Lefthand Corner of Your W as Shown In Screenshot 14 Below.

Now, Go To Your Layer Palette and Right Click On Your Star1 Layer. Select Duplicate Layer With Your Left Mouse Button. Your Star Should Appear Brighter Than It Was Before.
Click on your Mover Tool and Move The Star Across Your Button to the Upper Right Hand Side of Your O as Shown In Screenshot 15 Below and Rename This Layer Star2.

Duplicate your Star2 Layer and Click on Your Mover Tool Again and Move This Star To the Lower Left Corner of Your M on the Word My as Shown In Screenshot 16 Below and Rename This Layer Star3.

Duplicate your Star3 Layer and Click on Your Mover Tool and Move This Star To the Lower Left Corner of your E on the end of the Word Home as Shown in Screenshot 17 Below. Rename This Layer Star4.

Save What We Have Now.
Ok, Now We Have All Of Our Stars Layers Finished. Now we Are Going To Alternate The Dimness And Brightness of these Layers.
First Though, we need to make a copy of the Image We Have Now. Hit Your Shift and D Buttons At The Same Time To Make A Copy of This Image.
After You Make The Copy of Your Image, Go Back to Your TwinklingStars1.psp Image.
Go To Your Layers Palette Again. We Are Going To Change The Opacity of Each of the Star Layers.
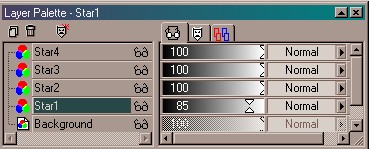
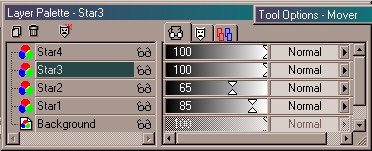
Leave Your Star1 Layer Opacity Set At 100.
Click On Your Star2 Layer To Select It. Now, Click on The Hourglass Icon and Slide It Left Until You Reach 75 as Shown In Screenshot 18 Below.
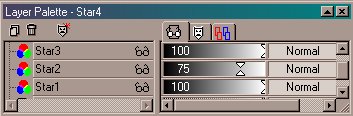
Select your Star3 Layer and Click on the Hourglass Icon and Slide It Left Until You Reach 65 as Shown In Screenshot 19 Below.
Select your Star4 Layer and Click on the Hourglass Icon and Slide It Left Until You Reach 85 as Shown In Screenshot 20 Below.

Ok, Now We Have The Layer Opacity for Our Star Layers Finished on Our First Image. Go to File/Save. Go To Layers/Merge/Merge Visible. Make Sure That You Do Not Click On Layers/Merge/Merge All (Flatten), if you do our animation will not work, if by chance you accidentily do, just go to Edit and Click Undo Merge Layers. Minimize This Image, But Leave It Open.
Now, go to the Copy of Our TwinklingStars1.psp Image and make Sure It's Active. What We Need To Do On This Image Is Alternate The Star Layers So That They Are the Opposite Amount of Opacity that They Are In Our TwinklingStars1.psp Image.
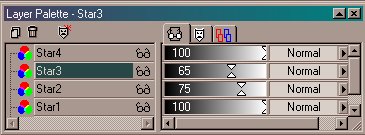
Select Your Star1 Layer and Click on the Hourglass Icon and Slide It Left Until You Reach 85 as Shown Below.
Now Select Your Star2 Layer and Click on the Hourglass Icon and Slide It Left Until You Reach 65 As Shown Below.
Now Select Your Star3 Layer and Click on the Hourglass Icon and Slide It Left Until You Reach 75 As Shown Below.
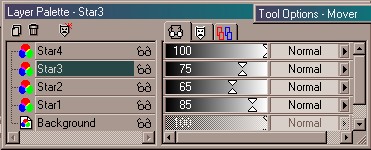
Leave Your Star4 Layer at 100
Now, Go To Merge/Merge Visible Like We Did With Our TwinklingStars1.psp Image and Then Save This Image As TwinklingStars2.psp.
Now, We Have Added Our Stars To Our Welcome Tag....to Continue to Part 4 of Our Tutorial Click The Next Link Below.
Next
|
|