
globs of epoxy on handles are required for proper operation
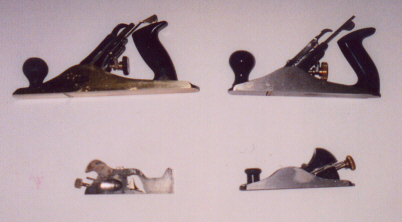
Planes
Glued lap boatbuilding is a lot about using planes, since to really get things tight, the plank �lands� have to be beveled to fit together to look good and for a decent glue joint.
I like to plane. (If you don�t, you�d better take up a hobby other than boatbuilding.) It�s physical, you can see the planks changing shape before your eyes, and it makes your shop smell great.
Most people who do a little woodworking have a �jack plane� (Number 5) and maybe a block plane. I suppose you should buy the best you can afford,(and you can spend hundreds of dollars) but once you get past Home Depot and Wal-Mart junk into Stanley�s and Record�s, (about $60, less for a block plane) the quality is fine for glued-lapping.
I seriously considered getting a fancy Lie-Nielsen or Veritas block plane to build Wee Rob. But I didn�t want to stretch the budget, and my old, beat-up Stanley takes an edge better than any plane I�ve ever used, and did yeoman labor on this job. My big plane (an AMT and a very good plane) had a bent adjustment piece that I couldn�t fix, so I bought a Stanley from Garrett Wade company for the heavier work. I went with a Number 4, one size smaller than a standard plane, and that worked great. Unless you are pretty well muscled to begin with, holding a heavy plane at about head-level for long periods (so you can see the bevels) is pretty tiring and leads to mistakes. They even sell number 3 planes, which for a dedicated glued-lap builder would be the way to go.
I think having a rabbet plane of some sort to get into tight places and smooth up gains is also handy, but not essential. Mine is a Stanley 92, and there are many others in the tool catalogs.
Sharpening
I took a class at WoodenBoat School that required some in-home woodworking experience. It was pretty amusing to watch people bring in 10-year-old planes that had probably been used dozens of times but had never been sharpened. One fellow had a special tool chest full of every Record plane ever made, lined with velvet, and all of them dull as a bowling ball. Our instructor John Brooks chewed him up and spit him out the first day.
There is too much fancy crap about sharpening in the tool catalogs that are trying to sell you a �system.� I use a slow speed grinder made in China that cost $59, a Veritas angle jig and a combination water stone (500 and 1000 grit, I think) that�s sold by every catalog. John uses a little oilstone that came over on the Mayflower. Slow speed in a grinder is important, since a high-speed grinder will wreck the blade�s temper. If you don�t want to invest in a grinder, have your plane irons and chisels hollow ground by a pro, then keep them sharp on the stone. The hollow that�s ground in will last through a small project easily.
The secret is not the system, it�s using it. I sharpen twice for every land. Just keep the stone handy in a plastic container of water, and when you need to change a CD or take a sip of something, sharpen up. It makes the job much easier, and keeps your plane from chewing up the edges of some very expensive wood. I am a slow, non-fluid planer compared to the artists such as John, but with a sharp plane and a long stoke I can feel the bevels �roll� as they change up and down the boat. You simply can�t do that when hacking off the lands in choppy strokes with a dull plane.
Cutting Out Planks
If you are laying out planks directly from plans using a batten, I think cutting out planks with a router and a flush-cutting bit (I use a 1/4 �inch spiral bit that makes the sawdust fall downwards) is absolutely the way to go for planking 6 mil and over. Nail the batten to the plank stock, flip over, route, and that�s it. You have a beautiful, crisp line with no further planing necessary.
The 4 mil used for Wee Rob was just too jittery to do that, however, since there wasn�t enough material to hold the batten tightly, and the router would just chatter everything loose. Also, if you are using patterns for planks, nailing on a batten is an extra step. So I switched to a jigsaw and had an awful lot of work to do to plane and sand down to the proper line and obtain a fair curve (a tedious section on �fair curves� follows). This boat has 14 planks, so I had to find a better way. I grabbed my battery-powered DeWalt 3 1/2-inch circular cutoff saw and did some tests, then a plank, not knowing whether it would cut a curve properly.
Heaven opened up and the angels sang! The saw wanted to follow the line and was extremely stable and chatter free. There was no cord in the way and I had no trouble with the gentle planking curves. The price on these has really come down (mid $70s) and it is a handy tool to have around. I would never build another boat without one.
Other Tools
I think you have to have two battery-powered electric drills, one with a bit and the other with a driver, available at all times if you are going to build a boat by yourself. There are simply going to be times when a piece of wood has to bend in a half-dozen ways in three places and slippery, icky epoxy is getting all over everything. Tossing in a self-tapping screw or two � or six � to hold things together until gravity stops trying to ruin your boat is essential. Changing from a drill bit to a driver would require the fourth hand that you need when you are already one short, so having two drill/drivers ready to go really works � even if your drilling drill is a $19.95 Wal-Mart special with a cord.
You can be absolutely fastidious about epoxy clean-up while building (I am usually not, since it�s late and I want to get to bed), and still end up with globules of �frozen snot� all over your boat. You can�t sand them out or they will still be there, but your plywood veneers will be gone. If you are as clumsy as I am, a scraper or chisel is dangerous to have around expensive wood. So I ended up putting a rotary rasp into a Dremel tool, and ground away. By the time you get done, you will be skilled enough to do dentistry at the veterinary level, but it�s effective and much more pleasant than scraping. Again, these are getting mighty cheap compared to past years, and are useful to have for all kinds of little jobs.
A Japanese saw cuts through 4 mil plywood like butter, is extremely accurate because it cuts on the �pull� stroke and is useful for little jobs (cutting off the plank ends, fitting floors) where a power tool is overkill. If you live in a place without electricity, such as the Northeastern United States, you could cut out the planks with one of these if you had to.