|
|
|
|

|
This site will no longer be updated, please visit http://pixel-tickler.com instead. |
|
|
||||||||||||||||||||||||||||||||
|
||||||||||||||||||||||||||||||||
|
Complete my snowflake tutorial first, but don't add a background of any sort. Minimize for later use. |
||||||||||||||||||||||||||||||||
|
|
||||||||||||||||||||||||||||||||
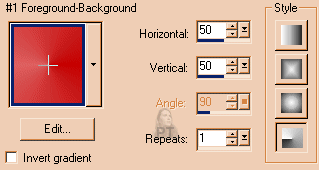
| Step 1: Set your foreground color to #C00000 and your background color to #DD6161. Open a new image 500 x 500 pixels, background transparent. | ||||||||||||||||||||||||||||||||
|
||||||||||||||||||||||||||||||||
|
|
||||||||||||||||||||||||||||||||
|
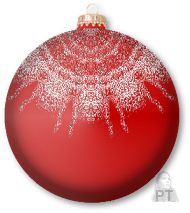
Figure 1 |
||||||||||||||||||||||||||||||||
|
||||||||||||||||||||||||||||||||
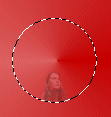
| Step 3: Go to effects/ geometric effects/ circle. Resize layer 50%. The resize all layers should NOT be checked, but the maintain aspect ratio should. Do not sharpen if you are in the habit of doing so after resizing. Use the mover tool to slide your orb down a few pixels, but not all the way to the bottom. | ||||||||||||||||||||||||||||||||
| Step 4: Use the magic wand with the all opaque setting, no feathering to select all pixels. Next, go to selections, modify, expand by 1. Save to alpha channel by going to selections/Save to alpha channel (Selections/Save to alpha channel) Hit the okay button and name this selection orb. Now go to selections/modify/feather at 20 and save to alpha channel. Name this selection feathered orb. Deselect. | ||||||||||||||||||||||||||||||||
|
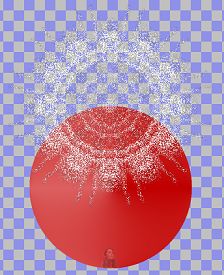
Step 5: If you want a different colored ball, now is the time to change it. Go to colors/ Colorize and adjust the hue and saturation. You can also adjust the brightness and contrast to make a deeper or lighter shade of the color you have chosen. Step 6: Go back to your snowflake
image, copy and paste it as a |
|
|||||||||||||||||||||||||||||||
| Figure 3 | ||||||||||||||||||||||||||||||||
|
||||||||||||||||||||||||||||||||
| Figure 4 | ||||||||||||||||||||||||||||||||
|
||||||||||||||||||||||||||||||||
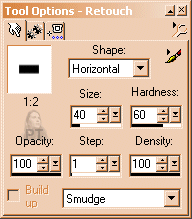
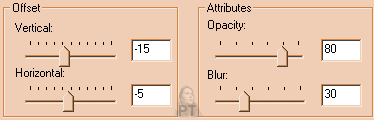
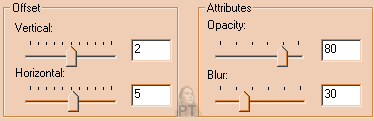
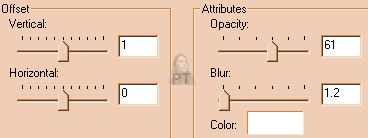
| Step 9: Add 2 new layers. Load the feathered orb selection from the alpha channel. You will be applying cutout effects on both of these layers. On one layer use the settings as shown in figure 6 and on the other, the settings from figure 7. | ||||||||||||||||||||||||||||||||
|
|
||||||||||||||||||||||||||||||||
| Figure 6 | ||||||||||||||||||||||||||||||||
|
||||||||||||||||||||||||||||||||
| Figure 7 | ||||||||||||||||||||||||||||||||
| Go to your layers palette and hide the layer containing the merged orb. Now make certain that you have one of the cutout layers selected and merge visible. I know this looks kind of strange at this point, but we're getting ready to fix that. Return to the load from alpha channel and select the orb selection. Invert and hit your delete key. Now deselect. | ||||||||||||||||||||||||||||||||
|
||||||||||||||||||||||||||||||||
 |
||||||||||||||||||||||||||||||||
| Updated 02/06/02 | |||
| Copyright ©
1999-2002 All rights reserved. All graphics on this site are property of Pixel-Tickler and are protected under US and International copyright laws and may NOT be copied, stored or offered for sale without written permission from the owner unless so stated otherwise. PSP tutorial groups may use these tutorials as part of their weekly lessons. If you have any questions regarding the content or images used on this site, drop me a note at news://news.annexcafe.com/annexcafe.psp.tutorials. I browse there regularly. |
|||

 of your orb as you can. Now
slide your mouse up just a few notches to create your stem. Slide the remnants of your
snowflake back the upper edges of your orb and merge visible.
of your orb as you can. Now
slide your mouse up just a few notches to create your stem. Slide the remnants of your
snowflake back the upper edges of your orb and merge visible.