The Sorceror's Garden
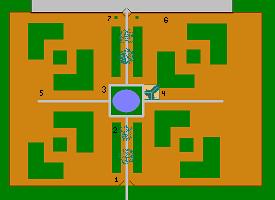
Area One - The Garden
Graph For #2
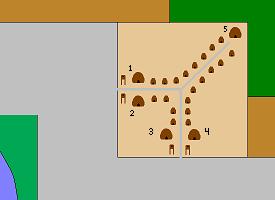
Area Two - Fey Town
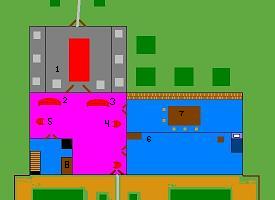
Area Three - 1st Floor House
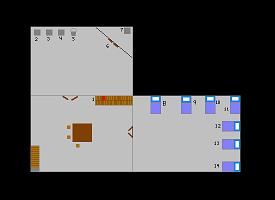
Area Four - Basement of House
Starting Out
Your players are walking through the woods when they notice a small cosy cottage off in the distance. Upon getting closer to it they notice three small kobolds (typical Monster Manual Stats) which quickly throw their javelins at them and run into the house locking the door behind them.
By this time the players most likely want to get at these little goblinoids and extract some justice for any injury they may have attained and they will probably attempt entry through the front door only to find it locked. Now the door is of pretty thick oak and would be difficult to break down. Not only that, the lock seems to be of exelent quality (Open Lock DC: 30) and even the most expiranced 1st level rogues would have difficulty picking it. If perchance they do find their way in they will have to deal with the two animated suits of armor guarding the enterance and another locked (Open Lock DC: 35) stone door.
Animated Armor Stats are as medium-sized animated object in Monster Manual.
At this point they should be looking for another way in. If not have a Kobold throw a javelin at them from the roof to get their attention. After circleing the house and finding the windows locked and the door imposible they should find that the back gate that leads through the garden is open and the back door is still wide open. Here the adventure really starts.
(See Area One - The Garden)
#1)
As soon as a player steps into the garden they set off a shrink trap in a radius of 30 ft. reducing them to half an inch tall. (Will Save DC: 28) To all others it appears as their companion has dissapeared. The adventurers are now faced with a real problem, what to do now? Luckily for them there is path spread out before them.
#2) At the area designated number two on the map of the garden there is yet another obsticle in their way. An area which is littered with broken shells of some sort of creature, many of which are still hanging above. For this exersize you will need the grid linked up top in order to designate where your charecters will go and if they are hit by the traps that could befall their charecters. Here they must get acrost the path by noticing and avoiding as many of the overhead piercers as possible. I have taken the liberty to place and roll the hide for these creatures myself so if you wish you can use the following table to see if they can locate the traps/creatures.
| Check Needed To Spot |
Tile Found On |
Check Needed To Spot |
Tile Found On |
Check Needed To Spot |
Tile Found On |
| 7 |
D9 |
21 |
B7 |
19 |
E5 |
| 9 |
H2 |
10 |
G5 |
15 |
F8 |
| 24 |
C3 |
7 |
J7 |
20 |
A4 |
| 23 |
E2 |
17 |
H9 |
11 |
I6 |
Each piercer if triggered will drop on it's target dealing 1D6 damage and then remain there helpless until it is either slain or it dries out.
Link to Piercer Stats
#3)
Once this is passed the weary adventurers make it to the edge of the seemingly quiet little fountain in the center of the garden. It seems peacefull enough but in the end it proves to be yet another tough battle.
Upon disturbing the waters a group of rather large bubbles float out of the pool and attack the adventurers. Adventurers must fend off all three bubbles in order to move on. Upon the defeat of these bubbles the treasure of a coral crown is gained.
Link to Bubble Stats
Coral Crown - Value: 400 Gold, Effect: +1 AC, Weight: 1 Pound
Stats assume original size as restored after antidote is taken.
A spot check into the water reveals yet another group of strange creatures called floating eyes. These do nothing other than hypnotize the adventurers unless they kill one of them. Killing one attracts the quill fish which they will have to face if they are to move on without getting impaled in the back with quills. Fortunately it cannot leave the water so if they wish, or are overly battered, they can easily get away.
Coral Crown - Value: 400 Gold, Effect: +1 AC, Weight: 1 Pound
Stats assume original size as restored after antidote is taken.
Link for Floating Eye Stats
Link For Quill Fish Stats
#4)
Killmoulis Town See Area Two - Fey Town
Finally the party has a chance to rest and recuperate in this strange little town of telepathic mice. Actually a strange mouse type of fey they are friendly enough and will gladly provide food and shelter for the injured party for a small price. Unfortunately the town has no inn as they are unacustomed to having visitors so the party will have to accept lodgeing in either the barracks or one of the fey's homes.
Fey Town places of Interest
1) General Store
In Stock: Rations, Thread, and Fabric
2)Magic Shop
In Stock: Eye Pin (this magical pin shield grants the user 4 extra ranks into spot and will grow back to normal size with the party assuming they are able to get the antidote) Cost: 400 Gold,
+1 Needle (This functions as a +1 rapier and will grow back to normal size with the party assuming they are able to get the antidote) Cost: 600 Gold
3)Barrax
This houses the four trained watch post of the 32 Killmoulis living in the town. It can provide shelter for up to 8 people at one time free of charge.
4)Cloth/Clothing Shop
Rumors of Giant rat guarding a vile of liquid said to turn people into giants.
5)Food Storage
Mostly Grain and some dried rat meat.
In case you need it here are the stats for the Killmoulis
Back to the Task on hand
Back to Area One - The Garden
Once the adventurers decide to continue their journey they can choose to go right for the antidote and thereby faceing the giant rat, or they can continue to explore the garden at their leasure.
#5)
At the location of number five is an old rotting sandwhich and several maggots for the party to dispatch. It shouldn't take long to dispatch the 10 maggots littering the area and the party can move along.
Link to Maggot Stats
#6)
If the party is brave enough to explore up to the point where the map is labled number six they will have yet another battle on their hands. Three strange plant like creatures known as Mandragora have apperently been planted here and will move to attack the party swiftly.
Link to Mandragora Stats
#7)
So they have finally made it to the other side of the garden. The antidote as well as the cottage's back door is within their sight, and so is their hope to get them out of this predicament. Unfortunately there is a rather large rat in the thicket near the potion inbetween the adventurers and the antidote.
The rat fight is pretty much a joke as the rat is just the standard from the Monster Manual with only one hit point. Finish the rat off and give them access to the potion.
The Potion Predicament
Finding the potion is all well and good but how do they get it out of that gigantic potion flask? There is really only two ways to do it and either way you must start out the same. Climb the bottle and attempt to tip it. Next you must remove the cork. How is up to your party. Either with a good enough str check (Str Check DC: 20 due to extemely small size), or by hacking the cork to pieces (AC:10 HP: 4). Either way and the party can now resume normal size activities, just watch that trapped gate on the way out.
Inside the House
See Area Three - First Floor House
The adventurers arrive inside the house only to find no trace of the Kobolds that started this whole mess. The Sorceror who owns this house seems not to be home for it is far to well kept to be the home of a bunch of rampaging Kobold warriors.
#1)
As said in the beginning, this is the other side of where they probably tried to come in the first time. If they didn't take care of the animate armor the first time then they will have to do it now.
#2, 3, 4, &5)
If your charecters are so inclined to search the vibrant red furniture in the living room they may be surprised to find loose change in the coushions. Follow the table for what they would find.
| #2 |
#3 |
#4 |
#5 |
| 2D6 Silver |
2D6 Silver |
1D6 Copper |
1D6 Copper |
#6)
Searching the Dresser will reveal an old iron key and a potion of Cure Light (1D8+3)
#7)
Out on the table in the library the only open book is a recipie book on how to properly cook turkey.
#8)
In the kitchen on the table and under the counter are some basic food items, most of which are halfway eaten, probably by kobolds. The stairway that leads downstairs is also in the kitchen.
Inside the House Part 2
The Basement
#1)
At the bottom of the stairs your charecters are entitled to a listen check (DC: 15) to determine if they know that the kobolds are in the room full of beds. If not, anyone entering that room will get penalized their dex as they will be caught flat footed while the kobolds that havn't already thrown their javelins will do so now from various parts of the room.
The bookshelf in the first room has a single red book glowing, chained and locked (Open Lock DC: 15) shut. If opened the party will have to fight a Lemure (stats in monster manual).
#2, 3, & 4)
The following table shows the difficulty of getting chest open and what lies inside.
|
Chest Labled #2 |
Chest Labled #3 |
Chest Labled #4 |
| Open Lock DC |
15 |
15 |
20 |
Item(s) |
3 Explorer's Outfits |
3 Dull Gray Ioun Stones, 4 Sewing Needles |
Potion Cats Grace, Ring of Dex +1 |
#5)
Number five is a bucket with gardening supplies in it. Inside is a small shoval, a small watering can, and some hedge pruners.
#6)
To even notice number six requires a search check for secret doors of 20 or greater but upon the chance that it is seen a pretty decent treasure lies inside. Once the door is opened the party may have acess to chest seven.
#7)
Locked Iron Chest, (Open Lock DC: 40). Remember the key that was in the dresser in the bedroom upstairs. Well, that's the key to this chest and without it there is not much luck of getting it open. Inside is a single ring. The ring gives the wearer the aging traits of an elf and does nothing else. Though most would settle for the extra few hundred years an elf's lifetime would supply. For an elf this item does nothing.
#8-14)
If they haven't already been in this room the adventurers will have to take out the eight (seven if they killed the one on the roof) kobolds inside. After this they may search the room. If they decide to search the beds they may find the Kobolds personal posessions as shown on the Table below.
|
Bed Labled #8 |
Bed Labled #9 |
Bed Labled #10 |
Bed Labled #11 |
Bed Labled #12 |
Bed Labled #13 |
Bed Labled #14 |
| Search Check DC |
10 |
15 |
N/A |
15 |
12 |
N/A |
N/A |
Item |
4 copper |
Ring +1 Hit Points |
Nothing |
Cursed Ring Str -1 |
1 Silver |
Nothing |
Nothing |
THE END
That's as far as this mini-adventure will take you. Feel free to come back for my next installment, Oh No! Orcs. Thank you for playing and please come back often.
Some creatures in this modual were taken with permission from the Creature Catalogue
Click here to go back.

Open Game License