These instructions can be used to solve a 3x3x3 Rubik's Cube a starting from any combination of colors on a mixed up cube. The instructions are both easy to follow and easy to memorize.
As a preview, the steps are:
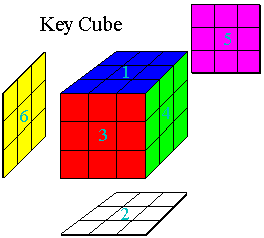
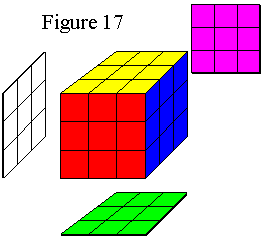
The figures in this document represent a sample cube. Although the colours on your personal Rubik's cube may be different than the figures, I feel that the coloured figures will still be helpful in solving the cube. I would suggest matching as many colours on your cube as possible to the figures, then making mental notes about which colours correspond between your cube and the figures. For example, perhaps you can match the red, green, and blue sides exactly, but the yellow in the figures corresponds to pink on your cube. Just keep this equivalency in mind when looking at the figures. In addition, I have numbered the middle-center pieces for reference such that 1 and 2 are opposite each other and 3, 4, 5, and 6 go around the cube in a circle. Finally, the diagrams show all six sides of the cube by pretending that mirrors are being held up so that you may see the "hidden" sides.
The directions for what parts of the cube to turn and when are given in a code that is relative to the current positioning of the cube. Each side or slice descriptor refers to a side with respect to the figure the move is referenced to. This means that the front side can be a different colour, depending on the diagram being used.
Although the directions are relative to the current
positioning of the cube, the numbers assigned to each
side always stay with the same colour/side they were
originally assigned.
In the figures, any gray pieces represent pieces that don't matter and can be any colour. To increase clarity, I have shown a lot of coloured pieces. In most cases, the figures represent an example of the situation being described, while the colours don't have to match perfectly, particularly when I describe correctly positioned yet incorrectly rotated pieces. Wherever I have placed numbers on the pieces in the figures, though, they should match up perfectly.
• Step 1: Solve the
top side of the cube (Side 1 in the figures)
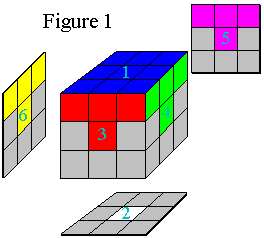 |
Pick a middle-center piece to represent the first side of the cube solved (side 1 in the diagrams) and solve that side (make it a solid color). Be sure to have correctly coloured and matched edge and corner pieces, such that an evenly coloured border exists around the side, as shown in Figure 1. |
• Step 2: Position the
4 corner pieces of Side 2
2a. If the two corners in the correct position are parallel (in line on the same edge):
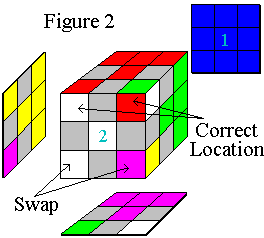 |
Orient the cube as shown in Figure 2 where the two corner pieces in the correct position are at the front-top corners of the cube and the two corner pieces in the incorrect position are at the front-bottom corners of the cube. Perform Move 1, then proceed to step 3. |
Move 1: U-1 F U
L-1 U L U-1 F2
|
|
2b. If the two corners in the correct position are diagonal to each other:
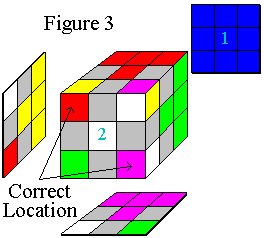 |
Orient the cube as shown in Figure 3, with side 1 in the back and either of the correctly positioned corners in the top-left-front and bottom-right-front positions. Perform Move 1, then go back to step 2, progressing to step 2a after correctly rotating Side 2 as instructed. |
• Step 3: Orient the
four corner pieces of Side 2
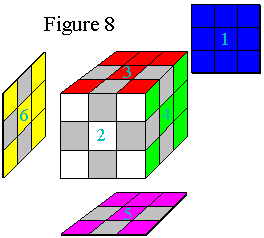
Examine side 2 of the cube. Zero, one, two, three, or even four of the corner pieces will be oriented correctly such that they perfectly line up with their adjacent middle-center pieces. If all four are correct, the cube should look as shown in Figure 8 (below). If not:
3a. For zero correctly oriented pieces:
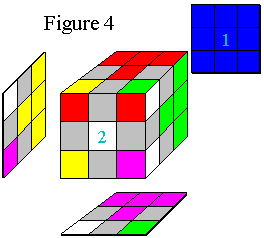 |
Position the cube as shown in Figure 4 such that Side 2 is facing you. Perform Move 2, then return to the start of step 3. |
| Move 2: U-1 F2 U
F U-1 F U F2 In words, rotate the upper side (red here) one quarter turn counter-clockwise, then the front side (white here) two quarter turns (half-way around), then the upper side 1/4 turn clockwise, etc. |
|
3b. For one correctly oriented piece:
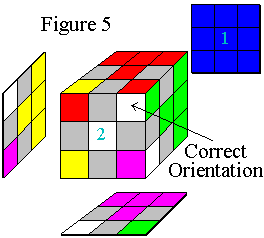 |
Position the cube as shown in Figure 5. Perform Move 2, then return to the start of step 3 only if the four corner pieces of side 2 are not oriented correctly. If they are correct, as shown in Figure 8, go to step 4. |
3c. For two correctly oriented pieces:
 |
Position the cube as shown in Figure 6. Perform Move 2, then return to the start of step 3. |
3d. For three correctly oriented pieces:
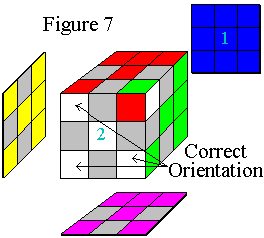 |
Position the cube as shown in Figure
7. Perform Move 2, then return to the start of step 3. Actually, I don't think it's even possible to set up the cube as shown in Figure 7. Another corner piece, either on the top or bottom, would have to be twisted also, in addition to the red-white-green piece shown twisted. |
NOTE: Step 3 may need to be repeated numerous times.
Also, the move directly before all four corner pieces are
oriented correctly will have just one piece oriented
correctly, as shown in Figure
5 (step 3b).
NOTE: To achieve the image shown in Figure 8, the slice containing middle-center pieces 3, 4, 5, and 6 may need to be rotated. Side 2 may also need to be rotated. |
 |
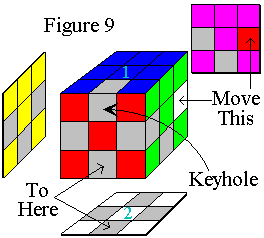 |
If the cube looks like Figure 9, then Move 3 will put the piece into place. |
| Move 3: F H2 F-1 In words, rotate the front side (red here) one quarter turn clockwise, then the middle horizontal slice (containing the red, green, pink, and yellow middle-center pieces) two quarter turns (half-way around), then the front side one quarter turn counter clockwise. |
|
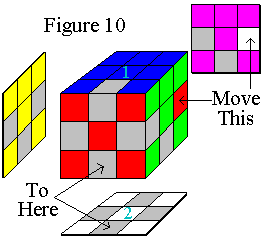 |
If the cube looks like Figure 10, then Move 4 will put the piece into place. |
| Move 4: F-1 H F In words, rotate the front side (red here) one quarter turn counter clockwise, then the middle horizontal slice (containing the red, green, pink, and yellow middle-center pieces) one quarter turn clockwise (so that the red/white corner piece moves toward the front), then the front side one quarter turn clockwise. |
|
Orient the cube as shown in Figure 11 or Figure 12, depending on how the keyhole piece is oriented in the middle horizontal slice. If the keyhole piece is already in the keyhole but oriented incorrectly, simply move it out by using Move 3 or 4 (it doesn't matter which) and go back to step 4.
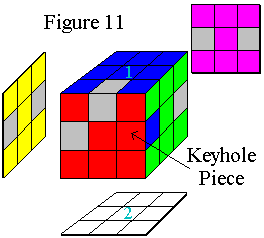 |
If the cube looks like Figure 11, then Move 5 will put the piece into place. |
| Move 5: F H-1
F-1 H-1 F H F-1 In words, rotate the front side (red here) one quarter turn clockwise, the middle horizontal slice (between the blue and white sides) one quarter turn counter clockwise (so that the red/blue corner piece moves toward the back), the front 1/4 turn counter clockwise, etc. |
|
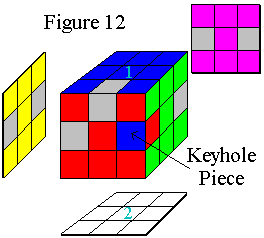 |
If the cube looks like Figure 12, then Move 6 will put the piece into place. |
| Move 6: F H-1
F-1 H2 F-1 H-1 F In words, rotate the front side (red here) one quarter turn clockwise, the middle horizontal slice (between the blue and white sides) one quarter turn counter clockwise (so that the red/blue corner piece moves toward the back), the front 1/4 turn counter clockwise, etc. |
|
• Step 6: Position the
four remaining pieces
Position the cube as shown in Figure 13, with side 1 on the right. Now the slice we have been calling the middle horizontal slice has become the middle vertical slice, V. Rotate the middle vertical slice and side 2 until each middle-center piece matches up with its corresponding side 1 and side 2 edge and corner pieces. Examine the four remaining center-edge pieces.
6a. If none of the four center-edge pieces is in the correct position:
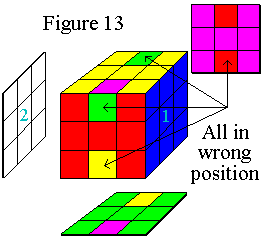 |
Position the cube as shown in Figure 13, placing side 1 on the right and side 2 on the left (the rest don't matter here). Perform Move 7, then proceed to step 6b. |
| Move 7: V U2 V-1 U2 In words, rotate the middle vertical slice (between the blue and white sides) one quarter turn clockwise (away from you), the top side (yellow here) two quarter turns (half-way around), the vertical slice 1/4 turn counter-clockwise (back toward you), and the top half-way around again. |
|
6b. If just one of the pieces is in the correct position:
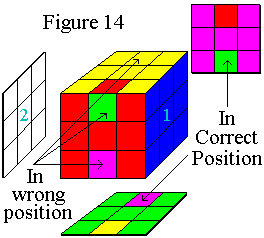 |
Position the cube as shown in Figure 14, placing the correctly positioned (not necessarily oriented) center-edge piece to the back of the cube so that it cannot be seen. Perform Move 7, one, two, or three times until each center-edge piece is in the correct position. Proceed to step 6d. |
6c. If two pieces are in the correct position, but are diagonal to one another, then position the cube as shown in Figure 16, perform Move 8, then proceed back to the start of step 6.
6d. When all four center-edge pieces are correctly positioned, proceed to step 7.
• Step 7: Orient the four center-edge pieces
The following "Rube Move", named after Mr. Rubik himself (since he formulated it), will flip the two center-edge pieces on the top side of the cube shown in Figure 15.
If two center-edge pieces are correct and the two that are wrong are diagonal to each other then perform step 7b and proceed to step 7a.
7a. For parallel misoriented pieces:
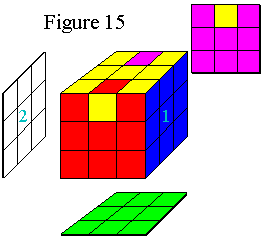 |
First orient the cube so that the two misoriented center-edge pieces are on the top side of the cube as shown in Figure 15 and perform Move 8. Next, place the remaining two center-edge pieces in the top positions and, if misoriented, perform Move 8. |
| Move 8: V U V U V
U2 V-1 U V-1 U V-1 U2 In words, rotate the middle vertical slice (between the blue and white sides) one quarter turn clockwise (away from you), the top side 1/4 turn clockwise, the vertical slice 1/4 turn up, the top 1/4 turn clockwise, the vertical slice 1/4 turn up, the top two quarter turns (half-way around), the vertical slice 1/4 turn counter-clockwise (back toward you), the top 1/4 turn clockwise, etc. |
|
7b. For diagonally misoriented pieces:
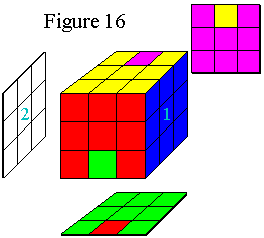 |
Position the cube as shown in Figure 16. Perform Move 8, then proceed to step 7a. |
 |
Congratulations, you've solved the cube. |
If you have pictures on the faces of your cube, or a logo on the middle-center piece of each side, see these instructions for extra help.
I hope you have found these directions to be clear and complete, yet concise. If these directions help you to solve the cube, I would enjoy hearing from you. If you have any questions, I would be happy to help you in any way possible.
Matthew Monroe in Chapel Hill, NCThese pages are mirrored at http://www.unc.edu/~monroem/ and http://www.geocities.com/CapeCanaveral/Lab/9548/.