 |
|
|
|
|
|
|
|
|
|
|
|
|
|
|
|
|
|
|
|
|
|
|
|
|
|
|
|
|
|
|
|
|
|
|
|
|
|
|
|
|
|
|
|
|
|
|
|
|
|
|
|
|
|
|
|
|
|
|
|
|
|
|
|
|
|
|
|
|
|
|
|
|
|
|
|
|
|
|
|
|
|
|
|
|
|
|
|
|
|
|
|
|
|
|
|
|
|
|
|
|
|
|
|
|
|
|
|
|
|
|
|
|
Mushroom Tutorial by Peter Chovanec (Wings3D subdivision modeling) |
|
|
 |
|
|
|
 |
|
|
|
Ok.. By request here's a tut on how I did a high-poly mushroom. It's not made according to reference, and it's probably not a very realistic representation of a real mushroom. It's just meant to look 'good enough'.
As in the case of the Jack 'o Lantern tut, this started as a result of a thread on the official Wings 3D development forum. (the request to make it into a tut was over at Renderosity)
This tut was made in Wings3D 0.98.17g, and though I'm not aware of any bugs in other recent versions. I recomend you upgrade to at least that version (or newer) to avoid any potential problems..
DISCLAIMER: I am the god of all Wings3D knowledge, and this is the ONLY possible way to make a mushroom in Wings3D, if you think you know another, you're a liar and a fool and should be hunted down and beaten with a burning stick...
Or, if you'd prefer that without the sarcasm ;]
This IS NOT the only way to make a mushroom in Wings3D (and no, I'm not the god of all Wings3D knowledge hehe). I'm sure there are other ways to make a mushroom, and perhaps some steps could be better/easier/faster. This is just the way that I did it, and this tut is intended more for people newer to wings who have 'no idea' how to make one (let alone multiple ideas). |
|
|
|
|
|
|
|
|
Once again, If I mention numbers, like do *some command* to 80% or 0.05 or whatever.. These can be seen in the upper-left corner of the Wings window. They appear there whenever you're doing some interactive command, and you can drag the mouse around to reach the desired number or simply hit the TAB key and type it in.
Also I will sometimes mention which keys to press, but since you can re-map pretty much any key in Wings to whatever you want. I will also mention what I assume that key means..
For example: "Hit the C key (Connect)"
That's it I think, so let's get started... |
|
|
|
|
|
|
[1] create a sphere, Right Click > Sphere. Then select one of the center horizontal edges |
|
|
|
 |
|
|
|
[2] Now hit the L key (Edge Loop) to extend the selection around the whole sphere. |
|
|
|
 |
|
|
|
[3] And do a Right Click > Loop Cut to slice the object in two. (select and delete the bottom half) |
|
|
|
 |
|
|
|
[4] now we'll shrink it down along the Y axis a bit, so select the object in body mode and Right Click > Scale Axis > Y to 50% |
|
|
|
 |
|
|
|
[5] Rotate the camera around to see the bottom, select the big circular face and do a Right Click > Intrude to 0.05 |
|
|
|
 |
|
|
|
[6] Select the one center vertex and Right Click > Bevel it to about 0.2 |
|
|
|
 |
|
 |
|
|
|
> |
|
|
|
|
|
|
|
[7] And Right Click > Inset this face just a little bit, say 5% |
|
|
|
 |
|
|
|
If you're wondering why this is done..
Later on we'll be extruding the stem from this place. And since we'll need to break up the geometry alot to accommodate the gills, we Inset the center face at this time to create a small "border region" between the stem and gills, so that the extruded stem won't be excessively high-poly (due to the highly dense geometry made for the gills). |
|
|
|
|
|
[8] Now select one of these 'inner-edge' edges, and hit L (Edge Loop) |
|
|
|
 |
|
 |
|
|
|
> |
|
|
|
|
|
|
|
|
|
[9] And Right Click > Bevel these edges a tiny bit to about 0.06 |
|
|
|
 |
|
|
|
This creates another "border region" to contain the details of the gills, this time on the outer edge.. |
|
|
|
|
|
[10] Now to make the gills.. Select any of these five edges (make sure it's only those five, do NOT select one of the 'small inner circle' edges for example) |
|
|
|
 |
|
|
|
[11] Now hit L (Edge Loop) to extend the selection out, it should now look like this: |
|
|
|
 |
|
|
|
[12] Now we're going to break up these edges to accommodate the gills, I'm gonna go with six, so go ahead and hit the 6 key (Edge Cut 6).. And you'll end up with this |
|
|
|
 |
|
|
|
If (AND ONLY IF) you've re-mapped your 6 key to something (and I'm not sure that's even possible), and now can't do step [12]. Feel free to just use "cut 5" instead.
OR.. Here's a way to manually do the step, and cut the edge into 6 parts:
-------------------------------------------------------------------
[alt 12.1] Right Click > Cut > 3
[alt 12.2] Hit the E key (Switch to Edge mode)
[alt 12.3] Right Click > Cut > 2
[alt 12.4] Hit the E key again (Switch to Edge mode)
[alt 12.5] Hit V key (Switch to Vertex mode)
- PC Dec 16, 2003 |
|
|
|
|
|
[13] Now just hit the C key (Connect) to connect all those points |
|
|
|
 |
|
|
|
[14] Now switch back to edge mode, and select any of these four edges (again carefull not to select edges in the small "border regions"), and then hit the G key (Edge Ring) to select all the rest. |
|
|
 |
|
|
|
 |
|
|
|
> |
|
|
|
|
|
|
|
|
|
[15] This is where we actualy make the gills, by doing a Right Click > Extrude > Normal to about 0.05 |
|
|
|
 |
|
|
|
[16] now switch to vertex mode, and select all those vertices on the outer edge of the gills we just created. Just keep selecting the individual verts and hitting the I key (Select Similar) untill they're all high-lighted. (be carefull at this step, it's easy to accidently select vertices in the background) |
|
|
 |
|
|
|
[17] Once they're all selected, get rid of them by doing a Right Click > Collapse |
|
|
|
 |
|
|
|
[18] Now zoom-in and do the same on the inner edge of the gills (keep selecting, hitting I key and all that) |
|
|
|
 |
|
|
|
[19] And get rid of these as well with a Right Click > Collapse |
|
|
|
 |
|
|
|
[20] Now select this one circular face |
|
|
|
 |
|
|
|
[21] Now.. We're gonna make the stem by extruding downwards.. values aren't too important, just extrude it down a few times so that the stem is broken up vertically to allow us to bend it a little later on. For example, I have it broken into 3 major sections (not counting the taper-off at the bottom). What I did was... Right Click > Extrude, stop and Right Click > Scale Uniform each time (to vary the size a bit). But you could just as easily extrude a few times (hitting the D key (Repeat Last Command) each time), or extrude the full length of the stem in one go and break it up later.. and only then adjust the size.
I'll leave that up to you, hopefully it's basic enough for anyone to handle. If not just e-mail me and I suppose I could do a step-by-step. But the point is you should end up with something like this. |
|
|
|
 |
|
|
|
If you now enter the smooth preview mode (Shift + Tab) you'd notice some shading "artifacts" near the top of the stem (well actualy there are multiple problems, but I never said the 'shroom was perfect :P). If you want to get rid of those, do the following..
[Fix 1] Zoom in to near the top of the stem and select any of the edges in the small "border region" and hit the I key (Select Similar) to select them all |
|
|
|
 |
|
|
|
[Fix 2] now hit the C key (Connect) to create another edge loop in there and trap the shading 'artifacts' in that small region where nobody will notice ;] |
|
|
|
 |
|
|
|
|
|
|
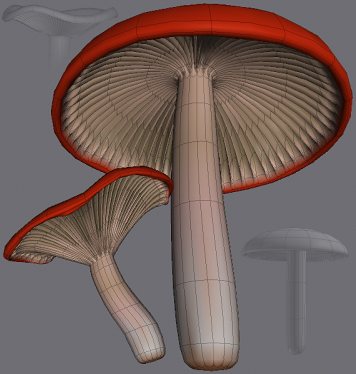
We're done!
"Hey, what the hell?? That's not what the Shroomie in the pic at the top looks like.. what a rip-off"
Easy there, we're done with the "Base" mushroom (Feel free to save at this time). All the nicer more natural looking mushrooms I have in the first pic were made from this model. No geometry was added or removed, it's all Tweak Magnet Deformations from here on out. Enter tweak mode, turn on magnets and have fun messing around getting the 'shroom to a more natural state..
But ok ok, since I was specifically asked about the smaller one, I'll give a general over-view of how I did that one. |
|
|
|
[NS 1] First, I'm gonna be dragging the top of the mushroom down to get the over-all shape.. But the top 'major region' of the stem is too short to allow that (without getting messed up), so I grab the two big bottom sections and move them down a bit with Right Click > Move > Y to about -0.5 You may or may not have to do this, or change the value depending on how your stem is broken up.. Point is to get enough space for the next step |
|
|
|
 |
|
|
 |
|
|
|
|
> |
|
|
|
|
|
|
|
|
|
[NS 2] I enter Teak mode, Top Menu > Tools > Tweak, and hit the 1 key to go into Magnet mode. I grab the very top center vertex, hit X to align the camera to the side and drag downwards. Hold down the +/- keys (plus and minus) to adjust the influence, and don't worry about dragging it down perfectly straight.. having it be imperfect and irregular looking like a biological object is the point after all. |
|
|
|
 |
|
|
|
 |
|
|
|
> |
|
|
|
|
|
|
|
|
|
[NS 3] Now just slap some chaos on it, go around to pull the outer edge up or down to make it irregular (notice I scaled down the magnet influence to get a smaller area of affect) |
|
|
|
 |
|
|
 |
|
|
|
|
> |
|
|
|
|
|
|
|
|
|
[NS 4] feel free to adjust the model from any point of view, not just aligned ones.. just keep turning the view around and adjusting it untill everything looks good |
|
|
|
 |
|
|
 |
|
|
|
|
> |
|
|
|
|
|
|
|
|
|
|
|
|
|
 |
|
|
But.. that's about it, I think I'll stop here. I can't really give a step-by-step description of how to randomly mess up a model after all. Just play around with it untill you get it to look good. Mess with the model, mess with the stem.. Keep changing the camera angle, the magnet influence etc
Add edge-loops to round things out more if you wish, it's all up to you now.
If you want to give some feedback, make suggestions for changes (hopefully small no-need-to-change-pictures-around-and-stuff-like-that changes.. yes that was a word, don't argue with me!) you can E-mail Me, and I might make some revisions to the tut. Enjoy!
- PC Dec, 12, 2003 |
|
|
|
|
|
|
If you need a closer look, you can download this .ZIP file (Pic above is the link, 260kb).
In it you'll find a .Wings file with my vertex colored "Base" mushroom, and two Tweak Magnet deformed variations. |
|
|
|
|
|
< Back to main page |
|
| All Images copyright (c) Peter Chovanec, 2003. |
|
|
|