 |
|
|
|
|
|
|
|
|
|
|
|
|
|
|
|
|
|
|
|
|
|
|
|
|
|
|
|
|
|
|
|
|
|
|
|
|
|
|
|
|
|
|
|
|
|
|
|
|
|
|
|
|
|
|
|
|
|
|
|
|
|
|
|
|
|
|
|
|
|
|
|
|
|
|
|
|
|
|
|
|
|
|
|
|
|
|
|
|
|
|
|
|
|
|
|
|
|
|
|
|
|
|
|
|
|
|
|
|
|
|
|
|
|
|
|
|
|
|
|
|
|
|
|
|
|
|
|
|
|
|
|
|
|
|
|
|
|
|
|
|
|
|
|
|
|
|
|
|
|
|
|
|
|
|
|
|
|
|
|
|
|
|
|
|
|
|
|
|
|
|
|
|
|
|
|
|
|
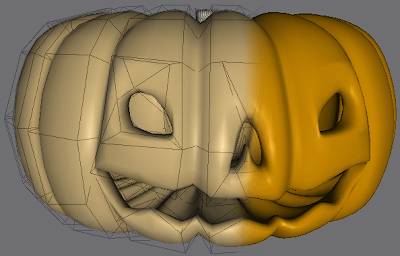
Jack O' Lantern tutorial by Peter Chovanec (Wings 3D, subdivision modeling) |
|
|
|
 |
|
|
|
originaly uploaded Sept, 22, 2003 |
|
|
|
|
|
This tutorial includes a lot of really basic stuff at times, if you're a more experienced modeler.. well you probably don't need to read this totorial ;) But if still want to check it out to see the basic "theory" behind how I did the model feel free to skip around over the simple stuff. I didn't put it in to insult your inteligence or anything :P
|
|
|
|
|
|
An expanded version of the "Super Dooper (and yet pretty crappy) Jack-O-Lantern mini-tutorial by PC ;]" from within a thread on the official Wings3D forum, "Q&A: Interface & Usage section". |
|
|
|
Before I start, let me explain a few things. If I say to do *some command* by 80% or 0.05 or any other number. That number can be seen in the upper left corner of the Wings Window. They appear there whenever doing some interactive command. You can move the mouse around to reach the desired number. Or simlpy hit the TAB key and type it in.
Sometimes I will also mention a key you should press, howeverin Wings, keys can be remapped to do pretty much anything, so I will also explain what command I assume that key means to the side.
For example: "hit the C key (Connect)..."
So let's get to it, start a new scene, and follow me down to the dangerous world of modeling Pumkings.. :D |
|
 |
|
|
|
UPDATE sept 23 2003. 'Tutorial Problems'
Some people have reported problems with this tutorial. 'Impossible to get past step [11] sucessfuly'. get Vertex spikes, and distorted over-all object shape. And step [36] bridging the inner and outer pumkings together. All these are related to using old versions of Wings3D. This tutorial was made in Wings 0.98.16, please upgrade to at least that release or it may be impossible to finish this tut successfully. If you get the "Vertex Spikes" on step [11] you cannot continue on without upgrading first. The "Bridge" problem on step [36] is less critical (though I still recoment you upgrading your Wings version), so I have included a work-around at the bottom of the page.
I shouldn't have assumed everyone would be useing an up-to-date version of Wings, sorry if anyone wasted their time following the faulty fix to the "vertex spike" problem which was posted here for a few hours. All resolved now.
UPDATE sept 24 2003. This just in! The following tutorial is NOT holy scripture :]
This all started out as a way of demonstrating "how I did it" to someone. Evolving into this full page "tutorial" only due to some of the steps in the text only "mini-tutorial" being hard to follow. In no way do I mean to imply that this is the "Best and only way" to make a Jack O' Lantern. Wings 3D is a felxible modeler which gives you the power and freedom to use various steps and commands to achive the same goal. If you're proficient enough with Wings that you can do this model using any of the other various tools and steps. Then you don't need to be reading this 70+ pic, step-by-step tutorial now do you? :P |
|
|
|
|
|
|
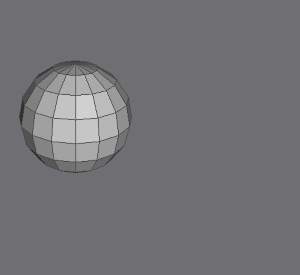
[1] We will start with a sphere primitive, so create one now with Right Click > Sphere. |
|
|
|
 |
|
|
|
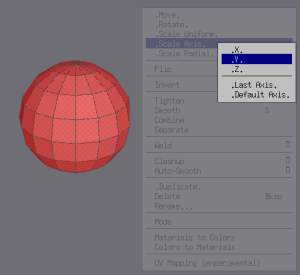
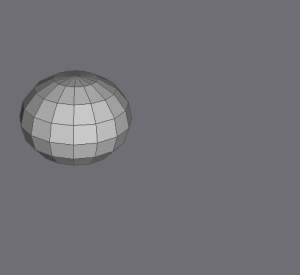
[2] Select the sphere (in body mode) and scale it down a bit top to bottom with Right Click > Scale Axis > Y to about 80% |
|
|
|
 |
|
|
|
 |
|
|
|
> |
|
|
|
|
|
|
|
|
|
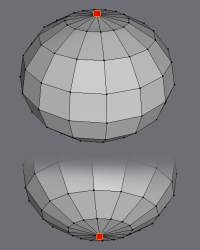
[3] Clear the selection, and select the very top and bottom vertices (2 total) on the sphere |
|
|
|
 |
|
|
|
top |
|
|
|
|
bottom |
|
|
|
|
|
[4] Now scale them into the sphere a bit using Right Click > Scale Axis > Y to 80% |
|
|
|
 |
|
|
|
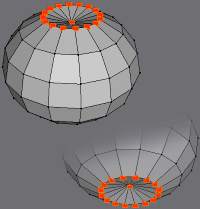
[5] Now hit the (plus) + key (grow selection), to select the next group of vertices |
|
|
|
 |
|
|
|
[6] Now scale all those inwards a bit with Right Click > Scale Axis > Y to 60%. |
|
|
|
 |
|
|
|
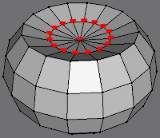
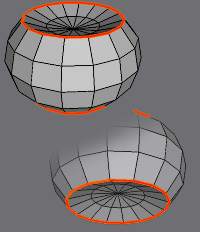
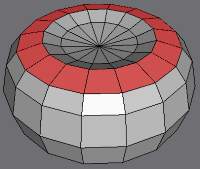
[7] Clear the selection, then select that edge loop forming the "crater edge" near both the top and bottom of the sphere.. |
|
|
|
 |
|
|
|
[8] And lets smooth them off a bit with Right Click > Bevel to about 0.8 |
|
|
|
 |
|
|
|
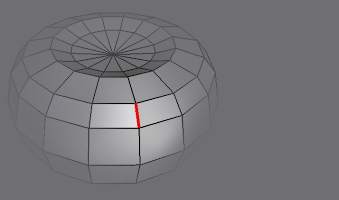
[9] Now clear the selection and select any one of the vertically going edges.. |
|
|
|
 |
|
|
|
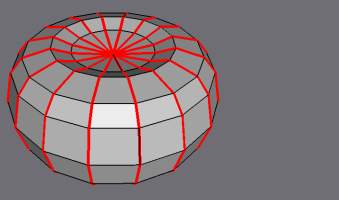
[10] Hit the L key (edge loop), then hit the I key (select similar) and you'll end up with a selection like this.. |
|
|
|
 |
|
|
|
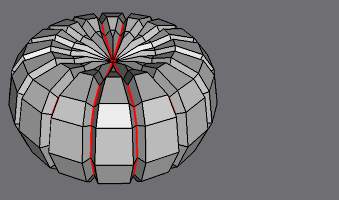
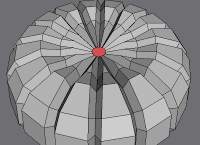
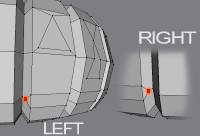
[11] Now extrude those lines inwards to form the pumking's 'ridges' by doing a Right Click > Extrude Normal to about -0.08 |
|
|
|
VERTEX SPIKES: If you get the apearence of thin spikes sticking out from the pumking after the Extrude Normal Command is performed. (As is seen in this Cactus tutorial on the Wings3D site.). This is caused by using an old version of Wings, this tutorial was written using Wings 0.98.16, please upgrade to at least that release to avoid further problems. WARNING: if you simply delet the spikes as seen in the cactus tutorial this will NOT solve the problem, the over-all pumking shape will still be distorted
(thx to both MMacD and Bryde from the Wings3D forum for pointing this problem out, and Bryde for the cactus tut link) |
|
|
 |
|
|
|
|
|
|
[12] Clear selection, select the top and bottom vertex again (2 total) |
|
|
 |
|
|
|
[13] Now bevel them Right Click > Bevel to 0.08 |
|
|
 |
|
|
| [14] Now extrude out a little with Right Click > Extrude Region > Normal to 0.03 |
|
|
|
 |
|
|
|
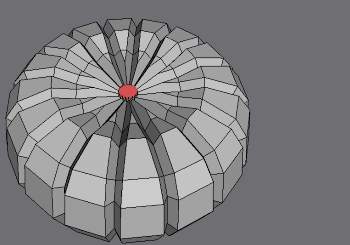
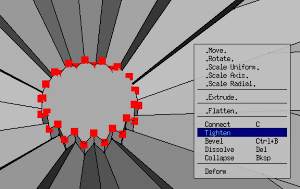
[15] Hit the V key (switch to Vertex mode), and do Right Click > Tighten to 100% to get rid of the jagged sides. |
|
|
|
 |
|
|
|
 |
|
|
|
> |
|
|
|
|
|
|
|
|
|
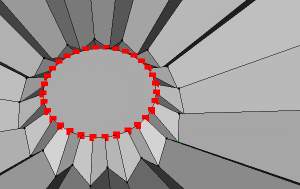
[16] Clear the selection, and select the little circle we formed on top of the pumking with the tighten command. NOT the bottom one though.. we'll be making the stem now.. |
|
|
 |
|
|
|
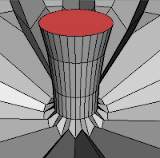
[17] With that circular face selected, follow these steps.
Right Click > Extrude Region > Normal up 0.05
Right Click > Extrude Region > Normal up 0.08
Right Click > Scale Unifrom to 115%
Right Click > Extrude Region > Normal up 0.05
Right Click > Scale Uniform to 120%
You should end up with something like this.. |
|
|
|
 |
|
|
|
 |
|
|
|
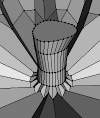
Distort it a bit, make it less precise, make it more organic and twisted till you end up with something like the one to the right --> |
|
|
|
|
|
|
|
|
|
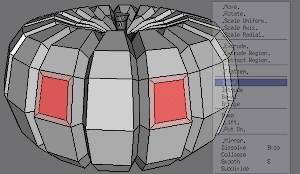
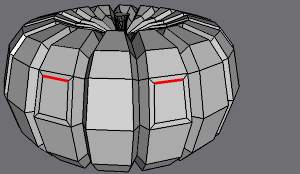
[18] Now on to the face... Clear the selection.. Then select 2 of the big square polygons like this. These will be the eyes. |
|
|
|
 |
|
|
|
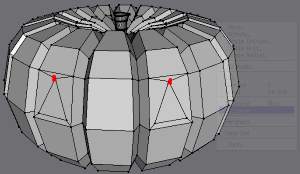
[19] inset them, Right Click > Inset to 25% |
|
|
|
 |
|
|
|
From this point on I'll no longer say numbers and amounts, just do the command to whatever looks right to you, or what looks close to the pictures..
Feel free to do whatever shape eyes/nose/mouth you want. But for the sake of providing an example I'll continue making "my pumking" |
|
|
|
|
|
[20] Now select the top edge of both of these 'inset squares' and do a Right Click > Collapse |
|
|
|
 |
|
 |
|
|
|
> |
|
|
|
|
|
|
|
[21] Now the nose, select the 3 edges between the 2 "eyes" as shown here.. then hit C (connect) |
|
|
|
 |
|
|
 |
|
|
|
|
> |
|
|
|
|
|
|
|
|
|
[22] Now Right Click > Bevel out till the center face covers about 2/3 the area between the eyes. |
|
|
|
 |
|
|
|
[23] Select the side edges (4 total) that apeared due to the 'bevel' aobve, and hit C (connect) |
|
|
|
 |
|
|
 |
|
|
|
|
> |
|
|
|
|
|
|
|
|
|
[24] Clear selection, select the top edge which we just made using the 'connect' command. and Right Click > Collapse it |
|
|
|
 |
|
|
|
 |
|
|
|
> |
|
|
|
|
|
|
|
|
|
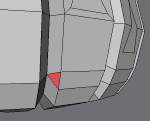
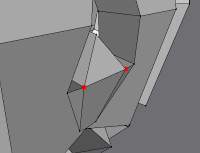
[25] Select the center edge and Right Click > Scale Unifrom it down about 50%, then Right Click > Dissolve it. So you end up with a triangle shape for the nose |
|
|
|
 |
|
 |
|
|
|
> |
|
|
|
|
|
|
|
[26] Select these two vertices and Right Click > Collapse them |
|
|
|
 |
|
|
 |
|
|
|
|
> |
|
|
|
|
|
|
|
|
|
[27] Select these two edges and Right Click > Dissolve them (or they'll cause trouble in the next step) |
|
|
|
 |
|
|
|
[28] Select these 7 edges, they will be our mouth.. Right Click > Bevel them a little |
|
|
|
 |
|
|
 |
|
|
|
|
> |
|
|
|
|
|
|
|
|
|
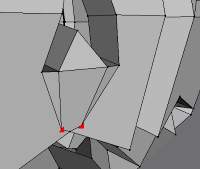
[29] Select the two vertices at the "corner of the mouth", and Right Click > Collapse them. |
|
|
|
 |
|
|
|
 |
|
|
|
> |
|
|
|
|
|
|
|
|
|
[30] Now select all the inner mouth edges connecting top and bottom "lip" and Right Click > Dissolve them. |
|
|
|
 |
|
|
|
 |
|
|
|
> |
|
|
|
|
|
|
|
|
|
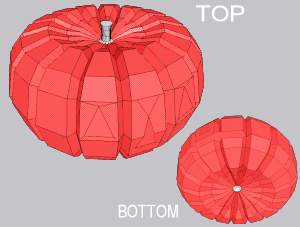
[31] Now to make the pumking hollow, go into face mode and select everything EXCEPT the stem (and that bottom "thing" if you want) |
|
|
|
 |
|
|
|
[32] Now do a Right Click > Extract Region > Anything, it dosen't matter which 'axis' you choose becase we want to leave the new pumpking.. (Lets call it Pumking#2) on the same spot as the old one. You can do this by holding down the Shift Key, draging the object away a bit, then snaping it back into place. OR simply hit tab and type in 0 (move 0 units) |
|
 |
|
|
|
[33] Now do a Right Click > Scale Uniform to about 92%, so that Pumking#2 shrinks, and dissapears into the original one. |
|
|
|
 |
|
|
|
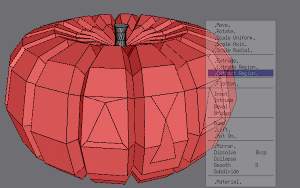
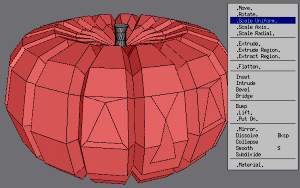
[34] NOT clearing the selection, hit B (switch to body mode) and do a Right Click > Invert Command |
|
|
|
 |
|
|
|
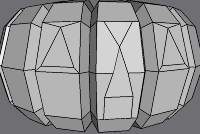
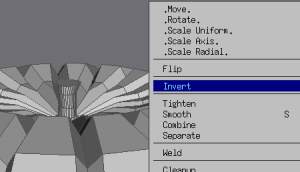
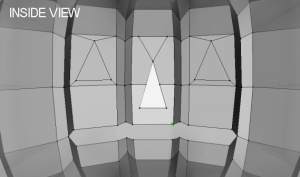
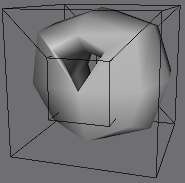
[35] Now Zoom the camera 'in' so far you'll actualy go inside the pumking object. Rotate around untill you see the "face" region (face as in eyes,nose, mouth.. not Polygon) of Pumking#2 (facing inwards, due to the 'Invert command' |
|
|
|
 |
|
|
|
"An object with vertex colors cannot be bridged with an object with materials"
If you get this error message when attempting to brige (starting with step [36]). This is due to you using an old Wings release (most likely 0.98.15a). Upgrade to at least 0.98.16 or see the bottom of this page for a work-around. |
|
|
|
|
|
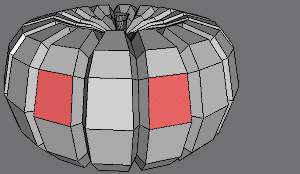
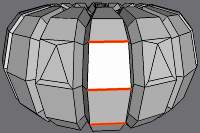
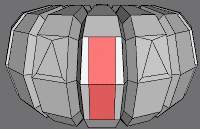
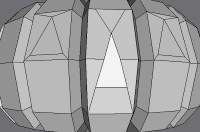
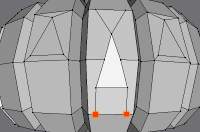
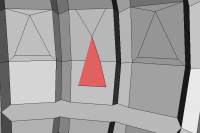
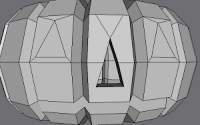
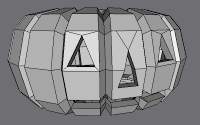
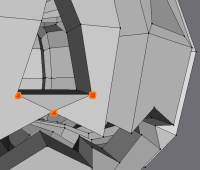
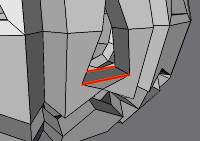
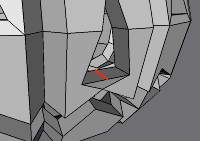
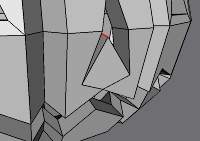
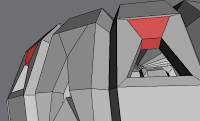
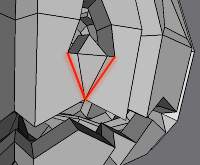
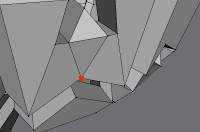
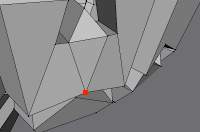
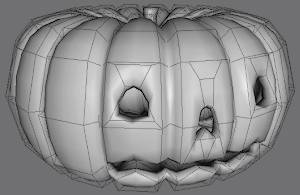
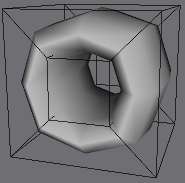
[36] You can do the following in any order, but I'll start with the nose. Select the nose on the "inside" of the pumking. Then Zoom out, (to see the pumking from the outside again), and select the nose on the other side.. And do a Right Click > Bridge command to create a tunnel between the 2 faces. This will also merge 'both pumkings' into 1 object. You should end up with something like pic number 3.. and be able to see inside the pumking from the outside. |
|
|
 |
|
|
|
 |
|
|
|
 |
|
|
|
|
> |
|
|
|
|
|
|
|
> |
|
|
|
|
|
|
|
|
|
|
|
|
|
|
|
|
|
|
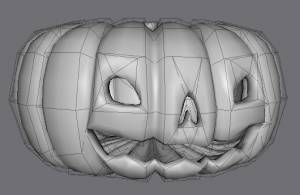
[37] Follow the process you did with the nose, do the same to each eye and the mouth. Untill you can see through all of them.
That's pretty much the end, but I'll continue on a bit with some tweaking. |
|
|
|
 |
|
|
|
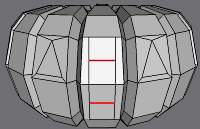
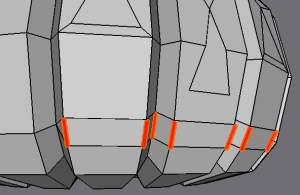
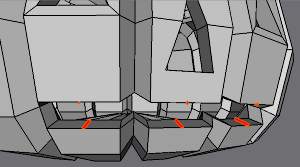
[38] Select the long horizontaly edges inside the mouth, and hit C (connect). |
|
|
|
 |
|
|
 |
|
|
|
|
> |
|
|
|
|
|
|
|
|
|
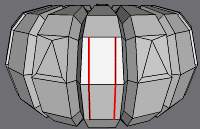
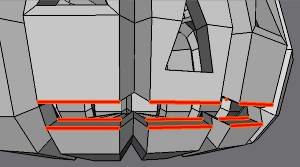
[39] Now Right Click > Move > Y them up a bit to form some teeth |
|
|
|
 |
|
|
|
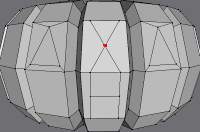
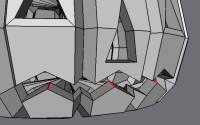
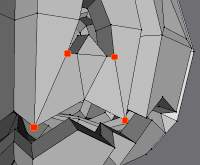
[40] Select these vertices and hit C (connect) to join them. |
|
|
|
 |
|
|
|
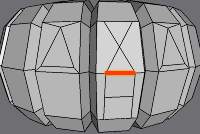
[41] Select these 2 edges and hit C (connect), then Right Click > Move > Y that edge up a bit. |
|
|
|
 |
|
 |
|
|
|
|
 |
|
|
|
> |
|
|
|
|
|
|
|
> |
|
|
|
|
|
|
|
|
|
|
|
|
|
|
|
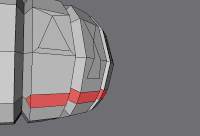
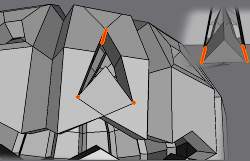
[42] Now I select the top edges of the eyes (2 total) and Right Click > Bevel them a little |
|
|
|
 |
|
|
 |
|
|
|
|
> |
|
|
|
|
|
|
|
|
|
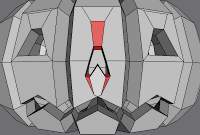
[43] Now take the 2 bottom edges and 1 top edge in the nose and Right Click > Bevel those some.. |
|
|
|
 |
|
|
|
 |
|
|
|
> |
|
|
|
|
|
|
|
|
|
[44] But the pumking is a spherical object, and some of the operations (move along X,Y,X etc..) left a sort of dent under the nose.. Grab those to vertices and Right Click > Move > Normal them out some.. |
|
|
|
 |
|
 |
|
|
|
> |
|
|
|
|
|
|
|
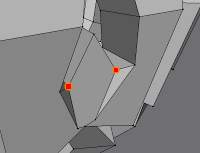
[45] To clean up a bit, select these 2 verts and Right Click > Collapse them, then select those edges and Right Click > Dissolve them. Instead connecting these vertices here (pic #3) |
|
|
|
 |
|
|
|
[46] Then select these edges and Right Click > Dissolve them. |
|
|
|
 |
|
|
|
[47] Select these verst and connect an edge between them |
|
|
|
 |
|
|
|
[48] To finish off removing that dent. Grab that center Vertex below the nose and Right Click > Move > Normal it out a bit to remove that inwards bump |
|
|
|
 |
|
|
|
 |
|
|
|
> |
|
|
|
|
|
|
|
|
|
Done! (about time eh?).. |
|
|
|
 |
|
|
|
If you want to take a closer look at the model, feel free to download the Wings file below.
Download JolPumking.Wings (58kb)
(It's in a .ZIP file, so you'll have to unpack it first. The geocities uploader had an alergic reaction to my attempts at using a straight .Wings file) |
|
|
|
|
|
Now it's fairly easy to add edges and cuts and alter the shape of the pumking |
|
|
|
 |
|
|
|
If I become aware of any new issues I'll update this tutorial as soon as possible. If you need clarification on anything, want to point out a mistake I made, or whatever else.. you can e-mail me.
Happy Halloween :P |
|
|
|
|
|
|
|
|
Common Issues (will add more if/when I become aware of them) |
|
|
|
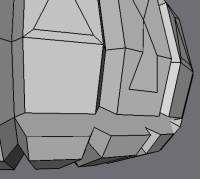
Strange faces covering 'holes' through the model on Smooth When dealing with "tunnels" through the geometry (like the Eyes, nose, mouth on the pumking) it's iportant to have enough edges around the outside of the hole to properly 'anchor' the mesh. Or you'll get wierd results when smoothing. |
|
|
|
BAD - not enough edges to hold things together.. |
|
|
|
 |
|
 |
|
|
|
GOOD - enough edges to keep things in shape |
|
|
 |
|
 |
|
|
|
|
|
|
|
VERTEX SPIKES: Some people have reported a problem with step [11],If you get the apearence of thin spikes sticking out from the pumking after the Extrude Normal Command is performed. (As is seen in this Cactus tutorial on the Wings3D site.). This is caused by using an old version of Wings, this tutorial was written using Wings 0.98.16, please upgrade to at least that release to resolve this problem. WARNING: if you simply delet the spikes as seen in the cactus tutorial this will NOT solve the problem, the over-all pumking shape will still be distorted and you won't be able to go forward with the tutorial successfully.
(thx to both MMacD and Bryde from the Wings3D forum for pointing this problem out, and Bryde for the cactus tut link) |
|
|
|
|
|
|
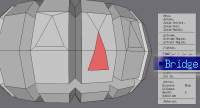
"An object with vertex colors cannot be bridged with an object with materials"
If you encounter the above problem while attempting to use the Bridge command in step [36], this is due to a Wings bug I reported in the Wings 0.98.15a BUG REPORTS thread (post 7 & 8).
The easiest solution is to upgrade to a newer version of Wings (at least 0.98.16). However as this problem isn't as critical as the "Vertex Spikes", I will also include a manual "fix" for the problem if you're too stuborn to upgrade :P
Switch to body mode, and select the inner (inverted) pumking model. (It's easier to select both the inner and outer model, feel free to do so as it won't cause any problems). Now do a Right Click > Colors to Materials. That's it, it's fixed. Now simply repeat step [36].
NOTE: While the model should work fine in Wings now, the inner pumking (created through the 'extract region' command) has no materials assigned to it. This can cause other applications to crash when trying to import this pumking in from Wings. To fix this, switch to Face mode, Select all the pumking faces (polygons) and assign them some material with Right Click > Material > 'Material name' (If you have some custom 'orange color' one for the pumking use that, otherwise default will work fine)
thx to Susan for reporting this via E-mail |
|
|
|
< Back to main page |
|
| All images Copyright (c) Peter Chovanec, 2003. |
|
|
|