SOME LINKS AND HI-TECH OPTIONS
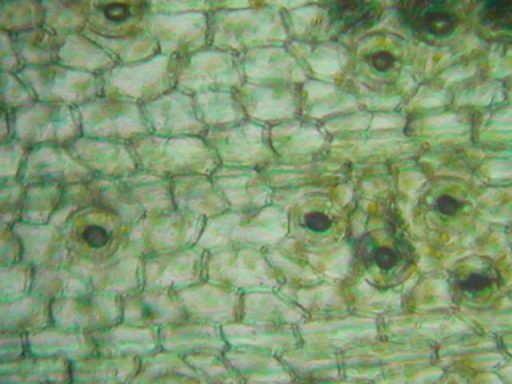
This is a picture of a thin slice of lower leaf epidermis of Cymbidium lowianum, showing the stomata.
There is a large body of information concerning Microscopy on the web. One of the most useful link pages I have found is the one created by Gordon Couger, which can be found at
If you are looking for a microscope, you may find what you are looking for at auctions, second-hand goods shops, flea markets, newspaper smalls, or such sites as eBay. Do not forget that distance purchasing of a microscope attracts a postage and packing charge that may be rather high, by virtue of the fact that microscopes can be quite heavy and require secure, padded packaging.
Another alternative may be a computer microscope. The Intel Play QX3 Microscope is an educational tool made for the younger market. The software is a bit puerile, having been designed with the child in mind, however this microscope could turn out to be quite useful for a simple job like guard cell measurement (I must stress that I have not used this product at all). A review of this product is available at Microscopy UK. A Yahoo QX3 discussion group also exists with 200+ members and a public archive. I have noticed that the QX3 is available from amazon.com at a reasonable price. It would appear that the production of this item has now been discontinued. Perhaps one should wait for other, similar, improved models to come onto the market.
There are digital cameras that can be fitted to microscopes, such as some available from Supercircuits. Model PC-164C is a black & white CCD camera, useful for low light work, such as fluorescent microscopy, and its use is covered on the interesting web page of Eli Silk. Such a camera is useful if you intend using your microscope for all sorts of strange applications, rather than just simple guard cell measurements.
It is much more practical for orchid growers to use a digital camera, such as the (borrowed) Nikon CoolPix 885 I use. A digital camera in the hands of an orchid grower has many uses around the greenhouse, at shows and even in the library. There are a number of information sources on the Web regarding the use of a CoolPix on a microscope. On Gordon Couger's site, information is offered on setting a CoolPix. There is a group dealing with this subject on Yahoo called CoolpixPhotoMicMac and one gets a large number of returns (about 2500) if you put "CoolPix microscope" into a search engine like Yahoo. Interestingly, one gets about 3500 returns if you put "Microscope CoolPix" in! One of the interesting pieces of equipment that I found on offer was an item known as a digital adaptor, priced around $500. So much for cheap techniques.
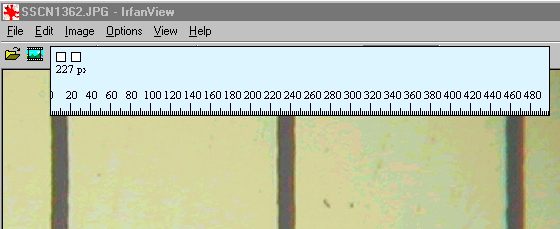
When guard cell measurement are to be made on a computer image, it is imperative that all procedures used in producing the image are standardised. Each image must be taken with identical settings, and if one wishes to work in actual units, it is also necessary to make an image of a stage micrometer or reticle (which one may need to borrow), at the same settings as the other images, so that some device can be calibrated to make real measurements on the screen possible.
A suitable measuring device to use would be an electronic ruler. I have found a few freeware programs of this nature offered on download.com, and after evaluation of these, I find that VirtualRuler is far and away the best. I originally actually got this program off ZD Net India Downloads, because although download.com offered it, they could not find the relevant server. As this download is tiny (24K), and now impossible to find, I offer it here.
| DOWNLOAD VirtualRuler |
This program does not have an installation file. Download it into your temporary folder, unzip the file and extract the two files into a folder on your hard drive (my folder is called "VirtualRuler", naturally). Read the "ReadMe" file to get some idea of how this program works and make a shortcut to the "vruler" file from your Start Menu or Desktop (WindowsHelp may be useful here if you cannot remember how to set up a shortcut). If you require an unzip program, I find ZipCentral to be excellent. It is also freeware, so when you use it, you do not have to feel guilty that you have not submitted your $30 to WinZip.
If you would prefer not to use my download, or you cannot get it to work, another very similar electronic ruler that you could try is the freeware program JR Screen Ruler, or the $15 shareware version, JRuler Pro.
I use an older model trinocular Leitz Laborlux Microscope, given to me by my late father some 30 years ago. For guard cell work, I always used a 40x objective and 10x eyepieces. Some years ago, I purchased a SLR camera adaptor for my microscope, which clips onto the body of my old camera in place of the lens assembly, no eyepiece being needed. With this setup, I have taken some fairly good transparencies. The cost of film has long been a limiting factor in my photography. Film could never be wasted on such trivial pursuits as guard cell measurements. How the digital camera has changed all this!
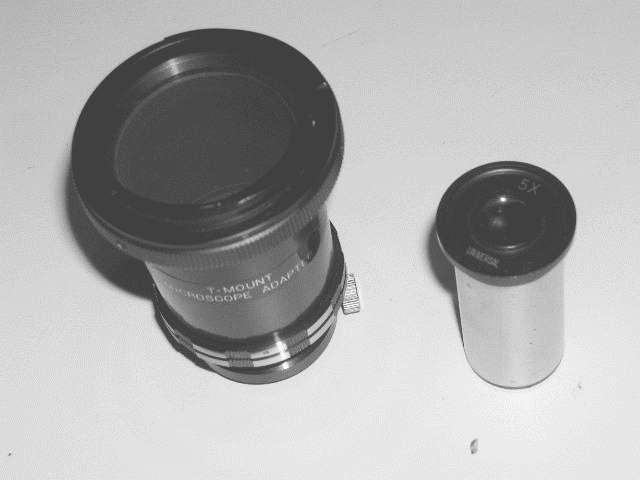 | 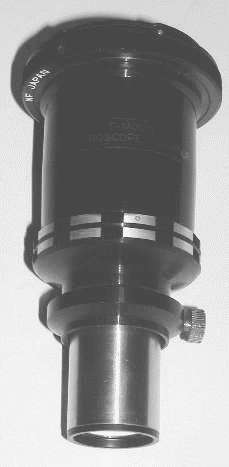 |
The above photos show the adaptor tube that fits onto the photo port of the trinocular tube of my microscope. The left picture shows the tube, which has no internal optics and a normal 5x eyepiece. The right picture shows another view of the adaptor tube with the eyepiece in place. The upper lip of the adaptor tube provides a convenient resting place for the digital camera I use, and ensures that the architecture of the setup is stable and unalterable.
It is critical not to use the autofocus when using a digital camera for photomicrography. So as not to waste the battery charge, the flash, which is not going to do anything, must also be disabled. In the Nikon CoolPix 885, one uses the SCENE setting on the mode dial. The SCENE mode menu is then activated and LANDSCAPE is selected. With this setting, autofocus and the flash are switched off and the focus is set for infinity. All the focusing that is required can be done with the microscope's focus knob. It is apparently important to open the aperture wide (as small a number as possible). I have yet to work out which controls are used to accomplish this, but life is too short to read the 200+ page instruction book that comes with the CoolPix 885. I just check the camera's monitor to ensure that the aperture number is low, which it fortunately always is.
I have a halogen illumination system on my microscope and this is set to a picture exposure time of 1/125 sec. or faster, as indicated on the monitor of the camera. Unadjusted picture framing results in a small bright spot centred in a dark field, when I place the camera on top of my SLR camera adaptor, housing its eyepiece. I use this adaptor as it is the only device I have to hand to ensure that the position of the camera can be standardised and stabilised. By maximising both the optical and digital zoom, an image just large enough to clear the edges of the monitor without vignetting (having a dark circular frame) appears. However, the effect of the 3x optical and 4x digital zooms combined with a 40x objective and 10x eyepiece, means that the specimen becomes magnified far in excess of what is needed. This is corrected by using the 10x objective of the microscope and a 5x eyepiece housed in the adaptor.
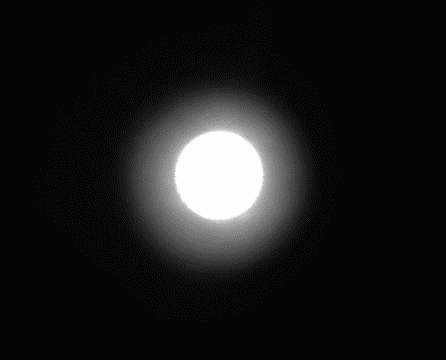 | This is the sort of image that appears on the camera's monitor when the camera is placed directly onto the seat of the adapter. The zoom system of the camera obviously needs to be utilised. |
The slide prepared as described in the article is placed on the microscope stage and focused. The camera is switched on and the zoom is set to maximum by depressing the T button, until x4 appears on the zoom indicator of the camera's monitor. The camera is placed on top of the adaptor tube. The monitor is inspected to ensure that the aperture and exposure time are suitable, the lighting being adjusted as necessary. The image is focused on the monitor using the microscope focus knob and the camera moved to centre the image. One can set a three second delay on the camera's self-timer, which is useful to prevent the vibration which may occur when the shutter button is depressed, although with sufficient lighting (an exposure time of faster than 1/60 sec), vibration should have minimal effect. The image is then captured. Ensure that each image is taken under identical conditions. You can also capture an image of a scale, such as a reticle or stage micrometer under these same conditions. Although it would be ideal to make these sort of images in black & white, because of the greater detail that can be had, with the camera I am using, this would disable the digital zoom.
The usual pictures produced by the Nikon CoolPix 885 are huge: 2048 x 1536 Pixels, ca. 500k in size. It is possible to make small pictures directly on the camera, these coming out at 640 x 480 Pixels, and about 50k in size (or smaller, depending on settings). As these small pictures are adequate for our purposes, it is suggested that one makes them, if possible. Whatever pictures are being used, it is important that each and every image that is going to be measured be the same size as the rest. If you need to zoom the image out on your computer monitor, ensure that each image is zoomed to the same pixel dimensions.
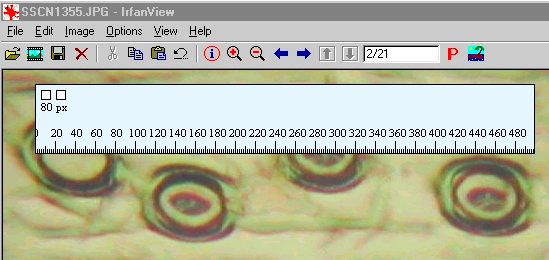
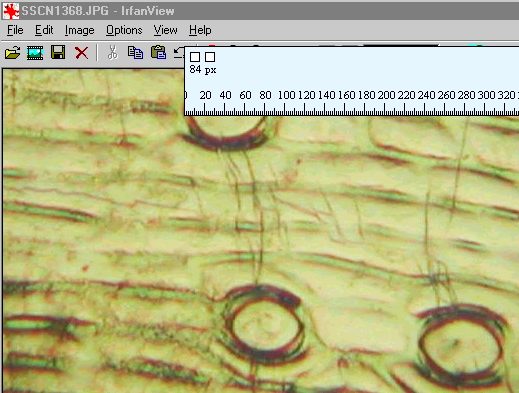
I display my images in a freeware image program called IrfanView. This is very popular and has been downloaded through download.com more than 2 million times ! In the images of measuring techniques displayed on this web page, the full small pictures (640 x 480 pixels) are being used. In each case you can see the VirtualRuler measuring a pair of guard cells.

All the above snapshots were cut out with ScreenPrint Gold. Naturally it is freeware, what else.
Using the graticule measurement to convert the three average pixel counts to microns, gives us:
| PLANT | PIXEL MEASUREMENT | MICRONS |
| C. Esmeralda AM/RHS | 64 pixels | 28 microns |
| C. Balkis 'Nevada' | 76 pixels | 33 microns |
| C. High Sierra 'Green Glory' | 84 pixels | 37 microns |
"In the genus Cymbidium, there is, throughout, a reasonably stable diploid stomatal guard cell measurement in the region of 27 - 28 microns long. From this, one can extrapolate a triploid size of about 31 -32 microns, a tetraploid size of 34 - 35 microns and a hexaploid size of 39 - 43 microns."
we can deduce that the Esmeralda is probably a diploid, the Balkis is somewhere between a triploid and a tetraploid, and High Sierra is heading towards being a hexaploid, something which anyone who has grown the plant probably already suspects.
Particular thanks to Andrew (Spook) Russell for the use of his camera and Andrea Christie at Turtle Rock for assistance with the transfer of images. General thanks to all the people, deceased and living, who have added to the accumulated, inherited knowledge of the ages. Without them I would be sitting here extracting fleas from underneath my loin skins.
Web page created by Greig Russell on the freeware HTML Editor Arachnophilia 4.0, a program given to the World with love by P. Lutus, Port Hadlock, WA.
Should you have any questions or suggestions, or find any problems, contact:
© 2003 Greig Russell
This page was updated on 20 November 2004.