Crusader�s In-Game Message Editor Walkthrough
Firstly this walkthrough assumes that the reader has Appendix E in front of them. Before we start let�s define a few things. The IGMs in Bis are triggered when something happens in the game, we will refer to such a trigger as an �event�. Examples of events are the player�s vehicle being hit by enemy fire or an ally unit being destroyed. Each event has one or more messages associated with it. When an event is triggered then one of the event�s messages is chosen at random and displayed. Each message contains three lines each of 15 characters. Note that a message can include more lines and the lines can have more characters but it is only the first 15 characters of each of the first three lines that are displayed.
When you first enter the IGM editor you are presented with a screen displaying the first event (Enemy vehicle located). The screen is broken in two areas: the blue rectangle which is the message view area and a box with dashed orange lines that is the event and the individual messages. The cursor (a thick grey line) is over the event description, but using the Left and Right on the D-pad you can scroll to the next or the previous event. If you press Down on the D-pad then the cursor moves to the description of the first message for the event. That text of the message will be displayed in the blue rectangle. By pressing the O button you will be taken to the message edit screen where you can alter the message you had selected with the cursor.
The use of the message edit screen is detailed in the manual so please read that now if you are not familiar with the operation of the editor.
In the first example we will edit a message that contains only text and does not include any variables (orange text). We want to start with event 5 (enemy vehicle destroyed) so use the D-pad to move the cursor onto the event description and then press Right on the D-Pad four times to get to event 5. You will see that the event has four messages; we want to edit the second one so press Down twice and then press the O button to edit the message. Clear the message by pressing the X button to get to the menubar and select the left most box (delete all). Press the O button to clear the message and then press the X button again to move to the edit message window. Press the O button to move to the character set box and press Down twice to select the English character set. Use the D-pad and the O button to write the following: �Commander�. Now we want to add a �:� so press Left until you are back into the Character Set Window and press Down three times to select the punctuation character set. Use the D-pad and the O button to write �:�. We have finished the line so we want to insert a new line character (the green arrow) we can either select it like a normal character or use the triangle button as a short cut. Add the new line character and then go back to the English character set. Write �Enemy tank�, to get a space just move to an empty place in the Characters Window and press the O button. Add a new line character and then write �destroyed!�, remember to get the �!� from the sixth character set. When you have done that then
Commander:
Enemy tank
destroyed!
should be displayed in the Preview window. We have finished the message so press the X button twice to get to the menubar and the cursor should be over the �Accept� button (the right most yellow rectangle) so press the O button to return to the IGM editor screen.

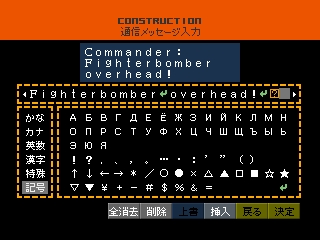
Commander:<Fighterbomber<overhead!<?
Where < is the new line character and ? is the variable character. The message should be displayed in the Preview window as:
Commander:
Fighterebomber
overhead!
Notice that the variable text does not now appear in the displayed message.
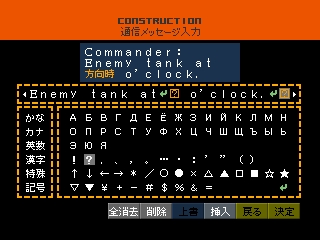
In the third and final example we will edit a message that contains a variable that we will want to include and one that we don�t want. Go back to the IGM Editor main screen and go back to the first Event (enemy vehicle located). Edit the first message, you will notice that it contains two variables, the first is the direction of the enemy vehicle and the second is the type of enemy vehicle located. Clear the message as before and you should be left with the two �?� for the variables. We want to keep the first one (the direction) because it is useful to give the player an idea of where the enemy is, but the second one is often in Japanese so we will keep it out of the displayed message. Before the first variable write �Commander:� new line �Enemy tank at� new line, and after it write � o�clock.� new line. The Message Edit window should display:
Commander:<Enemy tank at<? o�clock.<?
and the preview of the message will look like:
Commander:
Enemy tank at
? o�clock.
Thus we have included the direction variable in the message but have excluded the enemy vehicle type variable.
These three examples cover the basic variations of the in-game messages. Having successfully completed the example you should now be able to edit the rest and to write your own IGMs.