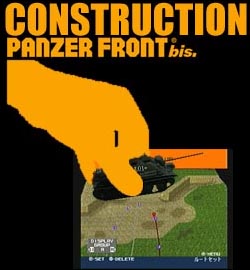
English Language Manual
Throughout the Construction Editor and the menus in Panzer Front Bis the O button is used to Accept and the X button is used to Cancel. This definition is the opposite to their use in the original Panzer Front.
Load Map
Load Saved Scenario
Load Custom Scenario
Exit
Load Map - up/down to select one of 50 available maps. See Appendix C for complete list.
Load Saved Scenario - Load scenerio from memory card.
Load Custom Scenario - Left/Right to select one of ten custom missions included with game.
Exit - yes/no
Memory Slot Slot 1 Slot 2
Saves
O Hose Kicks Arse
O Hose Kisks More Arse
X Empty
Exit
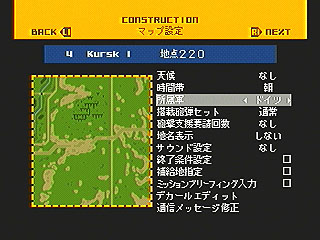
Back L1 R1 Next
4 Kursk I Mission One
************************** Weather Fog
************************** Time of Day Dusk
************************** Which Army USA
************************** Loadout Mixed
************************** Support Fires 6
**********MAP********* Show Place Names Yes
************************** Music Wind
************************** Victory Conditions []
************************** Supply Point []
************************** Scenario Intro []
************************** Paint Scheme
In-Game Messages
Weather (default = None)
None
Fog
Rainstorm
Snowing
Thunderstorm
Time of Day (default = Dawn)
Dawn
Midday
Dusk
Which Army (default = USA)
This setting determines the Map Names of the enemy units. The options are:
USA
Russia
Germany
UK
Japan
Loadout (default = Mixed)
Mixed Loadout
Anti-Tank Loadout
Anti-Infantry Loadout
Empty (no shells)
Supporting Arty Fires (default = None)
None
1 to 9 salvos
Show Place Names (default = No)
Yes
No
Music (default = None)
I - New Song
II - New Song
III - New Song
IV - New Song
V - Credits Music
VI - American Training Music
VII - German Training Music ("Panzerlied")
VIII - Russian Training Music
IX - Wind between buildings
X - Wind on plain
XI - Thunderstorm
American Commentary
Russian Commentary
German Commentary
Victory/Failure Conditions (default = 1)
The blue box is the victory condition while the red box is the failure condition. There are 19 options for the victory/defeat criteria.
There are four customised settings. These are
(1) - is the unit group one
(2) - is the unit group two
(3) - is the time interval
(4) - is the area
**************************
************************** Width 0
************************** Height 0
************************** Position Area
************************** Accept
**********MAP*********
**************************
**************************
**************************
**************************
**************************
Place the Supply point on the map where you want it.
Mission Intro Message
Type in your scenario intro screen. The bar down the bottom says:
Preview
Message
Delete All
Back Space
Over-write
Insert
Cancel and Exit
Exit
Allows you to edit/create the decals for the vehicles. The menu says:
Make Paint Scheme
Load Paint Scheme
The Toolbox contains a series of tool icons, their functions are:
.
Draw
Line
Draw Box
Draw Circle
Fill
Area
Erase
Copy Area
Paste Area
Undo
Clear
Vehicle
Image
Add Numbers
Exit
Load Default Scheme
Memory Slot Slot 1 Slot 2
Saves
O Hose Kicks Arse
O Hose Kisks More Arse
X Empty
Load
Type in messages you want displayed during the game. A list of the messages can be found in Appendix E.
The In-Game Message editor is divided into three areas the Message Window, the Character Window and the Menubar:
acter
Set
Space
Contains a preview of the message and a version of the message that can be edited. Use the D-Pad L or R to move the cursor through the message. The X button takes you to the Menubar and the O button to the Character Window.
Character Window
The character set can be selected on the left-hand side by moving the D-Pad. The third set is English and the sixth set contains Cyrillic and Punctuation. The characters are displayed on the right hand window. The X button takes you to the Message Window, the O button prints the highlighted character at the current cursor position in the message, the square button deletes the character to the left of the cursor and the triangle button prints the new-line character (green arrow) in the message.
Menubar
The function of the buttons is same here as for the Character Window, except the O button selects the highlighted menu option.
Simply pick the equipment and men you wish to use during your mission. The D-Pad is used to scroll through the list, use the Down to move down one item, the Up to move up one item, Right to move down one screen and Left to move up one screen. For a full list of vehicles see Appendix D
This page is broken into nine different groups. The D-Pad is used to scroll through the groups; Down moves down one unit, the Up moves up one unit, Right moves down one screen and Left moves up one screen. These groups are:
A
B-D
E-L
M-P
Q-T
U
V
W
Your Controllable Team
Vehicles (both sides)
Vehicle Reinforcements
Infantry
Infantry Reinforcements
Air Support
Fire Points
Pre-laid Artillery Support
Blue
Yellow
Orange
L. Green
D. Green
Grey
Red
D Red
3 Slots
12 Slots
32 Slots
16 Slots
16 Slots
8 Slots
32 Slots
6 Slots
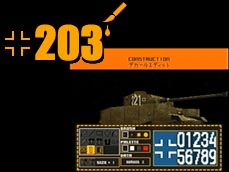
Unit ID Ply
Name Maus []
Name Hose Rules OK
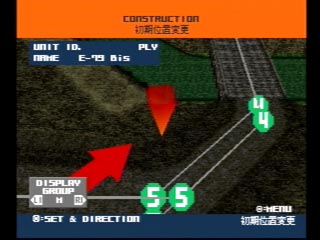
Location
Decals []
Name is your map name.
Location places your starting position and direction.
Decals places markings on the vehicles. Some of the markings allow you to add a serial number. Use the L/R on the D-pad to edit the number. Hold down the square button and use the D-pad to alter the tens and hold down the triangle while using the D-pad to edit the hundreds.
Unit ID A1
Name Maus []
Name A1
Open Fire At Short Range
Crew Quality Green
Location
Decals []
Open Fire at (default = Normal)
A. Long Range (~1500m)
B. Normal Range (~700m)
C. Short Range (~500m)
D. Not before reaching objective
Crew Quality (default = Normal)
A. Green (slow & inaccurate)
B. Normal
C. Excellent (fast & deadly)
Unit ID B1
Name StuG IIIG []
Name B1
Side Enemy
Open Fire At Normal Range
Crew Quality Excellent
Start at Waypoint 1
Waypoints []
Decals []
Side (default = Enemy)
A. Enemy (Red)
B. Friendly (Blue)
Start at Waypoint (default = 1)
Allows you to pick which waypoint to start at. If you make 4 close waypoints at the start, you can then make 4 copies of this unit and just give each one a different starting waypoint from 1-4. This is the fastest way to make complete formations which move together.
Waypoints (default = None)
Takes you to the waypoints screen. The box in the bottom right corner says
Place Waypoints
Select Gears
Save & Exit
Cancel

Holding down the start button moves the view towards the last waypoint.
Select Gears (default = A for all waypoints)
Allows you to pick the highest gear available from each waypoint. Options are A (automatic), 1, 2 and 3.
Unit ID E1
Name JagdPanther []
Name E1
Side Enemy
Open Fire At Normal Range
Crew Quality Excellent
Start at Waypoint 1
Replacement for tank B1
Waypoints []
Decals []
Side (default = Enemy)
A. Controllable (Blue)
B. Enemy (Red)
C. Friendly (Green)
Replacement for unit (default = Nothing)
A. Nothing
Replacement vehicle is active at the start of mission
B. Unit ID (eg "A2","C1")
Replacement vehicle is active when named unit is destroyed.
C. Group ID (eg "B","D")
Replacement vehcile is active when every unit in named group is destroyed.
There is a limit to the number of units active at one time. If number of units set to be active is greater than the maximum allowed then the activation of some units will be delayed until there are slots free. In such as case replacements of units or groups have priority over �Nothing� replacements.
Unit ID M1
Name R-1. Winter2
Name M1
Side Enemy
Open Fire At Normal Range
Crew Quality Excellent
Start at Waypoint 1
Waypoints []
Unit ID Q1
Name R-1. Winter2
Name Q1
Side Enemy
Open Fire At Normal Range
Crew Quality Excellent
Start at Waypoint 1
Replacement for Infantry M1
Waypoints []
Unit ID U1
Name P47
Name U1
Side Enemy
Attack From The North
Attack Starts At 10:00
Repeat Attack Every 05:00
How Many Repeats 3
Attack from the (default = North)
Gives the direction from which the attacking aircraft will come. The options are North, East, South and West
Attack Starts At
The time the first attack starts. Use the D-pad L/R to edit the start time. Hold down the triangle button to adjust the number of minutes.
Repeat Attack Every
How many minutes/seconds before the attack is repeated.
How Many Repeats
How many times would you like this mission reflown.
Unit ID V1
Name Firepoint
Side Enemy
Weapon 17pdrGun
Location []
Weapon (default = MG34)
Every position (building or bunker) may have up to three Firepoints equipped with different weapons (ie one bunker may have a 50mm Anti-tank gun and two MG34�s). Choices of weapons are: -
MG34 (German Machine Gun)
MG42 (German Machine Gun)
Pak 38 (50mm German Anti-Tank Gun)
Pak 40 (75mm German Anti-Tank Gun)
8.8cm Gun (88mm Flak18 Anti-Aircraft Gun)
Pak 43 (88mm L71 Anti-Tank Gun)
7.62mm DT (Russian Machine Gun)
76mm F32 (76mm Russian Anti-Tank Gun)
100mm D10 (100mm Russian Anti-Tank Gun)
Cal 30 (7.62mm M-1919A4 American Machine Gun)
M1 ATG (American copy of 6lb (57mm) British ATG)
3inch ATG (76.2mm M5 American Anti-Tank Gun)
Bren GUN (British Light Machine Gun)
6pdr GUN (British 57mm Anti-Tank Gun)
17pdr GUN (British 76.2mm Anti-Tank Gun)
Location (default = None)
The Firepoints may only be fitted to buildings and bunkers. This means some maps can not have Firepoints
Unit ID W1
Name Support
Begin at 01:00
End at 02:00
Location []
Begin at
Time you want your barrage to commence at.
End at
Time you want your barrage to end at. If no time is given then barrages go for about 30 seconds.
Location
Position the target area for the barrage
Play Edited Map
Save Edited Map
Exit Without Saving
Play Edited Map - This allows you to play your edited map exactly like you would a normal mission. You are given six special menu functions to help you. They are: -
Const1 Show which tanks are still alive
Const2 Show what infantry is still alive
Const3 Makes your tank invisible to enemy
Const4 Makes your tank indestructible
Const5 Destroys all enemy Firepoints
Const6 Destroys all enemy Tanks
The Play Edit Map screen displays the details of the loaded mission and allows you to play the mission as well as view the saved high score.
Time of Day Dawn
Side USA
View Score
Load Mission
Exit