| The Steering Rack |
| By Chuck Melton, Murphy�s Son |
| My car was in a minor accident, and as part of the insurance settlement, they paid for a new (rebuilt) steering rack. Prior to the accident, I was not certain of the rack�s condition, but the previous owner had included a rack bushing with a box of parts. I didn�t know if he got the bronze bushing intending to install it, or if he acquired the part, then determined that the rack didn�t need it, yet. |
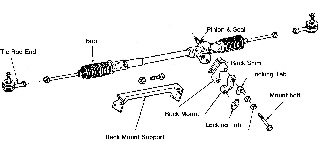 |
| The rack housing was newly painted, and there was no play in the rod, so I suspected the rack was still OK. However, the steering bushing is something every rack will need sooner or later. As long as the insurance company was paying for a rebuilt rack, I might as well take it. This would save me the labor of rebuilding it later myself. Or so I thought. The detailed procedure to rebuild a rack will follow shortly. The vendor delivered a rack quite some time after I got the car back, so it was up to me to install it. To remove the old one, first I unbolted the tie rod ends. Next, I disconnected the steering coupler by removing the cross bolt, and sliding the clamp off the spline, up towards the firewall. |
| There is one rack mount bracket on either end, which clamps the rack assembly. The upper bolt for each of these brackets goes directly into the chassis, while the lower two bolts first pass thru the rack mount support, then into the chassis. It is impossible to get to the nuts welded in the chassis, so great care, and �Liquid Wrench� should be used to avoid stripping the threads. The rack mount support is removed by bending the bolt tabs back, (my support still had the stock bolt-retaining locking tabs), and removing the two lower rack mount bolts. (Upon reassembly I chose to use hex head cap screws with lock washers versus the stock tab method.) There are 3 bolts that attach the rack support laterally to the frame, one on the driver�s side, and two on the passenger�s side. My coolant tubes rest against this support so I had to prop the tubes up, and rotate the rack support slightly to remove it. I found that loosening the 2 upper rack mount bolts helped when rotating the support. The rack then is pulled out through the driver�s side wheel well. The �new� rack went in with little or no trouble. I can actually say that installation is the reverse of removal ! The fact that this task went so easily made me feel a bit suspicious. The next morning, I went out to my garage to adjust the toe-in setting. What I found was that the rack had leaked a significant amount of fluid out via the rack boot. The fluid �should� have been gear oil. It was a mix of water and rust particles in a small amount of what may have been gear oil. Lovely ! (Now you know why I sometimes write under the pseudo-name of �Murphy�s Son�) |
| Now I get to remove the rack again ! The task went a little faster the second time. With the rebuilt rack on the work bench, I found that the leak was from where the band clamp on the outside of the rack had cut the boot. These rack boots were the wrong ones anyway as they have about 14 pleats and are several inches longer than the stock boots having 9 pleats. I removed one boot, and drained a sample of the liquid into a jar. Then I examined the rack. Although the housing was newly painted, the rack itself was in terrible shape. There was a significant amount of pitting all over the rack, and rust had formed in numerous places. Then I opened the bearing cover. See for yourself ! |
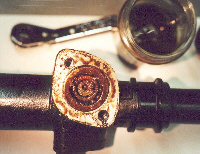 |
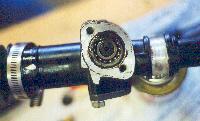
| What you see is not a new bearing or a rebuilt rack, but a nearly 30 year-old, worn out rack, with just a new paint job ! Below is what a decent rack pinion bearing should look like. |
| After a long delay, I received a replacement. The vendor reported that I was given the wrong rack from his inventory. I guess so ! Upon receiving the next rack, you can bet I immediately checked the bearing. It looked acceptable, so I took this one back home. The next morning, I went to install it, and found a large pool of gear oil under it. Yet again, one rack boot had a large cut from the band clamp. The issue with the clamps is that a narrow band is required. These clamps are hard to locate in the USA, so the vendor chose to use a �use once� style of clamp. You can�t tighten them |
 |
| once they are installed, so if they leak (like they have now twice) the clamp must be replaced. Luckily I had saved my old clamps (reusable ones). With the boot damaged, it gave me the opportunity to inspect this rack for similar damage. This rack was in better shape, so I replaced the boots with the correct set from a different vendor, and reused my old clamps. Then I reinstalled the rack. By now I was getting pretty good at this task. Unfortunately, the next day, I found yet another large pool of oil under the rack. What was it THIS time ? The �new� pinion seal was bad. Lovely ! I pulled the rack out for a third time. |
| I called the vendor, and ranted for a while. He wanted me to return the complete rack, but I was not about to trust him again, dubious as his parts seem, so I told him to just ship me a good pinion seal. Then he offered to sell me a set of tie rod end boots, which I needed. Again I was suspicious, but I told him I�d give them a look. Eventually the pinion seal arrived. After it was installed, I gave the rack a VERY close inspection. What I found was the setscrew that holds the bushing was also leaking slightly ! Lovely. It seems that the wrong size tap was used. This could be fixed with a few layers of Lock-Tite as a sealer. |

|