![]() |
|||||||||||||||||||||||||||||||||||||||||||||||||||||||||
![]() |
|||||||||||||||||||||||||||||||||||||||||||||||||||||||||
![]() |
|||||||||||||||||||||||||||||||||||||||||||||||||||||||||
| BASIC NEEDLE TATTING Copyright Oct. 2000 THIS IS THE VERY FIRST THING YOU HAVE TO LEARN. THE INSTRUCTION ON THIS PAGE AND THE NEXT. WILL GIVE YOU THE BASIC RING AND CHAIN SEQUENCE. |
|||||||||||||||||||||||||||||||||||||||||||||||||||||||||
| PART 1 IS THE RING | |||||||||||||||||||||||||||||||||||||||||||||||||||||||||
| MATERIALS NEEDED | |||||||||||||||||||||||||||||||||||||||||||||||||||||||||
| A needle with a blunted point,...Thread the same thickness as the needle...A small crohet hook for the joins,...and patience. | |||||||||||||||||||||||||||||||||||||||||||||||||||||||||
| ABBREV: RING-----------R CHAIN---------CH DOUBLE STITCH---------DS PICOT---------------P or " - " JOIN--------------- J or " + " CLOSE RING------CL R REPEAT FROM * TO ** |
|||||||||||||||||||||||||||||||||||||||||||||||||||||||||
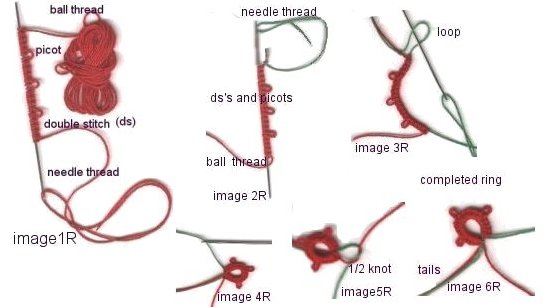
One thing you must do is USE THE BALL THREAD for making the DS'S. ( double stitch) A picot is formed by leaving a space between the ds's. To do a join pull the ball thread through the picot to be joined (usually its on a previous ring or chain). see part 2 the last pic (8) |
|||||||||||||||||||||||||||||||||||||||||||||||||||||||||
| HOW TO READ PATTERNS | |||||||||||||||||||||||||||||||||||||||||||||||||||||||||
| SHORT FORM OF WRITTEN PATTERN :-----RING OF 5 - 5 - 5 -5. Which would be.....5 ds, 1 picot. repeated, 2 more times. or 5 ds(3 picots separated by 5 ds) 5 ds |
|||||||||||||||||||||||||||||||||||||||||||||||||||||||||
| Now the following images 2 thru 5, when completed will give you your first ring. For these instructions I will demostrate with 2 different colors. RED for the BALL thread. GREEN for the NEEDLE thread. |
|||||||||||||||||||||||||||||||||||||||||||||||||||||||||
| Instructions | |||||||||||||||||||||||||||||||||||||||||||||||||||||||||
| Pattern | |||||||||||||||||||||||||||||||||||||||||||||||||||||||||
| ring: 5 - 5 -5 -5 cl ch: * 3 - 3 - 3 ring: 5 + 5 - 5 - 5 cl r ** |
|||||||||||||||||||||||||||||||||||||||||||||||||||||||||
| The first pic. is to show you how it will look when doing your project. | |||||||||||||||||||||||||||||||||||||||||||||||||||||||||
| Image 2 shows the ds's and picots on the needle. Image 3 shows the loop that you get, when pulling the needle thru the ds's. Image 4 shows the closed ring after you have pulled the needle thread all the way thru the ds's firmly. Image 5 shows the 1/2 knot needed to anchor the ring. (also called "shoe lace trick) Image 6 shows the completed ring. Don't take any notice of the tail ends in pics. That is because I'm using two colors for this demo. You will have tail ends to weave in on your finished piece. All you do for that is to weave one tail in the nearest ring or chain, and the other tail into a different ,but nearest ring or chain. |
|||||||||||||||||||||||||||||||||||||||||||||||||||||||||
![]() |
|||||||||||||||||||||||||||||||||||||||||||||||||||||||||
| HOME | TUTORIALS | NEXT | |||||||||||||||||||||||||||||||||||||||||||||||||||||||