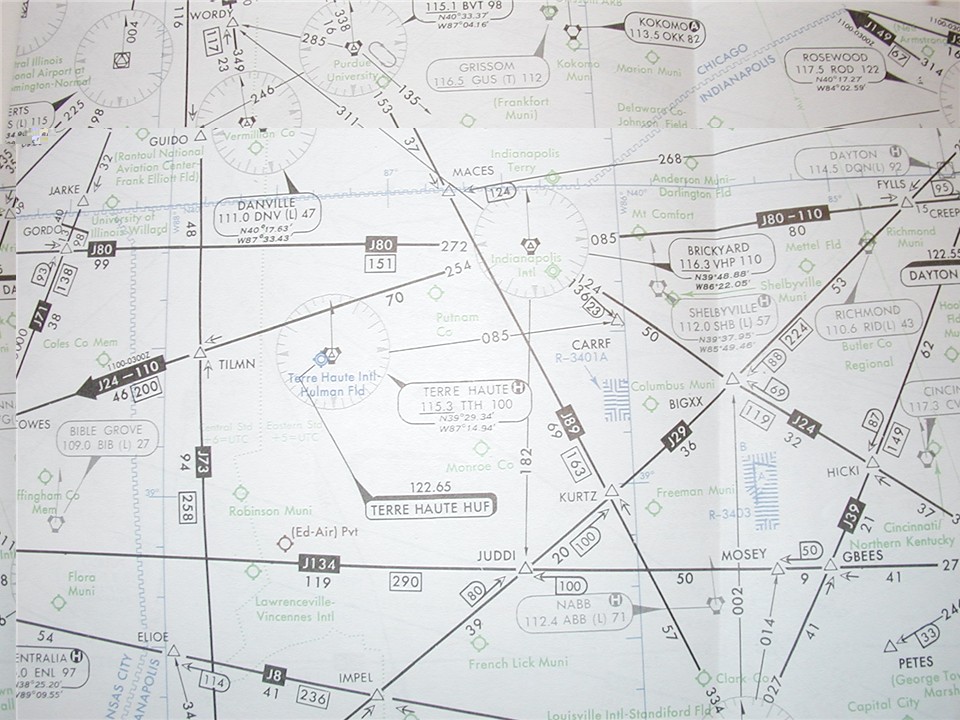
This is a photo of the high altitude enroute chart #4, which covers most of the central-eastern portion of the United States. Due to the size of this chart, only a small portion of it was photographed to provide greater detail.
Enroute Navigation...the Jet Routes
This is a photo of the high altitude enroute chart #4, which covers most of the central-eastern portion of the United States. Due to the size of this chart, only a small portion of it was photographed to provide greater detail.
The black lines you see are called Jet Routes. These are routes flown in Class A airspace, which is above 18,000 feet. Once an airplane climbs above 18,000 feet, the altimeter setting is set to 29.92 inches of mercury, which is the standard pressure at sea level, and provides a standard altitude datum. Below 18,000 feet, aircraft use local altimeter settings, which is the measured pressure altitude at a given location (can vary from 29.50" to 31.50").
The jet routes are labeled just like roadways. You can see J80 and a number of other routes in the photo. The jet routes are defined by NAVAIDS (navigational aids) or waypoints, which are intersections of two bearings from a given NAVAID.
There are two primary types of NAVAIDS. The first kind is the non-directional beacon, or NDB. These were developed in the 1930s and 1940s, and use AM radio waves. A needle on an instrument inside the cockpit homes in on the site of the beacon, and shows the pilot the direction he or she needs to fly to get to the NAVAID. NDB routes are depicted in brown and are called LF routes. They are extremely rare in the United States, but are common in other countries without well-developed airway systems.
The second type of NAVAID is a Very-high frequency, Omni-directional Range radio, or VOR. VORs are very common throughout the US. The way they work is very different from an NDB. The VOR transmitter transmits different signals for each of 360 radials. A circle has 360 degrees all the way around, so each radial is given a different number and frequency. For example, due east is the 090 radial. Due south is 180, due west is 270 and due north is 360. There, the radials start over, with 001. If a pilot wishes to fly outbound on the 090 radial, all he or she needs to do is set 090 in an instrument in the cockpit, intercept the radial until the course indicator is centered, and keep the course indicator centered. The instrument also tells the pilot if he or she is flying TO or FROM the VOR on the given radial.
What this serves to do is provide very accurate course guidance. Instead of drifting around trying to keep the airplane pointed at an NDB, the pilot can apply a wind correction and keep the course indicator centered and know that he or she is flying an exact course to or from a NAVAID. VORs are indicated on the map by several symbols, each showing what kind of VOR it is.
Yes, there are actually three major kinds of VORs out there. The first, and most common, is a VORTAC. The VORTAC is a NAVAID with a paired VOR and TACAN. These are depicted by hexagon with three little squares on three of the sides. TACAN is very similar to a VOR, except that it gives automatic distance measurements to the pilot. This is displayed in nautical miles on an indicator in the cockpit, usually paired with the course indicator. The other kind of VOR is a VOR/DME. They are depicted as a hexagon inside of a square. This is a VOR paired with a DME (Distance Measuring Equipment) frequency, and will essentially do the same thing as a VORTAC. The third kind of VOR, and least common, is a plain VOR station. They are depicted by a plain hexagon. This gives only azimuth (direction) information, and does not give distance to the VOR.
Ok, Ok, I'm almost done with VORs! Last but not least, VORs are also classified as low-altitude (L), terminal (T), or high-altitude (H). Jet routes are defined by H-class VORs. Some L and T-class VORs are depicted on high-altitude charts for information purposes, and are depicted in brown.
OK, so now you know HOW the routes are connected. Now, look back on the chart. You'll see the VOR symbols depicted and those used for jet route navigation are surrounded by a compass rose, with a true-north facing arrow. Eminating from the VORs, you will see the black lines that form the jet route. Immediately outside the compass rose, you will see the on-course radial listed. In order for the pilot to fly the route, they have to dial the radial in, intercept it, and fly it to the change-over point, which I'll talk about later. For this example, look just above the center of the photo, and you'll see the Brickyard VOR (it is labeled with a box that points to it). Both J80 and J110 fly the same route to the east, so it is labeled J80-110. The on-course radial to fly is 085 outbound from the Brickyard VOR.
Directly under the J80-110 label (a black box halfway down the route segment) you will see a number. In this case, it's the number 80. This is the number of miles in nautical miles between Brickyard and the next point along the airway.
Now, let's talk about change-over points. These are the points at which you will switch from one VOR station to the next. Some change-over points are depicted, and if you look at J71 (upper left side of photo), just to the north of its intersection with J80, you will see a change-over point. It looks like half a Nazi swastika, with the mileage of either side written on the top and bottom parts. If a change-over point is not depicted, pilots are required to change NAVAIDS at a mileage breakdown (indicated by an "X" in the route, and denotes a change in direction), a change of direction at a designated waypoint, or if nothing else, halfway between VORs.
Now let's talk some other symbology on the chart. First, each VOR has an information box. This lists the name of the VOR, its identifier, what kind of VOR it is, the DME/TACAN channel frequency, and the VOR frequency. It also lists the VOR's location in latitude and longitude.
For this exercise, let's use Brickyard again. It's identifier is VHP. This is what pilots use to file for a specific routing, and how the FAA airway computers identify Brickyard. Also, each VOR emits a Morse Code signal of its identifier so that pilots can be sure they have the right VOR tuned. The Brickyard VOR is a high-altitude VOR, because on high charts, they are assumed to be high altitude unless otherwise indicated. Look just to the northwest of the Brickyard VOR and you will see the Danville VOR. In its box, it has a (L) indication, which shows it is a low-altitude VOR. On the left side of the Brickyard VOR info box, you will see the frequency, which is listed as 116.3, and the DME/TACAN channel is listed as 110. Most civilian airplanes cannot tune just the DME/TACAN channel, but the distance information is still shown in the cockpit because dialing in 116.3 will automatically pair you with channel 110. Some info boxes have little letters in the upper corner of the box. Look just to the southwest of Brickyard, and you'll see Terre Haute. It has an "H" in the box. This indicates that the VOR can also broadcast HIWAS, or Hazardous Inflight Weather Advisory Services. Finally, just below Brickyard's info, is it's location, listed in lat-long coordinates.
Now we get to the non-VOR symbology. Follow J24-110 from Brickyard to the southwest. You will eventually come to an intersection, or waypoint. This is indicated by a triangle, with a five letter name. In this case, it's TILMN. Again, the FAA computers recogize NAVAIDS by three-letter identifiers, and intersections and waypoints with five-letter indentifiers. They are pronounced as seen, in this case you'd pronounce it "Tilman" or "Tilmen". The small arrows next to TILMN show which radials are the defining radials. In order to have an intersection, you need to have two or more radials to define it. Not all intersections are located on airways. Look southeast of the Brickyard VOR, and you'll find the CARRF intersection. It is not located on an airway, but is defined by the Brickyard 136 radial and the Terre Haute 085 radial. Another thing about these: intersections are formed by NAVAID radials, and waypoints are GPS coordinates. They all have five letter identifiers, but intersections are depicted by triangles and waypoints are depicted by four-pointed stars. GPS waypoints are typically NOT depicted on high-charts, but are located on terminal approach plates.
Airports are depicted as circles. Circles with "prongs" indicates it is a civilian field. Military airfields are depicted as two circles, one inside the other. Joint-use (civil-military) fields have the two circles, with prongs. Not all airports are depicted. Only those with applicable instrument approaches are depicted.
Distances are depicted by a number of methods. I mentioned that the segment of each route is depicted under the route designation box. The total distance for each route segment between two NAVAIDs is listed in an outline box, halfway between the two NAVAIDs. Look at J134 running across the bottom half of the photo. The distance between JUDDI and the last point from the left of the photo is 119 nautical miles. From JUDDI to MOSEY, it is another 50 miles. The total distance on J134 between the two VOR stations is 290 miles, and that number is located just to the right of the J134 indentification box. The number 50, enclosed in a "D" with an arrow pointing to it, located just to the right of MOSEY, indicates the DME reading from the VOR off the photo to the right. As you can see, MOSEY is defined by the 014 radial off the page to the bottom, and the 278 radial off the page to the right.
Other things depicted include the boundaries of the various ARTCC (Air Route Traffic Control Centers). These are called "Center" by the pilots, and the controllers that work there manage traffic in their own sectors. Each Center is broken into many sectors, which have altitude boundaries as well. The Center boundaries are depicted by a blue "zipper" line, and the corresponding Center names are listed on each side of the "zipper". Look in the upper right corner of the photo. You'll see the zipper line, and see that to the north of that line, Chicago Center manages traffic, and to the south, Indianapolis (Indy) Center manages traffic.
These charts also depict certain kinds of Special Use Airspace. SUA is broken down into several categories. The first is called an Alert Area, and is used to denote areas with intensive or unusual traffic, such as flight training. Alert areas are generally not shown on high charts. Military Operations Areas are also not shown on high charts, but are areas designated for military aircraft to perform aerobatic maneuvers. Civilian airplanes are not restricted from entering MOAs. Restricted Areas, however, are (duh) restricted. As secret-squirrel as this sounds, it's usually NOT to hide secret bases. Restricted areas are areas that can pose a flight hazard. Artillery ranges (the shells can travel very high in the air) and other firing ranges, rocket launch pads, and bombing ranges usually make up most restricted airspace. Aircraft flying into these areas can chance being hit by an artillery shell, bullets, rockets, bombs or missiles, so the area is cordoned off. Prohibited Areas DO exist to keep aircraft from flying over areas that have national security senstivity. Areas include the notorious "Area 51", the President's ranch in Texas, and the White House, among others. Aircraft flying into a prohibited area risk being shot down. Note, aircraft generally will not be shot down entering a restricted area...unless that aircraft is accidentally hit by a missile, bomb or bullet from the associated ranges.
Special use airspace is depicted on charts by hash marks, and is identified with the name of the SUA. SUA names are generally a letter identifying what type of SUA it is, followed by numbers. Just southeast of Brickyard, in the photo, is R-3401A. And further to the southeast is R-3403. Both are restricted areas.
Finally, holding patterns are depicted on high charts as well. Holding patterns must be identified with a holding fix. You can't simply start doing circles out there or you will drift all over. Intersections, NAVAIDs and radials can be used as a holding fix. Holding patterns are shown as ovals, and also show the direction of turns (right or left turns). For example, look northwest of Brickyard (top-left of the photo), and you'll see the Boilermaker VOR (identifier is BVT). Just to the right of the VOR symbol, you'll see the holding pattern oval. It shows right turns, and the inbound course is the 135 radial off of Boilermaker. Note, holding patterns can be created anywhere, but depicted holding patterns provide a quick and ready place for a controller to put aircraft if they need to sequence traffic. If a controller wants a pilot to hold, they must either say "Hold as depicted at the Boilermaker VOR", or they have to define the holding parameters for the pilot (e.g. "Hold northeast of the Brickyard VOR 090 radial, right turns...").
Now, a little bit about the coming of GPS navigation. Most commercial, private and military jets are equipped either with an RNAV (aRea NAVigation) or GPS (Global Positioning System) system. Both of these systems allow the crew to input points into a computer, which includes a database of every known NAVAID, intersection, waypoint, airport or other defined point. You can even define your own points using lat-long coordinates. What this means is that the old radio navigation routes that make up the VOR/NDB system will eventually be going by the wayside. Prior to computers, the only way for aircraft to navigate without getting lost was to use the radio-based navigation systems and their corresponding airways. Now it's all changed. Today, a crew may file a jet route to their destination. But as soon as they get airborne, they may request "direct" to their destination, using GPS or RNAV technology to navigate. Or a controller might clear them direct to either their destination or an intermediate point along their route, to save the controller time and the pilots time. For example, say you are flying from Indianapolis to Atlanta. You might file Brickyard (VHP), direct to Louisville (IIU), then get on J89 to Atlanta (ATL). After takeoff, however, the controller might tell you "proceed direct SWAPP", which is an intersection on J89. You would then skip going to Brickyard and Louisville, and just fly straight to SWAPP.
Another thing that many people don't understand or know is that most of the time, pilots choose their own routes. Except for very busy airports, pilots can pick the route they want to fly. Busy airports are the exception because standard controller-issued routes allow for better traffic sequencing and cut down on delays. Often, busy airports have published Standard Instrument Departures, or SIDs, along with Standard Terminal Arrival Procedures, or STARs. The pilots must file a SID or STAR associated with an airport. If they don't, the controllers will issue the SID or STAR in the pilot's clearance anyways. Other busy areas, such as the Northeast Corridor (starting at Washington DC and going to Boston), have "preferred routings", which usually wind up being mandatory routings during busy periods.
Summmary
Well, I hope this provides an informative look at jet navigation. It seems very complex at first, but after doing it for a while, I've found that the ins and outs of navigation charts, routings, and other navigation issues are usually very predictable. Controllers and pilots alike love standardization and doing things the same way each time. So if I fly to Washington DC for the first time and get cleared a certain routing, I know that next time I should expect that routing again. The charts hold alot of information, but you generally use only bits and pieces of it at a time. Again, I hope you enjoyed this insight.
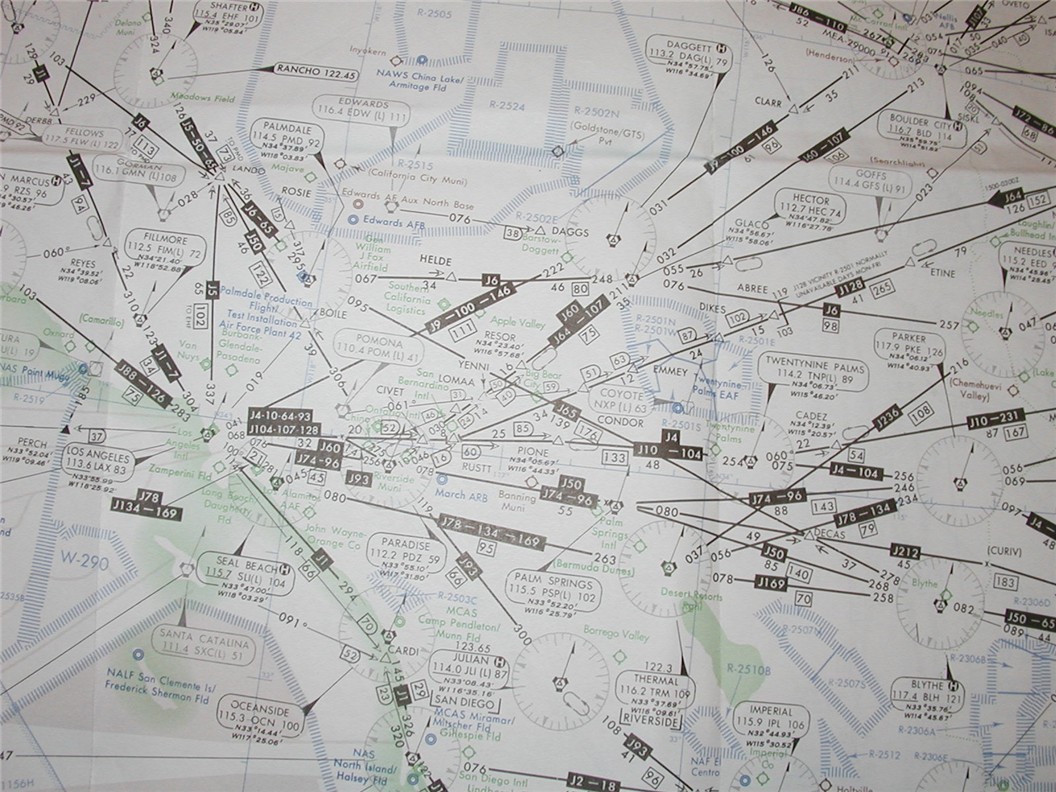
The airspace above Southern California is very busy indeed! Airspace used by Edwards AFB and China Lake NAWS to the north, and Navy weapons ranges to the south channel most airways going to Los Angeles over the central portion of So. California.
Start Page
"The Makings of a Flight" Index
Arriving and Departing an Airfield
Take-Off and Landing Data
© 2000 [email protected]