|
My Volvo 850 started to make grating and crunching noises when I opened the drivers door, after a quick look to check the bolts were all secure, I realised that something was very broken.

After several phone calls and a few visits to local panel beaters,
I found that the cost to repair this was somewhere between A$150.00 to A$450.00.
After searching the web for a few minutes, I found an excellent post by [email protected] on the excellent site http://au.geocities.com/ozbrick850/index.html.
His bloody marvellous
instructions are in red
It
seems this is a common occurrence on many 850s. Mine had the bad version
of it - the weld in the pillar gave up and the plates squeaked and growled
with every opening of the door. After checking for possible approaches
to fix it, it became clear why there is so much work involved when welding
is chosen. They have to take apart the interior trim, knee bolster, electric
wiring, and access the inner side of the pillar, then remove the door,
which is a colossal amount of work. A pleasure for mechanics, who cash
grossly for these trinkets. I came up with a simple solution which is now
3 months old and holds as good as a weld. I did it alone and doesn't
require any interior work.
I thought to myself OK
seems easy enough, Ill give it a go using these instructions...
Who wants to give it a try, follow this:
You
have to take down the door, which is simple - 2 jackstands under the door
in the open position (tape generously the upper face of the stands to avoid
scratching the door and then push the stands up as far as you can, even
forcing the door a little up -it will help to remove the hinges).
I a bit lazier than this,
so I didnt use any stands, the hinges are attached by pins which wont
allow the door to fall off, but the stands may be useful for others because
the door is heavy and care should be taken when lifting it off, NOTE:-
Now is the time to lower the window, because your just about to disconnect
the electrics.

Unplug
the door electric connector by removing the small lockscrew and then twist
the plug -which will come out (I didn't disconnect the battery, the contact
was off anyway) Remove the big torx bolt on the strap and the 2 bolts that
lock the hinges.
This was very easy, the
Torx bolt on the door strap needs a special driver to undo it, but you
can use a 10mm socket to loosen the door hinge locking bolts they dont
have to be totally removed, just loosened a few turns.
then slowly raise the door (window down) and slide the hinges up
to clear their brackets. When removed, put the door with the inner face
down in a clean place.
Make the place where
you put the door quite close to where your working, its really quite a
heavy door.
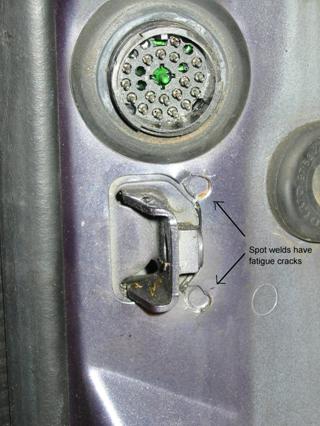 Heres
where you get to see the problem, the two spot welds have fatigued and
cracked.
Heres
where you get to see the problem, the two spot welds have fatigued and
cracked.
This is a design fault,
so check your car if the dealer warranty is just about to expire.
Now
find the big hole just in front of the strap on the pillar, covered with
a big rubber plug. Remove it.
The big rubber bung hole is visible to the right in this picture, with the electrical connector above.
Nows a good time to
wipe off the old grease from the hinges, and go get a magnet, I use the
magnets from busted Hard disk drives, they are really, really powerful
rare earth magnets, and are well worth the effort of dismantling a HDD.
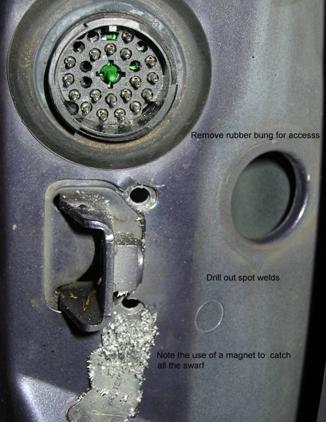
Drill
1 (or 2) 6 mm holes close around the strap- where the separation of the
inner plate is most visible - depending on the severity of the separation
you will find if 1 or 2 holes will fit your case. You have to insert in
each hole a good 6 mm bolt and nut, the nut in interior. Be careful to
drill close enough to the strap and catch the 2 plates (they cause the
squeak/growl), not just the pillar sheet metal.
Note the use of the magnet
to catch all the swarf when drilling the holes, you want to catch all this
stuff as it will cause rust if it gets into the wrong places,
First I recommend feeling around at the back of the plate to get an idea where the back plate ends, the backing plate it has a tiny lip on the top and bottom that might interfere with your hole placement.
Secondly see if theres
anything behind where you intend to drill, just go easy when drilling holes
in case of wiring etc
Lastly I got some paint
and a cotton bud and painted the holes I had just drilled to stop any rust.
The
big hole you removed the rubber plug from allows you to access the
interior of the pillar with your fingers and fit a nut on the back
of each hole, while from the outside fitting the bolt in the hole and catching
the nut.
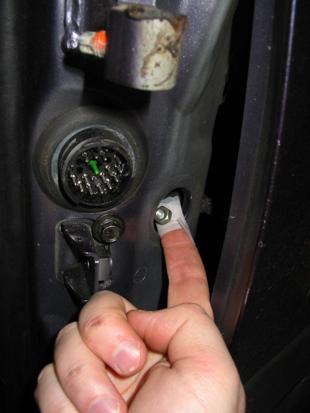
It
takes a while to fit them-I taped with scotch tape the nut on my middle
finger to prevent it from dropping indside the pillar -crucial idea after
I lost 2 nuts inside ! When you catch the nut with the bolt, you're set.
This was a brilliant
idea and worked like a charm but , I unfortunately wasnt set as the nut
just spun around, I couldnt hold it with my finger - Bugger!!. So I went
and found an old 10mm spanner, and using a vice I bent it 15 degrees about
25mm from the top, this allowed it to fit into the bung hole and hold the
nut, I also tied a string to the spanner to stop it falling into the hole.
Tighten
well to strongly catch both plates, follow then with the second hole -one
could be enough in many cases. I chose to drill 6 mm holes and fit 10mm
bolts and nuts. I sprayed the fix with paint to prevent my bolts from rusting.
I used some spare
Volvo M6 bolts about 10mm long with Locktite blue to stop anything shaking
loose.
 Reinstall
the door, no adjustments necessary because you just unlocked the hinges
and now you'll put the bolts back for each hinge, as it was before.
Reinstall
the door, no adjustments necessary because you just unlocked the hinges
and now you'll put the bolts back for each hinge, as it was before.
Dont forget to put some Locktite blue
or red to stop the hinge locking bolts and check strap boltfrom working
loose, and regrease the hinges,
The last comes
the bolt for the strap (don't forget the rubber cover).All operations on
the door must be done with it opened as far as it will go. The fix is as
good as a weld and costs 2 bucks, -excluding your work, which is, I recognize
-pretty hard when you have to fit the nuts inside the pillar, blindly.
But hey, what a satisfaction when you succeed!
Thanks to [email protected]
What can I say
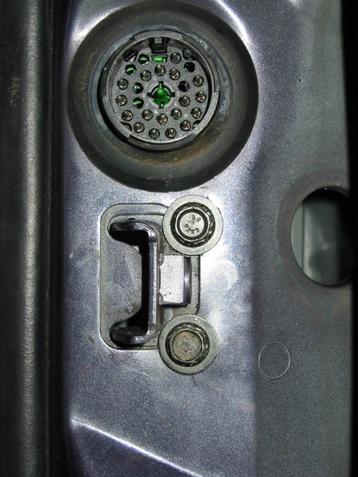
Heres
a picture of the finished fix - Thanks for these instructions, its saved
me a bundle and I do indeed find great satisfaction in spending only $7.95
on Locktite threadlock glue, and I recommend anyone with this problem to
give it a go.
See box below for more important comments on this fix from owners...
[ "Jwcook@(trousers)ozemail.com.au
Spam trap - please remove (trousers) to email me" ]

If you have any experiences, facts, hints comments or data that you think might be useful on the site, please

and I will post it, with an acknowledgement of your contribution (if you so wish).