|
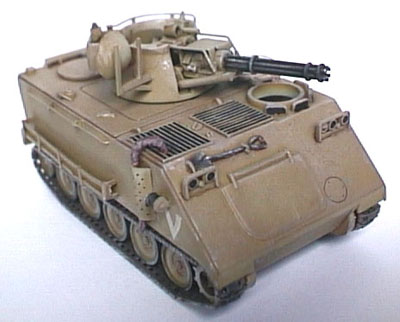
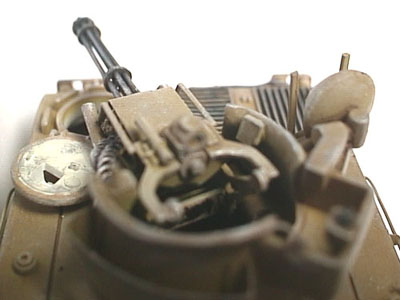
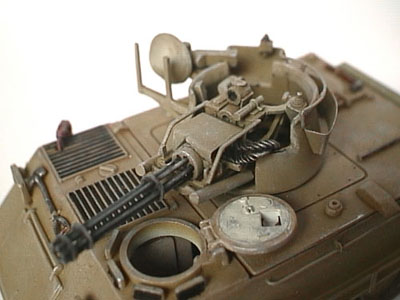
Israeli M163 About the vehicle: The M163 is basically the Vulcan air defense system mounted on an M113 chassis. As is typical with Israeli vehicle, additional stowage racks is evident on the side of the vehicle. Why I built this kit: I find the mechanism and form of the Vulcan cannon (or gun) to be very appealing and I am a fan of Israeli armor as well. When Esci came out with a kit of this vehicle I jumped at it, and boy was I sorely disappointed! Not to be deterred, I decided to build the model anyway...another lesson in patience, another eye straining exercise. About the kit: The Esci kit is bare bones, the vulcan cannon provided was totally unusable. However the turret was decent, and the M113 body was good. I built this kit around the time VP released their Vulcan kit (1/35 scale) and book, these were tremendous help (I bought the book and photocopied the instructions for the kit) for scratchbuilding the main gun. I also bought the Vulcan kit from Italeri (1/35 scale) for reference. So on with the show... Add-ons: The first thing to do was to get drawings of the main gun in the right scale (the kit provided guns are way too small). The strategic cuts were made to the turret to get rid of the molded on gun and the top edges were filed to a thinner width. Aside from the radar mount, and antenna mount (a roco item) everything else you see in the turret was scratchbuilt. The side stowage racks were fashioned from sheet brass. The main gun body is plastic tube, to which I glued one of the ends from a 1/72 scale rocket launcher pod (from a fujimi cobra gunship kit). It had the right amount of holes and was the right diameter. The gun barrels are plastic rod and the other rings around it is cut and shaped from plastic sheet. It's really tricky to figure out which parts go where from the photos, so this where having an actual kit for reference came in handy! There's quite a number of things to add to the body. These include stowage racks from sheet brass and wire. Exhaust extension made from thick copper wire and wrapped with masking tape. The exhaust guard is brass sheet with holes painted on. Painting: As usual, I airbrush on a base coat of tamiya acrylic paint. I think I used Dark Yellow for this one. Then a lighter shade of this base color was airbrushed selectively on horizontal surfaces represent fading paint. Add nicks and scratches, wash with dark brown oil paint thinned with turpentine then drybrush to taste. Another one bites the dust, I thinking of putting this in a diorama with my Isherman. Any strong objections from military historians out there? Ciao |
 |
 |
|
 |
|
 |
