|
|
|
|
|
|
|
|
|
|
|
|
|
|
|
|
|
|
|
|
| RAY'S MONTERO SITE |
|
| HOME PAGE |
|
| MY MONTERO MODIFICATIONS |
|
|
|
| SPECIFICATIONS |
|
|
|
|
CB Radios |
|
| MODIFICATIONS |
|
|
|
| PLANS/PROJECTS |
|
|
 |
|
THE RATINGS |
|
|
|
|
| RESOURCES/LINKS |
|
|
|
|
|
|
|
Function
Installation
Fit n Finish
Overall |
|
 |
|
|
|
|
| OFF ROAD TRIPS |
|
|
|
|
 |
|
|
|
|
OK. So after having two portable CB units, I decided it was high time to look at |
|
|
|
|
|
|
|
|
|
|
|
|
|
|
|
|
|
|
|
| READER'S RIGS |
|
|
|
|
|
|
|
|
|
|
|
getting a permanently mounted unit for the Monty. I also knew that I wanted several specific key features... |
|
|
|
|
|
|
|
|
|
|
|
|
|
|
|
|
|
|
| CONTACT ME |
|
|
|
|
|
|
|
|
|
|
|
|
|
|
|
|
- Ease of operation, especially with the Monty's low DIN openings.
- Auto Channel Scan
- Weather Channels
While looking through a number of online sources and realizing there are "ZERO" CB shops in the San Jose Area (closest is in San Carlos, or Morgan Hill). I happened upon a unit made by Cobra which had all the controls built into the "Mike" unit.
I thought to myself,"Hmmm.. that's exactly what I need. Controls at my fingertips at all times, no longer had to look down to see what channel I was on, or to find a knob or switch, and worries about a portable unit wearing out my interior."
Sold. Only problem was, they cost $125.00. After searching for quite some time, I found a unit on EBay for only $80 delivered. Done!!
|
|
|
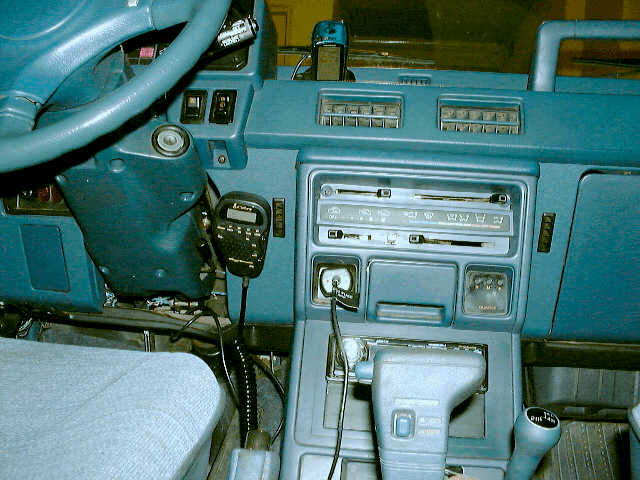
After recieving it, I found the best place to mount the handset for the unit was to the right of the steering wheel between the steering column and the radio console. After a quick session with a drill (two 3/16" holes) and a power driver, I was able to mount the clip which holds the hand unit. You can see the mounted handset to the right.
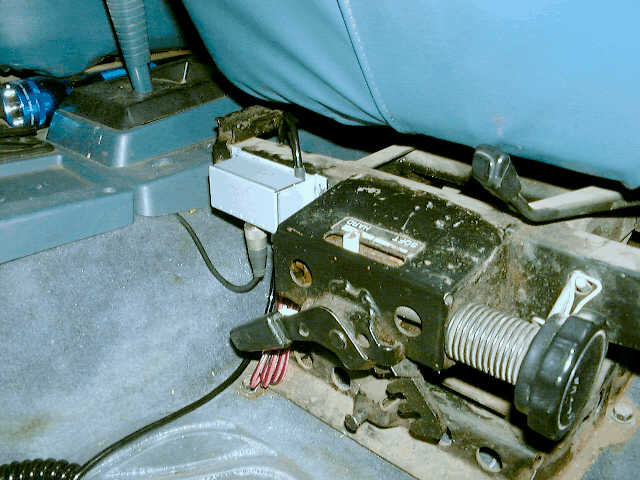
Now I needed to figure out where to mount the 1 1/4" x 11/4" x 4" CB base box. I found an, unobtrusive, but still accessable location on the front of my driver seat frame. After another quick session with the drill (this time using Carbide Bits) and a power driver, I was able to effectively mount the unit. Again, you can see a picture to the right. |
|
 |
|
|
|
|
|
 |
|
|
|
|
|
After this was mounted, it was just a matter of wiring the unit to +12V, Ground, and to the Antenna. In the picture above, you can see the antenna cable tucked into the center console/shifter area. I used my existing Firestik antenna and merely used a longer length (9') of coaxial cable to allow it to reach the base box under my seat. The best part is, it's all fully accessable, yet nearly invisable. |
|
|
|

|
|
|
Hits since created on 12, March 2002 |
|
|
|