| Antarctica - Nuggies On Ice |
| [ Home > Other Pages > Training ] |
| Antarctic Field Training - (AFT) |
| Before being let loose on Antarctica, it is necessary to receive some training on what dangers there are and how to get yourself out of trouble. It never ceases to amaze that so many people are blissfully unaware of the scale of Antarctic dangers. For example, crevasses are not simply cracks in the ice. Some of them are big enough to put cruise liners into without touching the sides, or deep enough to take a skyscraper building. Once in one of those you don't come back unless you are prepared and have the necessary training. We get some of this training in Christchurch before departure, but the real nitty-gritty gets delivered in the first few days on the Ice. Firstly, there are lectures on such things as what dangers to be prepared for and helicopter safety awareness. You learn about what is in a survival pack. A survival pack is what you take with you into the field for emergencies and it contains emergency rations, a tent, sleeping bags and cooking equipment. If you have to open the survival pack then you know you are in a spot of bother. They contain food for two people for about a week. Being one of the few people to have used a survival pack for real, I can say that dehydrated food tastes real good when you are halfway up Mt.Erebus and a fair distance from home. |
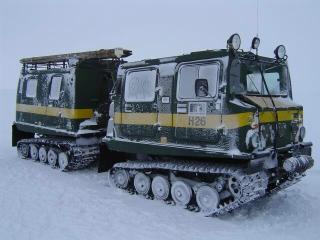
| Following more training on how to rope together, climb ropes using prussicks and lighting Primus stoves, you are taken to the field training area. Your mode of transport is a Hagglunds tracked vehicle. Designed as troop transport for snow environments, they are pretty sparse when it comes to passenger comfort. Driving through the snow here creates little snow storms that cover the windows completely. Therefore there is not much to see. The picture to the right is a Hagglunds after a trip across the snow. Arriving at the camp site you find that you have to make your own accommodation out of the materials to hand - namely snow. |
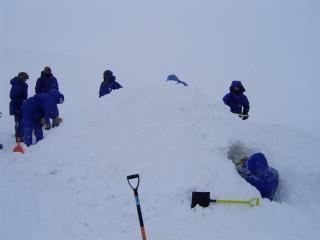
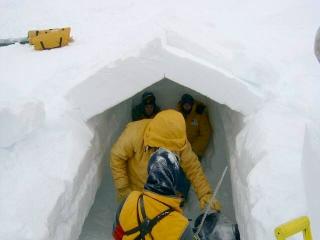
| The pictures to the left show two methods of making a shelter. The first is a snow mound. This is fairly easy to construct. Heap all your bags and camp boxes on the snow and cover the heap with a ground sheet. Then start shovelling snow on top of the heap. When you have a covering of about 30 centimetres (one foot) and it is packed down hard - this can take about an hour - you are ready for stage two. This involves tunneling to the buried bags and removing them. Once they are out of the mound, get inside and start digging once more - this time down into the snow. After about another hour you have a shelter for two or three people. The second method is to form a trench in the snow using an ice saw to cut slabs of snow. The slabs removed from the trench are then used to form a roof over the trench. The next step is to cut sleeping shelves from the side of the trench. Again, after about two hours, you have a shelter for, this time, four people. In both cases, depending on the artistic flair of those involved, you can construct furniture to make your stay a little more enjoyable. Also a wind break is a good idea before you run out of breath. |
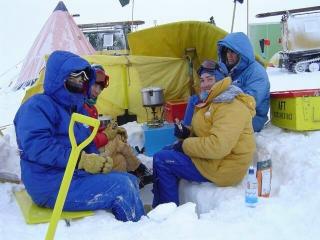
| Following the building of your home for the night, you get to put into practice all the lessons you have learned on how to light and run a Primus stove. Then comes the snow melting to make a hot drink. People never cease to be surprised when they find out just how much snow is necessary to get enough water to give three or four people a hot drink. On top of that, there is the water needed to re-constitute the dehydrated food for you evening meal. When the meal is prepared, you are in for your next surprise. There is no time to stand round waiting for everybody to be served. You eat your food as |
| soon as you can because, if you don't, in a very short while you will have a rather solid chunk of something that is less than appetising. Doing the dishes is a breeze, however. All that is needed is some clean snow and a paper towel and there you have it - a clean plate once more. |
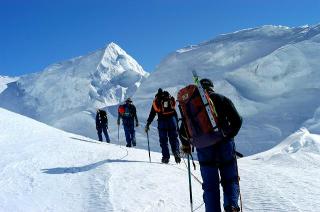
| Sometime during the two days of field training, you will be roped together with a number of others to learn how to cross a crevasse field safely. You will be taught how to identify and probe for crevasses in what looks like an area of flat snow. The group on the right is safely roped together, so that if anybody goes into a crevasse, the people either side can brace themselves to stop that person falling too deeply into the crevasse. Then follows the process of extraction. I guess the lesson here is, don't fall in the crevasse in the first place. |
| Also, at some stage, you are taken out on to the sea ice to learn about sea ice cracks. These fall into two broad catagories - static cracks and active cracks. Static cracks are reasonably safe to cross and a merely where the sea ice has cracked in two due to up and down movement of the ice. The edges of a static crack are normally the full thickness of the ice and straight up and down. Active cracks, on the other hand, are very dangerous. These occur when a crack has movement caused by the two sections of ice moving back and forth against each other. This results in edges that are irregular and undercut. People are taught how to drill the ice, measure the thickness and profile the shape of the crack. |
| Winter Field Training |
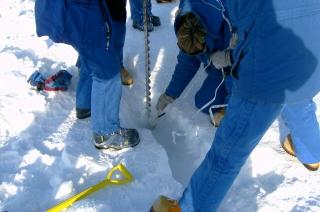
| Before the summer science season draws to a close and while there are still a lot of summer base staff around, the winter team go off and do field training for winter. As well as being a refresher for field training already covered, we learn additional skills. On the first day we travelled out on the sea ice near Turtle Rock to practice how to profile a crack. We need to know this to find out if the ice near the crack will support our vehicle safely. The first thing we have to do is clear the snow from the ice so that we can accurately measure the ice thickness. Next we have to drill holes through the ice at regular intervals across the line of the crack. A line is then lowered down the holes to measure the ice thickness. The distance between the two points of minimum thickness to support the weight of the vehicle is then the deciding factor as to whether the crack is safe to cross or not. Sometimes this involves laying bridging timbers carried on the vehicle for that purpose. |
| The picture on the right shows our group profiling a large crack. As you can see, from the person on the right, sometimes the snow covering the ice can be quite deep. Depending on the thickness of the ice, this can mean quite a lot of digging. Others in the group are using an ice auger to drill the holes. Using a standard brace-and-bit handle and 1-metre auger lengths, there can sometimes be a lot of drilling involved before getting through the ice. The result of the exercise here was that the crack was too wide for our vehicle to cross safely, even if bridging timbers were used. We detoured to a safer area of ice bypassing the crack. |
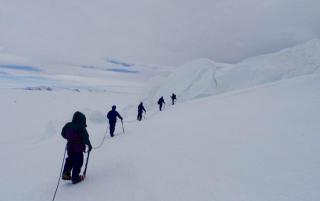
| The next order of business was to establish a camp for the night. Even though it was fine, where we were at Turtle Rock was very windy. We travelled over Hut Point Peninsula to Windless Bight. Luckily the place lived up to its name and we found a camp site where there was not a breath of wind blowing. It didn't take long to set up the tents and we then got some more digging experience. Somewhere to cook meals that is additionally sheltered is a good idea, in case the weather starts deteriorating. We dug out a kitchen area, complete with a ledge for the primus cookers and used the blocks of snow to build a wind-break wall. More digging and we had a dining area, with seats for all. The picture, at left on top, shows our campsite in Windless Bight. The next day, we broke camp and moved off to an icefall that was heavily crevassed. What we learned today was firstly the correct technique for roping together and travelling through crevassed areas. This is not as simple as it sounds. The rope between you and the next person must not be allowed to become too slack or too tight. If the person has the misfortune to go through a snow bridge over a crevasse and the rope is too slack, they will fall to far down the crevasse, with a greater risk of injury. Too tight and you can be over-balanced and dragged into the crevasse also. |
| So that's us roped together, in the picture above, climbing through the ice-fall. Later on, when we were coming down off the ice-fall, there were a number of times when this technique was put into practice as people fell through snow bridges over crevasses. A highlight of this exercise is learning techniques for extracting a person who has fallen into a crevasse. This is a lot of fun and we get to be lowered into a crevasse, while the rest of the team set about setting up the gear for the extraction technique used. This exercise uses quite a lot of equipment and once again involves a lot of digging in the snow. The technique we used in this instance was for a soft snow extraction. Some distance from the crevasse we dug two trenches in a "T" shape, with the bottom of the "T" facing the crevasse. A length of metal stake called a waratah, with a long prussick, (loop of rope), at its mid-point was then placed in the cross part of the "T", with the prussick laying in the vertical part of the "T". Ice axes were used to pin the apparatus to the snow. A series of prussicks and carabiners were arranged on to this "deadman" anchor to enable the team to work the rope holding the person up and out of the crevasse. In a real situation, all of this would have to be performed while the next person on the rope was carrying the weight of the person in the crevasse. Only when the anchor was completed could the person holding the rope then release themselves from the rope to arrange the lift out of the crevasse. |
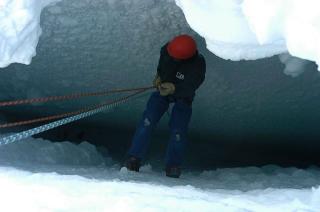
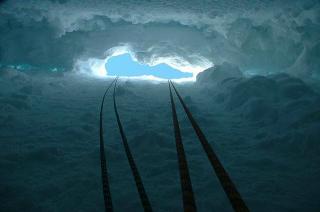
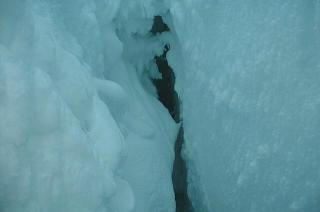
| The sequence of pictures on the right, above, show what the inside of a crevasse looks like from the view-point of somebody dangling on a rope. The top picture is of me being lowered on a belay into the crevasse. This in itself is quite a good exercise in belaying and abseilling. The middle picture is what the world looks like from about 20 metres down the crevasse. The last picture is perhaps a little more sobering. Below your feet, dangling in a crevasse, is a small glimpse of more crevasse going down further than you can see. About now you hope that nobody goofs! |
 |
 |
 |
 |
 |
 |
 |
 |
 |
 |
 |
 |