Select Create a new project, give it a name and a path. Make sure that you have enough space left. As mentioned before FU takes quite a bit of space.
You will need the following software for this guide:
FairUse_0.30_Beta.zip
Audio Utilities
nandub1.0rc2.zip
If you wish to do multiple encodings or have the audio encoding and muxing done automatically, be sure to check out FUBatch written by beardboy.
Step 0: Read the FAQ's
Step 1: Encoding the video / Ripping the audio
Open the Fair Use Wizard and press I Agree to continue to the
following screen. If you get an ASPI error message when opening FairUse,
download and install ForceASPI.
Select Create a new project, give it a name and a path. Make sure that
you have enough space left. As mentioned before FU takes quite a bit of
space.
At a later point you may come back to Fair Use, maybe to add another encoding session, or to encode again with different parameters altogether. As long as you don't delete the .fud and .fup files on your harddrive you can still load the project after closing Fair Use using the Open an existing project button.
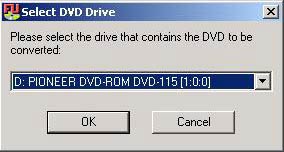
Here you'll select your DVD drive. If you get an error message here
that means you don't have a working ASPI layer installed and you should
download and install ForceASPI.
This screen allows you to select which movie to encode. You will usually
see one long one, and possible one (the trailer) or several (outtakes)
other short chains. This particular DVD has 2 trailers and a "making of"
clip. The longest chain is usually the main movie. Chain 8 above has 4
Audio channels (English 2.0, Eng 5.1, French, and directors comments) and
2 sets of subtitles. You'll be able to verify if you've really chose the
right chain before you start encoding.
 This is the
ripping stage, depending on the speed of your DVD drive and the size of
the selected chain, this could take anywhere from 10 minutes to an hour
or so.(as a reference, this picture IS actually using the chain that was
selected in the last step and the dvd drive shown a few steps back) ONCE
THE ABOVE SCREEN FINISHES YOU CAN REMOVE YOUR DVD. I say this because there
has been many posts in the forum from people who don't seem to realize
this.
This is the
ripping stage, depending on the speed of your DVD drive and the size of
the selected chain, this could take anywhere from 10 minutes to an hour
or so.(as a reference, this picture IS actually using the chain that was
selected in the last step and the dvd drive shown a few steps back) ONCE
THE ABOVE SCREEN FINISHES YOU CAN REMOVE YOUR DVD. I say this because there
has been many posts in the forum from people who don't seem to realize
this.
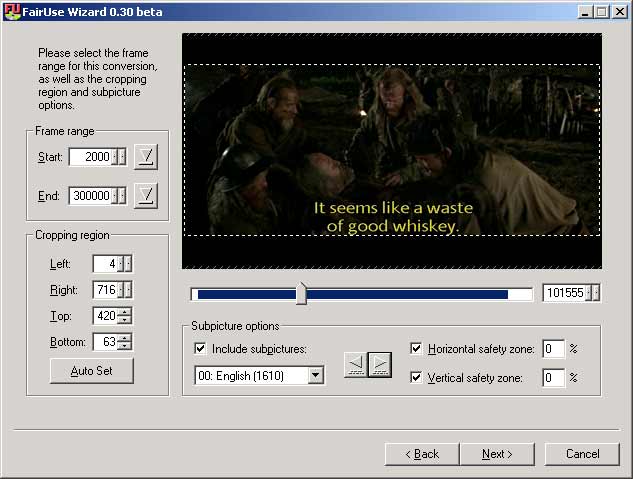
Here you can select a frame range to encode. I like to cut out the
credits and also the stupid logos that show up at the beginning. Here is
my reasoning: I don't watch the credits, or like watching the producer's
logo, so I'd rather FairUse make use of disk space on the part of the film
that I actually want to watch. So, do it how you like, I usually have my
DVD player open at the time to see if there is some important audio before
the video appears. I also make sure there is nothing after the credits
as is the case in some movies....(Wayne's World, Southpark, ...etc.) Use
the slider below the movie to move towards the end of the film, then use
the small arrow buttons (next to the number 101555 in the above picture)
to get you exactly where you want to end the encode. Then press the End
button. Do the same for the beginning of the film.
Press the Auto Set button and the program will automatically crop the movie properly.
If you want subtitles now is the time to select them (check Include subpictures and select a stream). Selecting subtitles will also show the grey rectangle, which represents the safety zone which subtitles won't be able to cross (e.g. you don't get subs outside this rectangle). You can configure the safety zone using the Horizontal / Vertical safety zone fields. I have had success setting the safety zones to zero, but it's always good to check a few subtitles before continuing. This can be done using the right and left arrows within the Subpicture options. Try to find a long subtitle and make sure it all shows up within your cropping region.
Here you can select one of the most powerful features of Fair Use:
IVTC, which will work even with some Anime titles. If you don't know what
IVTC is don't worry, you don't have to know. Just press the Auto Detect
button and press OK to whatever FU has to say.
When you're encoding a PAL movie there will be two other modes instead of the ones shown: Native mode and Field Align mode. Don't let this deter you, the procedure is exactly the same: Press Auto Detect, then OK to what it comes up with.
Here you enter the final size of your movie plus the audio data rate.
For VBR mp3's, this data rate is an average for the file and can be found
by opening the file in Winamp and pressing Alt+3 (View File Info). The
info window will open and near the bottom left there will be a number followed
by kbit (VBR). For Example: 93kbit (VBR). But since we have not yet encoded
the audio, we must make a guess. If you plan on following my guide to create
the audio, a good guess is between 80 and 110 Kbits/sec. If you are
going for 2 CD's, it's probably a good idea to use a higher quality VBR
mp3 which could come out up to170Kbit/sec. Choosing the correct Audio
data rate at this point is not crucial as you will be able to change it
later. If you want, just leave it at the default 128 for now.
Fair Use will stick very closely to the final AVI size so you don't have to worry about your file not fitting on the number of CDs you intended to put it on. I actually figured out that my 700MB CD's could hold 702MB of data, so I use this value, in this case 1404 to span 2 CD's. Select a resolution which offers an acceptable compression ratio to you. The instructions say the compression ratio must be below 120:1 for action movie and 150:1 for a drama. The lower the compression rate the higher the quality of course, but you do not want to lower the resolution too low. It has also been said that many computer will have a tough time with playback of anything with a width over 640, so keep that in mind as well.
Fair Use will do as good as possible to keep a constant quality given the parameters you set.
Why is your favorite resolution not available? FU tries to respect the aspect ratio of the movie as closely as it can but it can't stretch a movie. Therefore it will rather cut off a few pixels at the borders giving you slightly odd-looking resolutions at first sight. (Don't worry, just don't think about it and you won't notice.)
Here you can define how many encodings to make. I've had some good
results by just leaving it at the default of 4 and pressing Auto Add. Recently
I have been working during the day, so time is not an issue and I let it
do 5 encodings. Some people like to autoadd 10 encodings, but I think that
if you are going to spend that much CPU time on encoding, you might as
well do so with a little foresight. But for general use under fair compression
settings, 4 or 5 auto-added encodings should be just fine. Adding
additional encodings is likely to only increase the quality of the
final AVI slightly, but some people (myself included) would like to see
just how good a FairUse DivX can get. As you can see above, I have also
added a Diff Tracking encoding to test out this new feature and I must
say that I am pretty impressed and you should test it out yourself if you
have the time. Just press the add button and choose Diff Tracking as shown(below,
left). It should be noted that mixing DT encodings and regular(FM
and LM) encodings is a bad idea for a couple reasons: first it can cause
huge gaps in the possible filesizes that the crosscutter can acheive, second
the DT encoding might be way off from the desired file size and therefore
not used much(if at all). Though the second case will allow the correct
filesize to be generated, adding the DT encoding is a huge waste of time
just to get a couple usefull frames out of it.
You will also add your audio stream from this screen, just press the
other add button to bring up the window (above, right) in which you can
choose the correct stream.
If you have a choice, as I do in this case, between a 2.0 stream and
a 5.1 stream (both of the same language and content of course), I'd say
choose the 2.0 stream. Once you convert it to mp3, it will only have 2
streams anyways, so you might as well get the dvd studio's stereo downmixing
instead of attempting to do it yourself. But if the multi-channel
audio is the only choice, AZID will still do a great job of stereo downmixing.
In order to prevent problems during fast forward/backward FU will, in addition to the VKI on scene changes, also place keyframes after a certain interval and prevent too frequent keyframe insertion. These is done by the KF Min / Max parameters. It's best just to leave those alone.
Once you've got your encodings ready press Next and the encoding will start. It will take a VERY long time, but considering what it is doing(basically performing many flask encodings at once, and just like flask, you'll notice that lower resolutions will have faster encodes) it's not too slow. But still, you better make sure you don't need your PC much for the next day or so.
Get used to seeing this screen. This one has been going for 9 hours
or so already.

After the encoding finishes, a short screen pops up to load all the
encodings along with their associated qualities. This is so quick, that
unless you're sitting in front of your computer when encoding finishes,
you may never see that screen. As you can see above, the DT encoding
has prevented the output file from acheiving the filesize that I wanted.
However, this 698MB file will be better quality than a 702 MB file would
have been if I had left the DT encoding off.
Now it is time to step away from Fair Use and convert the audio(see below).
Put in your audio data rate from LAME or winamp and press Recalculate to generate your crosscut list from your encodings. In this case we have a diff threshold of 10993 which is not bad. If you get a diff threshold below 11000 the result will be pretty good, between 11000 and 12000 the result will be acceptable and if it's above 12000 it is suggested you allow for a larger output size, go back and define other encoding sessions (don't delete any of the created AVIs, they will still be used by FU), go back and encode your audio at a lower setting, or create a new session at a lower resolution. Press next when you are satisfied with the information on this screen.
And to reiterate this important point: FU doesn't favor Fast Motion at all. It just tries to keep a constant overall quality and while it's true that taking Low Motion for a certain scene might have made it look better the size would also have been increased, or you'd have to decrease the quality of another scene. FU does everything it can to deliver the best quality while respecting the constraints you put upon it. Since it uses a metric that calculates how the human eye will perceive a particular scene or group of frames, I tend to trust it. However, if you feel that any of the encodings is hindering the quality of your file, you can perform the following steps to remove the encoding:
There are several ways to deal with the audio in DivX and all have their
pros and cons:
| Method | Pros | Cons | Comments |
| Just use the AC3 | Simplest | Requires codec for playback, filesize | It can't get any easier than opening up Nandub and choosing your AC3 file, but on single-CD DivX's you lose a lot of video quality because AC3's can be quite large. A special codec must also be loaded on any machine that you wish to play it on. |
| FUBatch | Simple, 1-step DivX, batch encodings | Can't get audio bitrate | Covers for FairUse while audio implementation is not yet complete. Set everything up and start up FUBatch, then come back to find your final DivX complete with audio. The downside is that VBR audio will require an additional step since you can't predict the bitrate beforehand. |
| HeadAC3he | High quality, fast | Can't use in a batch file | Fast, high quality AC3 to Wav, including normalization and DRC. It requires user intervention to get to final mp3 format. Can now encode directly to mp3, but lacks advanced options. |
| BeSweet | no intermediate files, fast | Can't use all LAME switches | Saves disk space by not using a temporary wave file, as such it is very fast and only a single step. It uses lame_enc.dll so the only downfall is that not all the lame switches are available. |
When LAME is done, it will show your your average bitrate. I prefer
this over the winamp method since winamp seems to round down, adding to
the filesize overshooting problems. Just take the value shown in
the dos window and instead round up to avoid any overflow(i.e. 84.3 -->
85kbits/sec). Alternatively, you can open your newly created mp3 in winamp
and press Alt+3 (View File Info) The info window will open and near the
bottom left there will be a number followed by kbit (VBR). For Example:
95kbit (VBR). Now we take this number and head back to Fair
Use.
For additional info on the audio conversion and to download the separate
command-line programs, go here.
Step 3: Joining the audio and video
When I first started using VBR mp3's, I used the mp3 version of Vdub
1.4c to add audio to the FU generated video. But I figured that since nando
is constantly working on nandub, It
should be good for the job. As it turned out, I mixed the same audio and
video file with nandub and with vdubmp3 and ended up with a slightly smaller
file using nandub, which leads me to believe that it's doing something
right, since the final size ended up closer to the size predicted by FU
(granted it was probably less than 500k difference, but still).
here we go:
If you have used VBR mp3 as I do, you will need to read
this in order to ensure that your final AVI is not too big to fit on
your CD.
You should now have a perfectly sync'd, high-quality DivX containing just the frames that you wish to watch, at the exact size that you wanted. Please feel free to let me know if anything in the guide was confusing or unclear, or if anything needs to be added. I hope this guide helped. {-n24-}