|
|
|
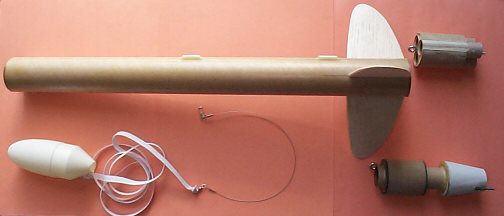
One evening I was sitting in the middle of my rocketry workshop (3/4 of the basement). I was looking at a Big Bertha nose cone and an 18" length of BT-60 body tube. Next to them was a partially built Astron Sprint kit. Also sitting on the table was my very old and dear Ranger with the three engine cluster. I'd really love to have a Big Bertha that flies on a 24mm engine. I'd also really love to have a Big Bertha that flies on a three 18mm engine cluster. I'd also love to have a Big Bertha that looks sleek and sexy like the Astron Sprint. All of these wishes eventually gave birth to my Bad Bertha. Bad Bertha would be an upscale of the Astron Sprint with three elliptical fins, a tapered tail cone and a 24mm engine mount. By making the tapered tail cone/engine mount assembly removable, Bad Bertha could also be flown with a removable cluster of three 18mm engines. Now that I had the concept ironed out, there were only a few minor details. An upscale of the Astron Sprint was pretty simple. The stock Big Bertha body tube and nose cone don't provide an exact upscale of the Astron Sprint (3/4" too short), but I decided that I'd allow myself some latitude and stick with the stock Big Bertha parts. I opted for the 3-fin design of the Sprint over the 4-fin design of the Big Bertha. Here's how the parts broke down:
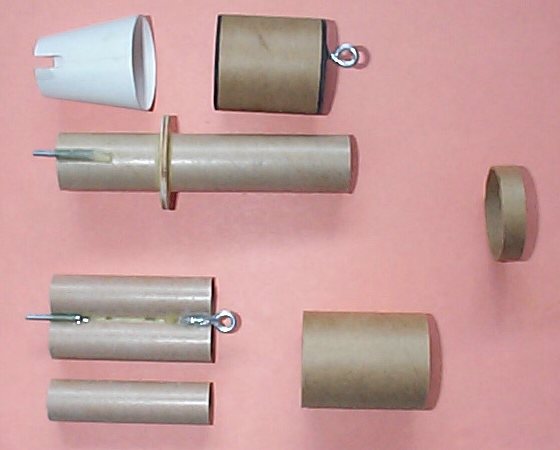
For my upscale fin pattern, I downloaded the Astron Sprint fin pattern from JimZ's website and set my copier for a 168% enlargement. I cut the three fins out of 1/8" balsa. For the tapered tail cone, I created the flat pattern using Microsoft Visio along with my tapered tail cone formulas. The only real issue left was how to do the engine mounts. I remembered reading something about a modified Big Bertha a while ago on Rocketry Online. After poring through the Forums, I came across Mike Rangitsch's posts on his "Better Bertha". I decided that I'd use an approach similar to his for my two different engine mounts. Here's a material list - just in case you are interested in making your own Bad Bertha.
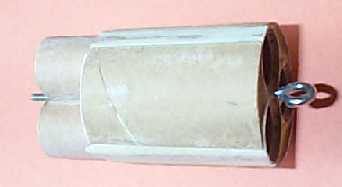
For the 3-engine cluster, I glued 2 of the BT-20 engine tubes together. Then I epoxied a 1" long #4 screw (with the head cut off) and a screw eye to the 2 tubes. After the epoxy set, I finished gluing the third engine tube to the other two. I had to grind away a little of the epoxy to get a good fit for the third tube, but it was no big deal. This arrangement created an engine retainer at one end and shock cord mount at the other. I cut a JT-60 stage coupler into 3 pieces and glued them to the 3 engine tubes. I cut out pieces of heavy card stock to fill the large gaps between the JT-60 pieces and the engine tubes . I used wood filler on the outside to help create a tight seal. I glued engine blocks into the tubes 2 1/2" from the aft ends. Here are the steps I took to make the 24mm engine mount. I made the tapered tail cone. I slipped the tapered tail cone over the BT-50 tube. I slipped a heavy duty centering ring onto the tube and slid it back until it held the tail cone snugly in place. Without moving the centering ring, I carefully removed the tail cone. I glued the centering ring in place. I epoxied a 1" long #4 screw (with the head cut off) to the end of the BT-50 engine tube. I made a small cut-out in the tail cone to clear the screw and glued the tail cone in place. I cut 3/8" off of the JT-60 stage coupler to use as the thrust ring. I glued a stage coupler and two centering rings together. I epoxied a screw eye to the forward centering ring. I glued the centering rings/stage coupler assembly to the BT-50 tube. I glued an engine block into the tube 2 1/2" from the aft end. I used wood filler to make a smooth transition between the tapered adapter and the screw. I painted the aft end of the assembly.
Before I went out for my first launch, I grabbed an EM2050 adapter. This fits inside a 24 mm engine mount tube and will allow me to test fly my Bad Bertha on a singe 18mm engine.
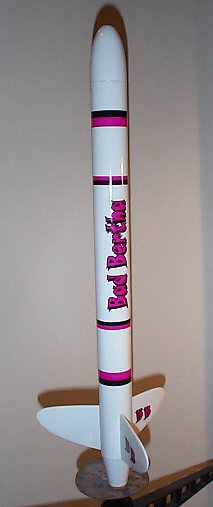
I cut off the damaged section and added a new length of body tube with a coupler. A couple of coats of white paint and Bad Bertha was ready to go again - without the forward decal stripe this time. June 17, 2001 (Father's Day): We went out to launch rockets today - a GREAT way to spend Father's Day. Bad Bertha flew today and this time she behaved herself. August 6, 2001: Christie used the Bad Bertha to take home a blue ribbon at a local NAR Drag Race competition. She won 4 consecutive heats. Way to go! September 2, 2001: Bad Bertha did her maiden launch with a D12-7 engine. The flight was beautiful, but the delay was just a little too long. It was certainly better than using 5-second delay though. Next I flew her with the cluster of three C6-7's. All of them lit and Bad Bertha screamed skyward. I didn't think she was ever going to stop. At the end of her 7-second delay, she was nearly out of sight. From what I could see, the parachute popped right on queue at apogee. CONCLUSIONS: The Bad Bertha as become one of my favorite rockets. She doesn't have the bulkiness of the Big Bertha. She has a nice size with very sleek lines. She flies beautifully. Try this one sometime. It's an easy build and a great addition to any fleet.
*************************************************************************************************** This page was created: April 3, 2001 Modified: May 19, 2001 Modified: August 6, 2001 Modified: September 7, 2001 I welcome comments from viewers of my pages. Feel free to send me an email: [email protected]
|