|
Minolta
Alpha Dynax Maxxum 507si 600si 650si Classic Panorama Date Camera Organization
Notes v
2002-10-06 13:37
Beyond The Owner's Manual - Culled the best of the Magic Lantern and Hove books and wrote my own addition to the Minolta Owner's Manual and published it to http://www.camerareview.com/templates/reviews.cfm?camera_id=115 along with about 3 dozen other Minolta 600si users. Also published to http://groups.yahoo.com/group/Minolta/message/9144 where there are about 1,700 members. Finally evolved as a semi organized collection here on this page! |
|
Please browse and enjoy, offer feedback, and return often!
| Minolta
Alpha Dynax Maxxum 507si 600si 650si Classic Panorama Date Camera Beyond the Owner's Manual: Tips and Tricks Compiled by Peter Blaise Monahon [email protected] (this is also available within the Minolta Owners Manual in Adobe Acrobat PDF form. See the Table of Contents at the http://www.geocities.com/minolta507si600si650si/index.html page) |
|
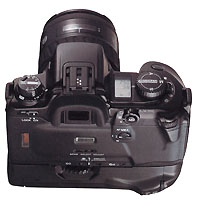
LCD
Displays Check: On the Minolta 507si, 600si, and 650si camera, to
check the valid functioning of every LCD Liquid Crystal Display element:
1 - Set the Drive Mode Selector to Multiple Exposure, 2 - Press and hold the ISO Film Speed Button while opening and closing the battery door. All displays appear in the Body and Viewfinder Data Panels.� 3 - Open and close the battery door to return the displays to normal. Auto Exposure Lock: Only the AEL Auto Exposure Lock button will lock exposure when the Minolta 507si, 600si, and 650si camera is set for Center-Weighted Average Metering Mode or Spot Metering Mode.� Pressing the AEL Auto Exposure Lock Button locks the exposure settings and switches the meter to Spot Metering Mode.� The AEL Auto Exposure Lock control has no function in M Manual Exposure Mode. You have three options for locking and holding the desired exposure value on the Minolta 507si, 600si, and 650si camera: 1 - Using M Manual Exposure Mode, once set, the camera auto functions will not override your Aperture and Shutter Speed selections.� 2 � Using 14 Segment Honeycomb Metering Mode and an attached automatic lens in AF Auto Focus mode, you can lock the exposure reading in P Program Exposure Mode, A Aperture priority Exposure Mode, or in S Shutter Speed Priority Exposure Mode by pressing the Shutter Release Button part way down.� 3 - Center-Weighted Metering Mode and Spot Metering Mode readings can be locked using only a third method - pressing the AEL Auto Exposure Lock Button, marked AEL to the right of the eyepiece. You can use the AEL Auto Exposure Lock Button to lock the exposure setting in any of the Minolta 507si, 600si, and 650si camera's three metering systems.� AEL Auto Exposure Lock is especially useful in the automatic exposure modes, Program, A Aperture priority, or S Shutter priority, when you want to take a meter reading from one part of your chosen photographic subject scene and then focus on another part.� You can do this by focusing, and possibly zooming in, on the detail you want to meter and then pressing and holding the AEL button.� [AEL] appears in the Viewfinder Data Panel.� You must maintain pressure on the AEL button until you release the shutter to the picture.� Then aim the focusing target at your subject and press the shutter release part way down to lock focus.� You can then reframe and adjust the lens zoom if necessary to get the image you want.� Then press the shutter release all the way down and make your exposure. By Minolta factory default, the AEL Auto Exposure Lock feature is effective only while you hold it down.� To reset the AEL Auto Exposure Lock feature to toggle - AEL on at first press, off at second press - hold ISO Button switch and tap AEL Auto Exposure Lock Button. Front and Rear Control Dial Rules: Generally, both front and rear control dials increase the numeric value being controlled when rotated to the right, and decrease the numeric value being controlled when rotated to the left. The Front and Rear dials Control Dials on the Minolta 507si, 600si, and 650si camera can be used interchangeably to set camera body Shutter speed and an attached automatic lens Aperture in all Exposure Modes and operations except M Manual Exposure Mode. In M Manual Exposure Mode, the Front Control Dial sets the camera body Shutter Speed and the Rear Control Dial sets an attached automatic lens Aperture.� For guidance from the Metering system, rotate the Control Dials in the direction of the arrows in the Viewfinder Data Panel to obtain a Shutter Speed and attached automatic lens Aperture to correspond with the camera Metering system's assessment of your chosen photographic subject. Viewfinder "Long Eye Relief": The viewfinder image and all displays can be seen in their entirety from a distance of 0.9 inch (22.7 mm), appropriate for photographers wearing glasses. Setting Viewfinder Diopter: You can easily set the diopter correction without a lens on the camera.� Point it toward a bright light source and turn the small diopter adjustment dial (next to the eyepiece) until the brackets etched on the viewing screen appear sharpest.� The dial sets correction factors between -2.5 and +0.5 diopters. High Shutter Speed Flash: The Minolta 5400HS accessory flash unit emits a short pre‑flash in HSS High Speed Synchronization Mode, which fires when the camera's Shutter Release Button is depressed half way.� This allows the camera metering system to measure the subject's illumination at this instant and select a flash intensity and Shutter Speed for balanced illumination of the subject and the background.� If, while in P Program or Aperture priority Exposure Mode, a Flash to Shutter synchronization speed faster than 1/200 second is called for, the system automatically shifts into High Speed Synchronization Mode.� High Speed Synchronization Mode Flash differs from conventional flash by firing a series of high-frequency pulses at 50 k Hz that resemble a constant light source.� Even illumination across the film frame is assured during the entire time the camera's shutter curtains are open to record the image. Flash Auto Program: The Minolta 507si, 600si, and 650si camera selects a flash program when the retractable flash head or an accessory flash unit is activated. However, in Program Exposure Mode with sufficient available light, the camera will not use the flash unless you press and hold the Flash Control Button during exposure. Auto Focus Illuminator: The Minolta 507si, 600si and 650si camera Auto Focus Illuminator light feature of the built in flash or attached accessory flash will not function in C Continuous Auto Focus mode. Auto Metering Features: The metering system of the Minolta 507si, 600si, and 650si camera starts with a proven auto focus-integrated computer first introduced by Minolta with the xi series cameras.� This computer ensures that the light meter's main emphasis is on the area in sharp focus.� This optimizes exposure for the primary subject. The camera meter is calibrated for medium gray, which is equivalent to an 18%, reflectance.� This value was arrived at with the assumption that 'average' photographic subject scenes have a contrast range of 1:32.� This is a valid assumption for common outdoor scenes that include grass, dirt, rocks, trees, and sky, for instance.� The various reflectance values average to a median value with a density of 0.75, or 18% reflectance. The camera meter measures light reflected back from the subject through the lens, hence the term TTL Through The Lens metering.� This is also the design of all other modern SLR Single Lens Reflex cameras. When the camera metering system determines the subject scene to be a landscape, metering emphasis is on the lower section of the frame.� In strong backlighting, such as when shooting toward a bright ocean, the camera metering and exposure computer automatically compensate for a bright rendition of the scene.� However, with a small subject on bright sand or surf, such as a small boat on a large body of water, expect to need to dial in a +1 EV Exposure Value compensation factor because the camera metering system interprets such a scene as a landscape. When you set the camera to the evaluative 14 Segment Honeycomb Pattern Metering Mode, the camera computer sets its own Exposure Compensation in an attempt to render a bright scene or dark scene accurately on film.� For example, beyond a certain high brightness level, the camera system increases exposure by one EV Exposure Value stop to render the subject as bright. Use the Exposure Compensation feature to assist the camera's Metering system to accurately match your chosen photographic subject scene brightness dynamic range to your chosen film's sensitivity dynamic range: A white surface reflects more light than a gray surface - approximately two stops more. + Plus EV Exposure Value Compensation will increase the amount of light reaching the film to render a light photographic subject accurately. A black surface reflects less light - approximately two stops less. - Minus EV Exposure Value Compensation will reduce the amount of light reaching the film, to render a dark photographic subject correctly. If the range of brightnesses within your chosen photographic subject scene are within the + or - range of the Viewfinder Data Panel scale, then they can be recorded accurately within most film's reproducible dynamic range.� Any index reading of +3 or greater will probably be reproduced as white on film, and any reading of -3 or beyond will probably be reproduced as black on film. To toggle on/off the viewfinder LCD indicator for Exposure Compensation, hold the ISO Button and the Depth Of Field Preview Button. The center-weighted metering is not linked to the auto focus system, nor does it input exposure corrections of its own.� Primary emphasis is placed on the subject area within the brackets etched on the viewfinder, with much less emphasis on surrounding areas, and none on the top section where sky might be located. Auto Focus Features: In the Minolta 507si, 600si, and 650si camera, program modes are aware of an attached automatic lens focal length.� A telephoto lens activates higher shutter speeds, and a wide-angle lens activates smaller apertures.� For example, the camera sets a small aperture for a landscape to achieve an extensive range of apparent sharpness.� If the AF Auto Focus system detects motion, it sets a high shutter speed such as 1/500 second to stop action.� For a portrait, a moderately wide aperture is set to blur a distracting background while keeping both the subject's nose and ears in focus.� In selecting an aperture-shutter speed combination, the system considers such factors as focal length, subject reflectance and contrast, subject distance and type, and the reproduction ratio, or degree of magnification.� The system then selects an appropriate combination of aperture and shutter speed for the situation, however it will try to maintain a hand-holdable shutter speed, such as 1/60 second shutter speed with a 50mm lens, to reduce the risk of blur from hand held camera shake. To disable AF Auto Focus lens to Shutter interlock, hold the ISO Button and the Lens Mount Button while turning the camera ON. Automatic Exposure Bracketing:� Automatic Exposure Bracketing drive mode exposed 3 consecutive images, one at normal EV Exposure Value, plus one at +1/2 stop EV Exposure Value and then one at -1/2 stop EV Exposure Value, which is a rather narrow exposure range best suited for the sensitivity and dynamic range of slide film.� For other film, you can use manual Exposure Compensation control, perhaps taking two additional frames, one at +1 or greater and the other at the +2 or greater setting. Multiple Multiple Exposures: Although you can pre-set a maximum of nine exposures on one frame of film, you can actually achieve any number.� If you want to shoot 16, for example, merely reset the Multiple Exposure feature to 8 after shooting the first 8. Body Depth: The depth of the Minolta lens mount to film plane is 44.7mm. Setting DX Film For More Than 24 or 36 Frames: The Minolta 507si, 600si and 650si camera will rewind the film immediately after the last frame of 24 or 36 exposures as sensed by the DX coding on the film can. The selected Aperture and Shutter Speed values will disappear immediately after the last exposure when rewind begins preventing you from viewing and recording these values. To wind to the true end of your film and expose additional available frames, scrape the paint off the film can DX sections 8, 9 and 10. The camera will then rewind only when film advance is not possible due to reaching the true end of the film, or if you manually press the Rewind Button. This permits you to manually rewind after recording your Aperture and Shutter Settings after the final frame, either 24 or 36, or to expose an additional frame. However, be aware that rewind will begin immediately after the final exposure, so watch for and record you final frame Aperture and Shutter Speed before or during the final exposure. |
Home