Jeep Main | 1981 CJ-7 Year 1-4 | 1981 CJ-7 Year 5-8 | Ford V8 into CJ swap | Scrambler | Rubicon
GTO | Minibike
1981 Jeep CJ-7 Year 1-4
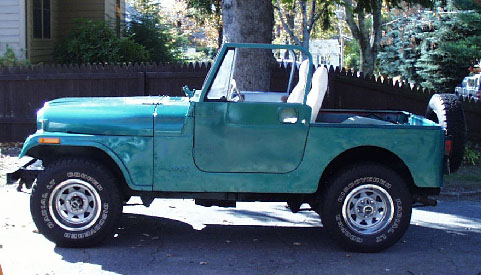
Summer '95
 After
a couple of years of missing the
Scrambler I had sold, I got the itch for another jeep. I
ended up
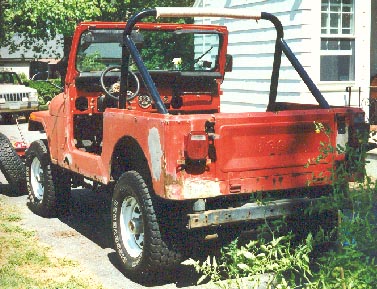
finding an '81 CJ-7 which was ready for the boneyard. Despite
it's terrible condition, it had
new rims and tires, a great hardtop and doors, and a fixable body tub
(at least by New England standards).
I also liked it because it was the last year for the narrow
track. It reminds me of the old CJ-2As and CJ-3A/B
CJs.
Plus, I had a Dana 44 narrow
track rear axle (1 piece axles) from a 72 Jeepster
commando that would bolt right in.
After
a couple of years of missing the
Scrambler I had sold, I got the itch for another jeep. I
ended up
finding an '81 CJ-7 which was ready for the boneyard. Despite
it's terrible condition, it had
new rims and tires, a great hardtop and doors, and a fixable body tub
(at least by New England standards).
I also liked it because it was the last year for the narrow
track. It reminds me of the old CJ-2As and CJ-3A/B
CJs.
Plus, I had a Dana 44 narrow
track rear axle (1 piece axles) from a 72 Jeepster
commando that would bolt right in.
 The
Jeep was a very early 1981 build. It had
some leftover '80 parts such as the 6 bolt front hubs and I
noticed the skid plate had a date stamp from October 1979. It
was
furnished with an Iron Duke 4 151 4 cylinder, an SR-4 (Ford) 4 speed,
Dana 300 transfer case and
3.73 gears. The seats looked original but I've never seen
similar; they were high backs, reclining, and the upolstery
was
unlike any Jeep I'd ever seen. It had suffered
from uncaring owners, and alot of unpleasant surprises showed up as I
was
rebuilding it.
The
Jeep was a very early 1981 build. It had
some leftover '80 parts such as the 6 bolt front hubs and I
noticed the skid plate had a date stamp from October 1979. It
was
furnished with an Iron Duke 4 151 4 cylinder, an SR-4 (Ford) 4 speed,
Dana 300 transfer case and
3.73 gears. The seats looked original but I've never seen
similar; they were high backs, reclining, and the upolstery
was
unlike any Jeep I'd ever seen. It had suffered
from uncaring owners, and alot of unpleasant surprises showed up as I
was
rebuilding it.
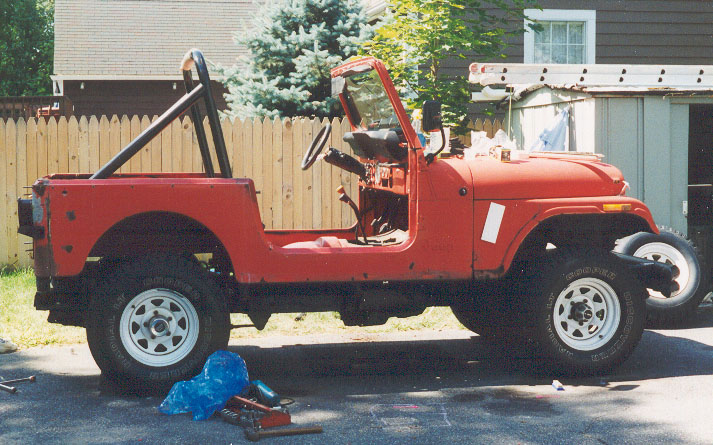
The first year of the rebuild.....
The tub
I started off by correcting the most irritating things. It had a homemade double tube front bumper which must have weighed 150 pounds. I cut it off. Ahhhhh. It had a nasty 3 inch body lift. It looked okay, but the shifter hit the floor, and tall body lifts by themselves on a stock jeep just seem goofy to me. So, I took the tub off the frame to replace the body mounts.
 Since
I was this far, I thought I'd do
some body work patching all the holes and cracks. I had no
welder so I used a drill, pop rivets, and a few panels of old
steel shelving I scavenged from the dumpster at work.
Since
I was this far, I thought I'd do
some body work patching all the holes and cracks. I had no
welder so I used a drill, pop rivets, and a few panels of old
steel shelving I scavenged from the dumpster at work.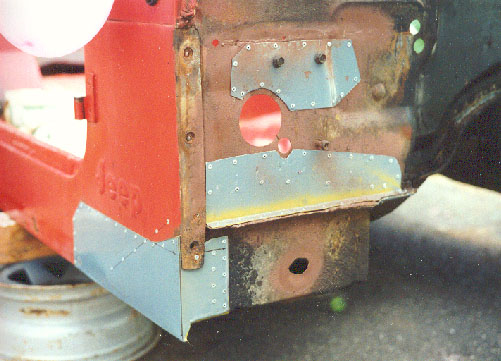 Some panels
required the use of wood forms to bend flanges, but, for the most
part I used a vise and a hammer to form the metal. I made
cardboard templates and cut the sheet metal using metal shears
which didn't have compound action. I now have popeye muscles in
my forearms. akakakakakakak.
Some panels
required the use of wood forms to bend flanges, but, for the most
part I used a vise and a hammer to form the metal. I made
cardboard templates and cut the sheet metal using metal shears
which didn't have compound action. I now have popeye muscles in
my forearms. akakakakakakak.
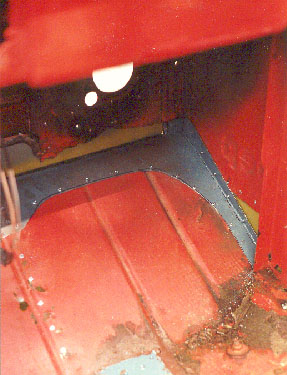
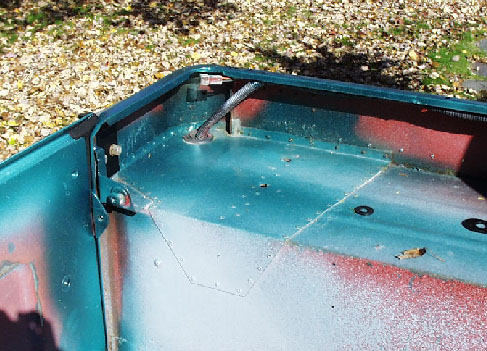 The
worst areas were the back rollbar
mounts, the passenger side firewall, and the rear kick up area on
the floorpan. Luckily, the sides were strong and rigid, and
the
rear floor and wheelhouses were intact. My fabrication skills
came into play when I had to make my own door pin brackets.
The
worst areas were the back rollbar
mounts, the passenger side firewall, and the rear kick up area on
the floorpan. Luckily, the sides were strong and rigid, and
the
rear floor and wheelhouses were intact. My fabrication skills
came into play when I had to make my own door pin brackets. 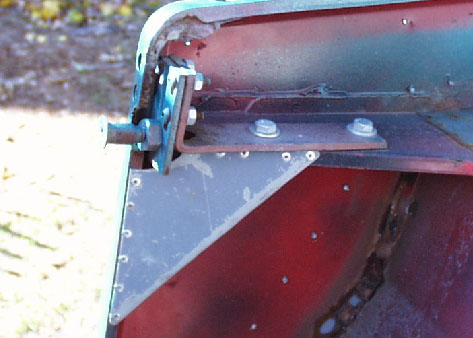 The
previous owner fudged in the late model style door pins to use
late model hard doors. They didn't fit well and the doors
wouldn't latch closed. So, I made all new brackets which work
with the older style body tub.
The
previous owner fudged in the late model style door pins to use
late model hard doors. They didn't fit well and the doors
wouldn't latch closed. So, I made all new brackets which work
with the older style body tub. Notice how I made an angled "L" bracket which bolts to the early style CJ tub side gusset. I added a triangular plate to further strengthen the existing side gusset. To the "L" bracket I bolted a plate with oversized holes for adjustment. The door pin bolts to this plate. I did have to slightly notch the side of the door opening lip to fit the pin. The whole structure worked extremely well and was very rigid.
With the tub off, I could perform some frame work. First I cut off the rear crossmember with my trusty makita angle grinder. The original was bent and cracked. I bought a replacement from Four Wheel Drive Hardware. Since I had no welder, I bolted the new one in with some custom fab work. Next, I attacked the skid plate. Sometime in it's life, someone snapped the skidplate bolts in the frame, and instead of drilling them out, they welded the skid plate to the frame. Not only that, but it was welded on very crooked. I cut the skid plate off with a grinder, punched out the broken bolt/welded nuts, and came up with a method to re fasten the skid plate. After much scraping, cutting, drilling, painting, and caulking, I finally put the tub back on the frame with urethane body mounts. I had to fabricate new "floating" plates to screw the body mount bolts to, and screwed the tub down.
Year 2
Drivetrain swap
Since the 4 cylinder iron duke was pretty tired, and since I had the 258 6 in my shed from my old scrambler, I decided early in year two that I might as well install the 6 into the CJ-7. This turned out to be a pretty complex job, but, I took my time and got over each problem as they came. By necessity, I laid out little cash for the swap parts, but "paid" for this frugality with turtle slow progress. So, I worked on it once in a while, and visited junkyards whenever I had a free saturday morning.
To swap in the 6, I wanted to convert from hydraulic to manual style clutch, which would require new swinging pedals. Also required would be a swap to Ford/Motorcraft (which AMC 6s used) ignition and starter electrics. And although not required, I was lucky to get a free, excellent condition T-4 trans to replace my leaky SR-4.
I took out the 4 cylinder in January '97 and bolted in the 6 cyl. motor mount brackets I had from my old Scrambler. I found manual style clutch/brake pedals from the boneyard (10 bucks) and a complete exhaust system including pipes, muffler, cat, pulse emmision tubes, etc. for 50 bucks!
I finally got the 258 installed in May '97. I was unpleasantly surprised to find that the 6 cylinder sits back farther than the iron duke. This would require new driveshafts. It took me 6 months to find a rear driveshaft. I found one at Stafford Springs Raceway(CT) swap meet for 20 bucks. I spent more months looking for a front shaft, but I could not find a reasonably priced used one. The ones I did find went for about 150 bucks. Instead of that, I laid out 185 bucks for a new heavy duty shaft from six states distributors (which has since splintered off to become Tom Woods Driveshaft). This is a great deal: large diameter duty tubing, slip joint boot, balanced and complete with U joints installed. My first NEW part.
As I continued
on
with the
swap, I had to convert from a GM style ignition /starter system
(GM "iron duke") to an AMC/Ford Motorcraft system. I ended up using
portions of harnesses from junkyard 6
cylinder jeeps, and soldering them to my harness. The tricky part
was tracing and converting the starter solenoid wires, and creating a
new
portion of harness for the AMC/Ford ignition module. The charging
system remained the same. Careful scrutinization of the
wiring
diagrams from my trusty Haynes manual got me through.
As for the fuel system, I junked the '83 vintage computer/CarterBBD system which was on the 6 cyl. and simply installed a non computer '79 AMC pacer Carter 2V carb. I put in the exhaust without the pulse tube emission stuff, but I did keep the catalyst. Not really necessary since Massachusetts doesn't require emissions tests for cars/trucks older than 15 years. (This has changed recently.) The engine ran great.
I hadn't
driven
the Jeep yet and I was itchin' to get it on the road so I rallied at
the end to get it road worthy. In two months I drilled out
old
broken bolts for the rollbar installation, patched
up a hole or two in the floors, hooked up all the wiring under
the dash, as well as all the lights. I chased around tons of
bad
electrical grounds. Then there was the gas tank vapor lines
and
roll-over
check valve. I made a new trans cover plate, found and installed
3 point seatbelts to replace the original lap style belts,
installed my 2 dollar (swap meet) CB and whip, installed a
junkyard battery, replaced the waterpump, and replaced the rear brakes.
While doing the brakes, I noticed the rear seals were oozing. I pulled the axles to put in the new seals and when I unbolted the two piece axles, I found the castle nuts to be loose. Inspection revealed that the serrations on the axle shaft and hub were rounding off, and close to failure. Eeeeep. I got a sharp file and dressed the serrations to sharpen them up. I then bought a 3/4 inch drive T-bar and socket from Sears. When I put the axle flange ends onto the shafts, I didn't bother torquing the castle nuts, I just paid attention to how much the axle shaft sticks through the flange. I used a 7 foot bar to tighten the nuts. It took quite a bit of grunt to tighten those castle nuts. The ability to light the rear tires with gusto prooved to me that the fix worked.
What a great
day
it was when I took it for my first spin. It
ran great. And boy, CJs with no carpeting and mud tires are music
to a jeep lover's ears. Who needs a radio? It passed safety inspection
with no problems.
So, after all this work, it was now running good and reliable, but it was still an ugly, rusty, beat up old jeep.
Year 3
During the summer of '98, I did some more mechanical work to the beast. I put in a new 3 core radiator, a vast improvement: no more overheating. I put in a new power steering gear, as the original started to seize up in the straight ahead direction. (Not good). A rebuild unit cost me 180 bucks. ouch. I put in a "new" clutch. The old unit chattered mercilessly, so I put in a rebuilt unit.Year 4
 I
finally had some money to do the
cosmetics. I bought an air compresser, paint gun, and some paint.
But first, I had to initiate phase two of the body-by-pop-rivet.
Some sections of the sides of the tub began to show some cancer,
and I didn't want to spend a ton of time cutting out the rot and
replacing panels.
I
finally had some money to do the
cosmetics. I bought an air compresser, paint gun, and some paint.
But first, I had to initiate phase two of the body-by-pop-rivet.
Some sections of the sides of the tub began to show some cancer,
and I didn't want to spend a ton of time cutting out the rot and
replacing panels. 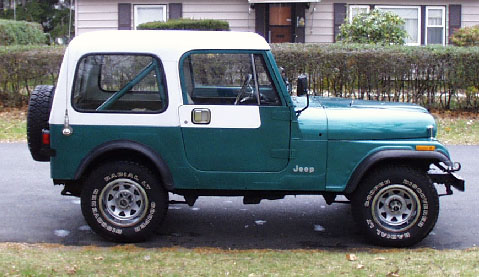 So,
I whipped out the trusty steel shelving and
flexed my popeye forearms and cut up some panels to cover over
the mild cancer. At first, pop riveted panels may seem hideous,
(okay, they are) but they look pretty good if done neatly, and
with paint, it's not too embarrassing. I'm happy with it for what
it is.
So,
I whipped out the trusty steel shelving and
flexed my popeye forearms and cut up some panels to cover over
the mild cancer. At first, pop riveted panels may seem hideous,
(okay, they are) but they look pretty good if done neatly, and
with paint, it's not too embarrassing. I'm happy with it for what
it is.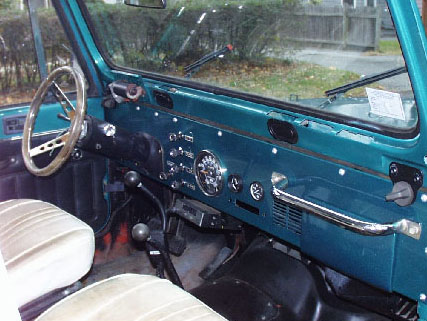 This
was my first paint job, and I
made all the typical mistakes. And I firmly believe that CJs are
one of the hardest vehicles to paint. I decided to take
everything off that could be unbolted including the all the
hinges, and even the dash panel. I painted in stages. First, I
did the body, then the dash, rollbar, and then the doors. I also
painted the top. By the time I got to the doors, I figured out
how to mix the paint, and use proper PSI in the gun. This gave me
excellent coverage with no orange peel or runs. My earlier
painting suffered from excessive orange peel.
This
was my first paint job, and I
made all the typical mistakes. And I firmly believe that CJs are
one of the hardest vehicles to paint. I decided to take
everything off that could be unbolted including the all the
hinges, and even the dash panel. I painted in stages. First, I
did the body, then the dash, rollbar, and then the doors. I also
painted the top. By the time I got to the doors, I figured out
how to mix the paint, and use proper PSI in the gun. This gave me
excellent coverage with no orange peel or runs. My earlier
painting suffered from excessive orange peel. Since I have a bit more dough now than I did a few years ago, I bought lots of stuff at once. I found a complete fiberglass windshield including glass, wiper motor, visors and hinges for 90 bucks. That was lucky. I had to buy a new rear fiberglass lift gate, hinges, and heater control cables. I also bought new trim rings (for use on-road only!) and painted the rims rally silver, and installed factory rear center caps which I managed to gather for free.
As
for fiberglass,
I don't like it, especially when glass has to be mounted in it.
The flanges are too thick to fit the window gasket. The
molded in nutserts seize up and rip out. A huge hassle which
is
not worth it if you can get steel. I couldn't find a steel
replacement
rear hatch, so I had to go fiberglass. I had to do quite a
bit of
finessing to get the glass into the rear hatch. Basically,
grind
the flange so it tapers to about a 1/16 of an inch. This will
allow the gasket to slip over the flange and not bulge out.
Also,
the molded gasket I purchased was too long and I had to cut it and
rebond it. I used super glue which worked perfectly.
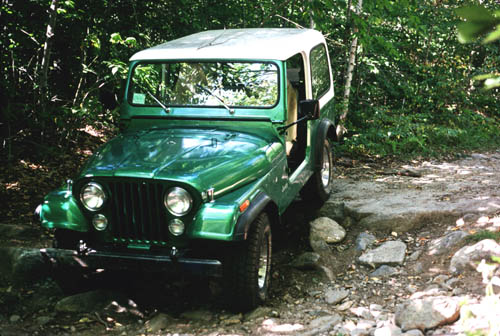
And yes, I took it on it's first 4 wheel run in October 99. Holy cow what a blast. I went with a couple of guys who own slightly modified YJs. They took me on some super nasty trails which included ledges, rocks, tons of trees and brush We stayed on trails, but alot of them were very old and unused. I got hung up once on my frame, but some well placed rocks under a wheel got me out. I did get stopped on a multi step ledge though, this is where my flat springs really hurt me. The YJs made it, but they did have swaybar disconnects. I wonder if that would have helped me despite the flat springs.
Overall, no damage during the run. I did, however, manage to scrape the ever-lovin' crap out of the very brand new paint job, and break a mud flare, but I don't mind one bit. Lockers would have been a great asset. Eeps but there goes my budget. The 4 wheeling adventure took place at night, so no pics.
But, here is a pic of the CJ during a trip in 2001.
I
don't consider this four wheeling, but it was fun. I saw a 2
wheel drive
suburban
come down this hill as I was going up. Sheesh.

Jeep Main | 1981 CJ-7 Year 1-4 | 1981 CJ-7 Year 5-8 | Ford V8 into CJ swap | Scrambler | Rubicon