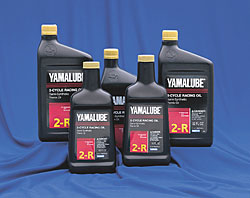
Yamalube 2-R is a Semi-synthetic pre-mix oil, and is the only thing I use in my YZ125. Yamalube built its reputation on this premium oil - Its premium base stock provides more protection from wear and breakdown, while reducing friction for increased performance. Special additives reduce carbon and deposit build-up on pistons, rings, and exhaust ports. The result is an oil that helps keep your horsepower at maximum and wear at minimum.
Twin-Air air filters have worked the best for me, the glue seals have lasted longer than those from UNI, and the fit in the airbox is better than stock. TWIN-AIR
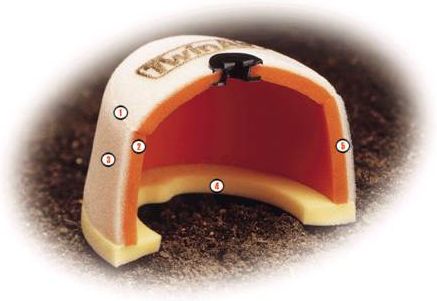
No-Toil makes a great air filter cleaning system. The oil, grease and cleaner is biodegradable and can be poured on your grass when you're done. You have to start with a clean filter, (use standard solvents for the initial cleaning if No-Toil oils weren't used to oil it), but then every time afterwards just cleanup with your hands, the cleaner powder and a bucket of water. I oil the filter by putting it in a plastic bag, sealing it, then moving the oil and the filter around for about 10 minutes until its saturated. Then pull the filter out of the bag and let the alcohol solvent evaporate and the oil will set-up. Very handy, quick, clean and easy to dispose of the used solvent. Highly recommended, see the reviews on their webpage: NO-TOIL
In general I always lean my bike over once or twice before I try to start it when its cold. This will dump some raw gas into the cylinder (dumping gas down the spark plug hole is thus unnecessary). Then kick it over slowly about 5 or 6 times to help atomize some of the gas. It should start easily. Its not uncommon for 2 strokes to be hard to start if they have sat for a few days.
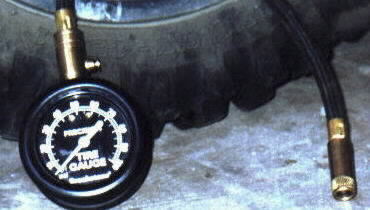
Tire pressure too low can cause rim damage if you ride in rocky areas, and pressure too high can cause problems hooking-up and other handling problems. 12psi works well for me on medium-soft dirt tracks. Its said that tires are the single most important handling-improvement items you can put on your bike. The front tire is as important as the rear, replace it as soon as you see the knobs round off. DUNLOP TIRES
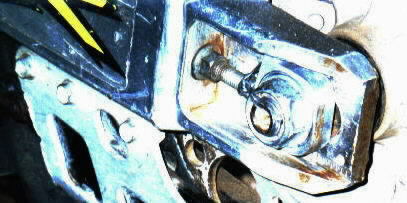
As the manual says, check your fasteners. The rear axle nut on my '96 CR250 worked its way off one day, causing a near accident. To buy some peace of mind when you're midair over that next double, consider using safety wire (or thread lock). Drill a hole through the tip of the axle and thread a wire to a nearby fastener to prevent the nut from working its way loose again. This works for your oil drain plug as well.
Try twisting/folding the boot at the ankle. An inexpensive / simple leather boot will twist there demonstrating what will happen to your ankle when you need your boots the most. If you need to spend a little less and you like the Tech 8, get a pair of Tech 6's. I tried on both and actually wound up liking the fit, of my size, Tech 6 vs. the same size tech 8. The removable liner on the Tech 8 is nice and fuzzy and feels good on your feet, but a pair of nice riding socks make the Tech 6s feel just as nice for me. The Tech 6s are also quite flexible and break in really fast. Just don't buy cheap boots, you'll regret it. ALPINESTARS
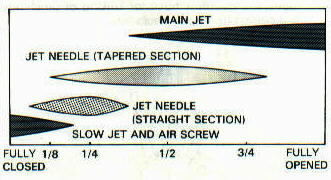
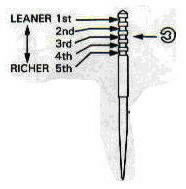
Jetting basically consists of four settings on your carb, to keep the engine tuned for the best possible power. Jetting changes with the weather conditions, so you'll want to keep a handy chart with/on your gear for quick reference. You can estimate which part(s) is/are the problem based on performance at the indicated throttle openings, (not rpm), shown above. At a given throttle opening, too lean, (too much air), sounds like 'WAAAA', like the bike wants to die. Too rich, (too much gas), sounds like a burbling WAP-WAP-WAP. Both rob your power.
Example jetting specs for my 2001 YZ125:
If you have to turn the Air Screw more than 2 turns out from fully seated in, you may need a leaner pilot jet.
Jetting is strictly trial and error. Just make one change at a time and keep track of your results.
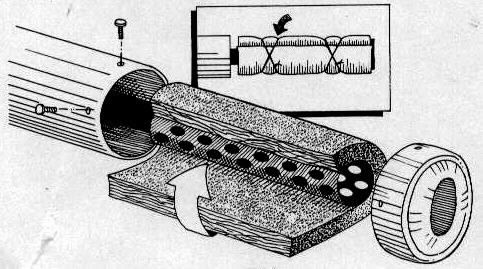
Muffler: If the old packing is carboned/clogged, it will reduce power..
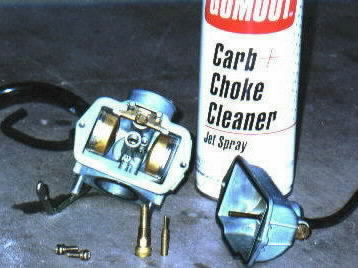
Small bikes, like the XR80, have small carburetors which easily plug-up if gasoline is allowed to evaporate from the float bowl, (commonly occurs if bike sits idle for 3 weeks.) A brownish varnish remains which plugs the critical fuel orifices and jets in the carb, causing the bike to run lean, (too much air). Plugged Slow Jet and carb orifices result in the bike unwilling to run unless the choke is ON, and trying to die when you turn the throttle. To remedy:
I have talked with people who have purchased Pro Circuit pipes for their 97CR250R and 98KX250 and both said the same thing... hardly any performance change. The guy with the KX said it might provide a little over-rev, but not much more. The guy with the 97CR measured up the PC pipe and said it measured almost the same in every dimension. He also installed an FMF pipe and noticed much more power. FMF RACING
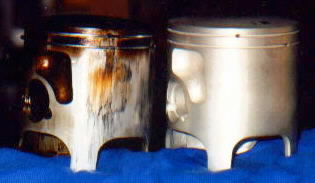
The piston on the left is a Honda piston with worn rings and a stuck lower ring. The brown carbon deposits below the rings are a tell-tale sign of 'Blow-By', caused by rings worn beyond their specified limits. You can inspect for this without disassembling the engine by removing the exhaust expansion chamber and looking in the exhaust port while pushing the kickstart lever slowly. PISTON GUIDE
The stuck ring on this piston could have been caused by oxidizing oil taking up the ring groove clearance, locking the ring. BelRay MC1 premix had been used at the owner's manual recommended ratio of 32:1. BelRay recommends MC1 use only at 50:1 to minimize carbon deposits that cause ring sticking. YamaLube 2R, or BelRay H1R at 40:1 is a better choice for a 2-stroke bike with powervalves. BELRAY If both rings had ceased to seal, fiery combustion gases could have blown down the piston skirt, scorching the oil film away, allowing the piston to friction-weld itself to the cylinder wall.
Uniform scratches on the intake side could indicate that the bike isn't being warmed up enough. This is termed Cold Seizure, which occurs when the piston heats up and expands faster than the cylinder. When the engine is too cold to vaporize the gasoline, the gas washes off the oil film from the intake skirt and allows scuffing to occur. Put your hand on the cylinder near the reeds, and wait for that area to feel warm before you ride the bike.
Scratches on the exhaust side show the engine was hot-seizing from lean jetting, pinging from low octane gas, or low water pump flow or radiator level.
General scratches on the piston sides can indicate dirt is getting past the air filter into the cylinder.
Freshly rebuilt engines are also prone to scuffing, since they're relatively dry inside and should be kept below half-throttle for the first half-hour of use.
RECOMMENDATIONS:
I put a Wiseco piston in my son's '92 KX250, it fractured after not many hours. However, the cylinder was worn, and I got it recoated. There were developing cracks in the Wiseco piston all around the boss. I only use stock pistons now.
I've heard good and bad things about Wiseco pistons. However, I've never heard anything bad about original equipment Honda pistons. I've been putting Honda pistons in my CR's for 15 years and never one problem. The factory piston is also better fitted to the individual cylinder. If you look on the side of your cylinder you'll see an "A" or a "B" stamped. When getting a Honda piston be sure to mention the stamping. You'll end up with a piston made exactly for your cylinder, rather than one designed to fit all.

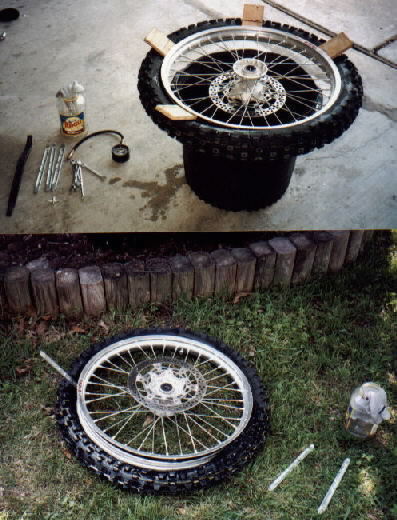
1. Bake the tires in the sun if possible, (warm rubber is less reluctant.)
2. Remove the wheel, place on a 'barrel' with the brake disk side down.
3. Remove the valve stem from the tube, and loosen the rim lock.
4. Pry down on the tire and insert 3/8 inch plywood spacers between the tire and rim. This helps keep the tire bead in the center of the wheel, which will give just a bit more 'play' to allow the tire to come off the rim easier.
5. Take the wheel to a soft grassy area, place it on the ground brake-disk side up, (plug the axle hole in the rim with a rag). Working with the tire on the ground allows me to use my knees to manipulate the tire without worrying it will fall off a stand/barrel.
6. Swab plenty of tire-juice (dish washing soap and water) with a rag around the rim where it meets the tire, so it will run down to the bead when the tire begins to loosen. (Tire-juice on the rim, tire and iron-ends help the tire move on/off the rim easier, protects the bead from damage, and helps prevent scratching the rims.)
7. Insert the end of the tire iron with the gentle hook in it into the tire at a location about 90 degrees around the rim from the rim lock. "Flip" the bead onto the outside of the rim and hold it with the tire iron (try hooking the iron under the brake disk).
8. Move 6-8 inches away from the first location and insert the second tire iron, flipping the bead over the rim as above. After the second location is free, place the next iron about 4 inches away and continue as above until you can pull the tire free with your hands. (Reapply juice as needed and be sure you don't pinch the tube with iron!)
9. With one bead completely free, remove the tube and patch/replace if needed. Make sure the spoke band (a rubber strip that protects the tube from the spoke ends) is in there. If not, a few turns of electricians or duct tape will do just as well.
10. To completely remove the tire from the rim (for a tire change rather than fixing a flat), remove the brake disk so you can flip the tire over and work on it. Re-apply the juice to the tire and rim surfaces and proceed as above.
11. Put the new tire on the rim with the rim lock positioned over the tire marking to ensure proper balancing.
12. After the first bead is on the rim, you can replace the tube. First coat the tube and the tire insides with tire juice, then position the tube in the rim and hold it in place with the nut. (Slightly inflate the tube before putting on the last bead, to make it less likely to snag the tube with the irons.) Make sure the tube goes *over* the rim lock.
13. KEY POINT: Start levering the bead over opposite from the rim lock and make sure the rim lock is the last piece of bead to be pushed over the rim. This allows the opposite side of the tire to be held in the center of the rim all the way around and makes it difficult to pinch the rim with a tire iron this way - a hard learned trick!
14. When you're done, put the valve stem back in the tube and air the tire up a bit. The tube should push bead out to where the outside of the tire looks evenly centered. Bounce it up and down a few times to seat the bead. Remove the valve stem, let the air out (this lets the tube move around to where it wants to be) and air back up to operating pressure (probably around 12-15 psi.) Tighten the rim lock and tube nut.
15. Note: Big tire irons are much more useful than the ones you might carry with you, and worth the $$$. Putting the rimlock on (loose) first is MUCH easier than getting the tire on and then trying to get the rimlock in place.
The reeds control the flow of the air/ fuel mixture going into the crankcase. If your reeds were worn, then the bike may be hard to start. The ability of the reeds to open and close rapidly and accurately, without flutter, affects your throttle response. Checkout Mototassinari Reeds to let your bike rev to the moon. Mototassinari
TIP: After every ride, put your bike up on a stand and release the built-up air pressure from each fork - see owner's manual for bleeder screw location. Air is an unstable gas, you'll be surprised how much pressure will be released. Also don't cinch down those forks so hard during transport!
Replacing fork seals isn't that much work, an upper and lower bearing, a wiper, and a seal. Buy your manual, read it a couple times, buy the parts and do it..No big deal...also maybe keep one fork assembled for reference for the first one.
Before you change the seals, pull down the spring retainer on the USD forks and slip a business card under the dustboot and seal. It should go up into the dustboot about halfway....which should put it under the seal. Move the card around the circumference of the tube, flat against the tube. When you pull it out, you'll see oil and a bunch of crap. I did this on a leaky fork seal as a last ditch effort before changing seals and it worked. Funny coz these quick fixes never seem to work for me.
I change the oil on my 2-stroke CR250 every few rides, change it regularly since the 2-stroke crancase is vented to the atmosphere. Using a magnetic drain plug helps pick up some fairly large metal chips.
The oil change interval on an air-cooled ATV should be every five tanks of fuel, with the filter changed every other time. Oil temperature at engine operating temperature is the key. The longer the oil spends above 200 degrees (F) the quicker it breaks down and you run the risk of metal-to-metal contact of the moving parts.
I recently acquired a 1991 RM250. The big problem is the rpm's. The bike was revving pretty high. I thought it was because the bike was cold, but then the rpm's went REALLY high. It sounded like the thing was going to explode! I tried turning the bike off because it was screaming so loudly. When I hit the cut off switch nothing happened. I opened and closed the choke and still nothing happened. I was about to pull the wire off the plug when it stalled out on its own.
Sounds like its running too lean. Check for air leaks between the carb and engine. Verify the head is torqed down to spec. Also, get a manual and see what the jetting should be for your altitude.
If your bike becomes water logged by riding with water up past the muffler, stalling and engine 'struggling' will be seen. Most likely water will have gotten into the carb and is beading in the jets, preventing the passage of fuel, so the motor runs lean. Check the airbox for water first. Then drain the float bowl into a container and look for water beads. Finally, pull the carb and remove the main jet, needle jet (not jet needle), and slow jet. Blow them out. Also check fuel flow for quantity and quality (water/dirt) from the petcock.
To test for clutch rattle, pull the clutch in, place the machine in gear and let it out slightly. With the load on the clutch, all clutch rattle should disappear. Squealing is a matter of the plates not having enough time to "shed" excess engine oil during a clutch slipping. This usually occurs during a period when the motor is cold and the oil is thick.
As for the smoking, a worn rod could have damaged the bore and piston by letting the piston wander inside the bore, so oil could be getting by the rings until it warms up and heat expansion seals everything up. Or the guides could not have been installed straight to the seats, or they could have been sized incorrectly, or a guide seal could have been torn during installation.
From most of the stuff I've seen here, people are justifiably nauseated by the prevalence of the "No Fear" gear. It seems to be a brash display testosterone poisoning. Bravery in the face of foolish risks. I would counter that No Fear means something somewhat different.
Most people in our society live in fear. Fear of every day life. Fear of being robbed, fear of having an accident, fear of not being loved. Life is full of imaginary fear. It is broadcast to us every day through the media.
To me, "no fear" is abandonment of the little fears that hold us back. Saying no to the fears that others would like to have you chained to.
I liked the "face your fears, live your dreams" stuff a lot. I liked the posters. Fear is a root of evil in general. Fear as the opposite of faith I mean. Fear stops thought. Fear keeps you from living life fully. That is the kind of fear I think of when I think of NO FEAR. Yea though I ride through the valley of the shadow of death, I will fear no evil. Everything good in the world came from those who faced and conquered their fears engendered by living in the world. The fears inside you. That's what I'm talking about. Those are the worst. The tallest mountains are within. You can climb a mountain and gain recognition of your achievements, but many far greater have scaled mountains within much more treacherous and cold and alone. Vanity has nothing to do with it. You will know when you realize that nothing in this world compares to the achievements possible within you with a little faith.
Fear or doubt, and mad desire for things of this earth, are two sides of the same coin. The coin of destruction. These things feed on each other and destroy your spirit. Then you are devoured by the destruction. That's why I think NO FEAR is good. You realize then that there are things greater than your life and any power, food... It is difficult to imagine that these greater things are free! Free with just some sweat on your inner brow. An old Chinese proverb says "the warrior must face himself before he can face the enemy". Too bad they didn't realize that they were the same thing really. Truth is the greatest pursuit. There is no love without truth. All meaning in life comes from truth. I live for the truth without fear. That's why I Like No Fear stuff.
Incidentally, motorcycle riding can teach you a lot about yourself and the nature of fear. Pay attention to all your fears when you ride, but you must be the one to decide what to do, not your fears. Be afraid of real danger. You know what it is. Rely on your intuition and listen to your inner voice.

A two-stroke engine works by burning a mixture of gasoline, oil and air in a cylinder containing a piston. The heat produced causes the air to expand and force down the piston, which turns a crankshaft linked to the wheels. The piston moves down and up one time for every spark from the spark plug, (compared to two times for a four stroke). A two-stroke engine has no valves, instead there are three ports, (inlet, transfer and exhaust) in the side of the cylinder that open and close as the piston moves up and down.
As the piston moves up, it creates a vacuum in the crankcase. This sucks the fuel-air mixture from the carburetor into the crankcase - usually through a one-way valve such as a reed valve. When the piston moves down, the fuel is pushed through the transfer ports up into the combustion chamber. When the piston moves up again, it compresses the fuel-air mixture in the combustion chamber (and sucks more fuel-air into the lower end). The plug fires, the piston moves down and lets the combustion products out of the exhaust (in part forced out by the new fuel-air coming in through the transfer ports).
This is why it is called a two-stroke. Piston up = compress fuel air in combustion chamber while sucking new fuel-air into crankcase. Piston down = power stroke, exhaust out the pipe while new fuel-air into the combustion chamber through transfer ports.
The effect of all this is that the only lubrication the engine sees is that which is mixed into the fuel. Upper and lower rod bearings and crank main bearings are lubricated by the premix only. The motor oil in the bike only services the transmission and clutch.
A Four Stroke Engine uses four steps, (known as the four-stroke cycle), to control the combustion of an air/fuel mixture. These steps must take place at the correct time and in the correct sequence in every cylinder of the engine to work.
The name "four-stroke" is derived from the number of piston strokes required to complete the combustion cycle. A stroke is the movement of the piston from its highest position in the cylinder (top-dead-center) to its lowest (bottom-dead-center); or from the lowest to highest position.
The four strokes are called intake, compression, power, and exhaust.
Each cylinder of the engine completes the combustion cycle at a different time. The steps include: Admitting the proper mixture of air and fuel into the cylinder; Compressing the air and fuel mixture so it will burn better and deliver more power; Igniting and burning the mixture; Exhausting the burned gases from the cylinder so that the process can begin again.
The intake stroke is the first of the four strokes in the combustion cycle. As the piston moves away from the top of the cylinder, the intake valve opens.
The downward movement of the piston creates a vacuum (negative pressure) in the cylinder. The greater pressure outside the cylinder (ambient pressure) pushes a mixture of air and fuel into the cylinder.
Just after the piston reaches the bottom of the cylinder, the intake valve closes.
The second stroke in the four-stroke cycle is the compression stroke. The compression stroke begins as the piston starts to move upward in the cylinder. The intake valve closes, trapping the air-fuel mixture in the cylinder. Upward movement of the piston compresses the air-fuel mixture into a very small area.
Compressing or squeezing the mixture is very important for developing maximum power. The higher the compression, the greater pressure exerted on the piston when the air/fuel mixture is ignited. Compression also "pre-heats" the mixture which helps it to burn more efficiently.

The third stroke in the four-stroke cycle is the power stroke. The power stroke begins as the compressed air/fuel mixture is ignited in the combustion chamber. A spark plug, located in the cylinder head, creates an electrical spark in the combustion chamber which ignites the air/fuel mixture. The burning fuel rapidly expands, creating a very high pressure against the top of the piston.
This pressure drives the piston downward, which provides the power that turns the crankshaft and drives the wheels to propel the vehicle.
The final stroke of the cycle is the exhaust stroke. As the piston approaches the end of the power stroke, the exhaust valve opens. Pressure in the cylinder causes the exhaust gases to rush past the valve and into the exhaust system. The piston moves up the cylinder, pushing most of the remaining exhaust gases from the cylinder. As the piston nears the top of this stroke, the exhaust valve begins to close as the intake valve begins to open. The exhaust stroke completes the combustion process. The opening of the intake valve signals the beginning of a new cycle. This cycle occurs in every cylinder and will be repeated as long as the engine is running.