
This text serves as an extensive user manual and setting up guide for the
Michell GyroDec turntable. In
addition, some notes on the Orbe, TecnoDec, Mycro and Syncro are provided.
The author is in no way responsible for any
damage following from these guidelines.
Copying and reproducing is allowed and encouraged, as long as nothing in the
text is changed without
e-mailed permission from the author.
(c) The Michell GyroDec Website 1996-2003
This manual is a private initiative and does not originate from or is affiliated with the J.A.Michell
Engineering Ltd company.
Revision list:
27 October 2003: added pictorial guidelines.
10 April 2003: post-2000 motors and motor controllers, TecnoDec added (note: messy layout,
but right now no time for more!)
Planned updates:
An entirely new version with step-by-step photographs is in the make. I hope to have
a draft on before July 2003.
TECHNICAL INTRODUCTION
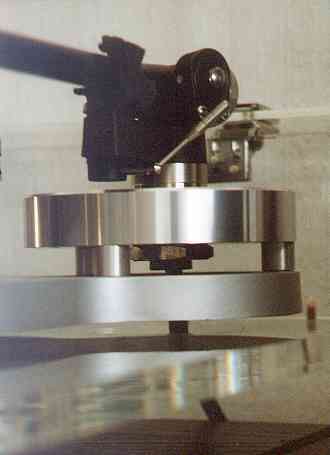
The Michell GyroDec is a classic three-point suspension design. Its success stems from the cleverness and simplicity of its design and its high standard of engineering.
The subchassis is suspended from extension springs, rather than sitting on top of compression springs, which is inherently less stable and also more difficult to tune correctly. The whole suspended mass is quite high, including 8 kg of the cast aluminium subchassis, 3 kg of the platter and 1 kg of the arm assembly. This tunes the main vertical resonance to 2-3Hz, one full decade removed from the bass register found in music.
The platter is an acryl/carbon compound, closely matching the mechanical
properties of the LP itself.
Together with the screw-down clamp it formes a stable platform for the record.
The platter is weighted
with gold-plated bronze weights; these not only put the listener in a
hypnotic trance (yeah, right), they also put the platter's center of gravity exactly in
the point of rotation of the
main bearing. The motor drives the platter exactly at this height, hence not
inducing tilt motions into
the platter/bearing assembly. The
bearing itself is a bronze inverted design,
with a rather unique oil circulation scheme.
(Older GyroDecs use a
standard type
aluminium bearing. Changing
over to the new type is a very cost-effective upgrade.)
The arm board is precisely machined to match any given arm, bringing the total
arm + arm board mass
at 1 kg precisely. This way the subchassis/platter/board system is always of
known mass and balanced,
regardless of the arm chosen. The center of gravity of the whole floating
assembly lies on the platter
spindle. The arms most commonly used with the GyroDec are the Rega RB-300, SME
IV, SME V, and Zeta,
although any good arm should work well on this platform.
Drive is via a DC motor (synchronous Papst motor on pre-2001 types), mounted in a standalone housing. The motor itself
can be powered via a
simple regulated PSU (step down transformer/phase shift network pre-2000), a more
elaborate passive PSU
(Gyropower, only AC and pre-1995 or so) or an active power supply, the VC (DC), or QC (AC pre-2001).
The platter is driven circumferentially by one round-section rubber belt. Older models use two belts, although one belt allegedly sounds better. The belt(s) run(s) in a V-groove in the platter.
As a result of its mechanical integrity, the Gyro is able to make a lot of most records you throw at it. While pristine LPs are rendered quite close to the mastertape (I know of a guy who did comparisons between master, a Gyro, a Linn and a Goldmund; the Gyro won...), damaged and second-hand LPs are made very listenable (I'm speaking now from my own experience).
IDENTIFYING THE GYRO'S PARTS
SETTING UP THE GYRODEC
1.
Locate a stable, level place to put the turntable on. Either a massive stand or
a lightweight one
(Target-style) is OK, but make sure, in the latter case, that the stand is short and tightly assembled, to
reduce potential rocking motions of the table. The table should be perfectly
stable; otherwise it will
interfere with the setup procedure.
Some people find that a massive slab of stone, or a big sandbox, are ideal platforms for the Gyro and Orbe. However, spikes or cones should not be used in this case.
2.
Put the plinth on top of the stand, and ensure that it is perfectly
level, either by adjusting the 3 feet or
by adjusting the table(top) itself. I prefer the last option, with the 3 feet
tightly screwed into the Gyro's
plinth.
3.
4.
5.
6.
Now take a look at the turntable from above. You'll see that the hole
for the motor in the chassis will
not be concentric with the motor. Likewise, the three spring turrets will not be concentric with the
spring holes. Now rotate the 3 spring rubbers, while holding their metal knobs,
for concentricity with
the motor and, to a lesser extent, the turrets. Take note that the motor housing itself can be rotated
around the vertical axis too, so a few iterations may be necessary.
7.
Let the chassis come to rest. Now give a gentle vertical tap onto the
spindle or clamp. The resulting
motion of the subchassis should be:
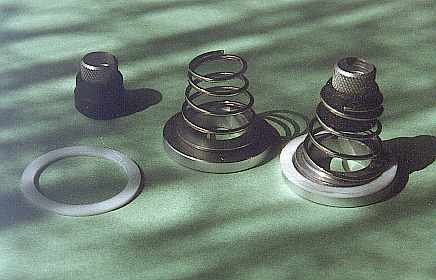
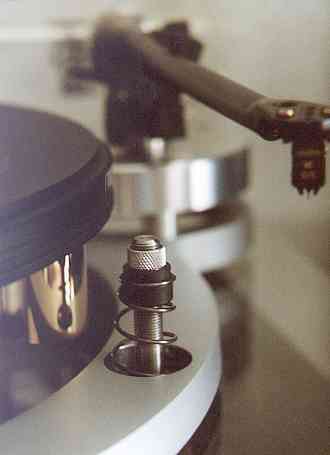
Post-January 1999 Orbes, Gyro SE, GyroDec MkIV:
These turntables have a new and better spring/turret combination. The turrets are split in two vertical parts, engaging to each other with a point-contact (in fact a bearing ball in one of the halves).
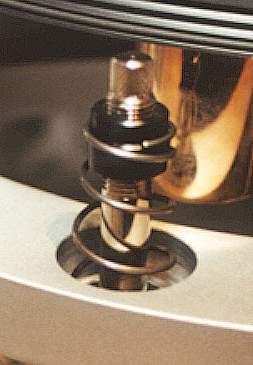
With this new construction, spring height is easily set by rotating the knurled top part of a turret, holding the rubber part. Spring orientation is set by rotating the spring's black rubber grommet. Thus orientation and height can be set independently of each other, thanks to the split in the turret shaft.
8.
Iterate through 5-7 if necessary, centering the subchassis
around the spring towers when seen from above. (The new stand-alone motors obviously do
not play any role anymore.)
9.
Wait a few days, and check setup again. When satisfied, cover the
springs.
10.
Gyro SE (or Orbe SE) only: since these turntables do not have a
bracket for the arm leadout cable, you have to find an other way of securing
that wire. I suggest to wrap it lightly around the turntable's hindmost leg,
assuring that there is sufficient cable in the loop between that leg and the
arm base not to impede the subchassis' motion.
11.
Enjoy the music. Or more: get addicted to it. And discover how good a $0.5 second hand LP can sound!
Doing a setup like this can take from 15 minutes to about an hour. If you feel the whole thing refuses to converge, take a step back, let the turntable settle for an hour or so and then see again to it.
Absolute neurotic adherance to the above is not necessary. It is perfectly acceptable to stop when the chassis bounces freely for many seconds, and on all three springs, and more or less vertically. If the bounce is too short, or asymmetrically restricted, bass and warmth are the first to suffer.
BEARING MAINTENANCE
The oil in all Michell bearings is a synthetic oil that is very resistant to degradation, and hence needs seldom to be refreshed. Replacement oil is available through distributors and dealers. Alternatively, you could use Mobil One 0-W-40.
In the bearing only the bearing ball can exhibit minor wear over time. If you detect any sounds from the bearing, you should only lift off the top, and turn the ball into a slightly different position. After this you're set for another couple of years of normal use. (Does this sound weird? OK then, when spinning the bearing the ball rotates only along the platter spindle. There is no further precession. This means that the ball always holds the same position viz-a-viz the bearing shaft, and all pressure is concentrated into the same small area. That area is the only part of the bearing ball relevant to performance, so if it gets worn, all you have to do is to turn a new and fresh contact point towards the shaft!).
Of course you could also replace the ball. It costs next to nothing.
Do not ever try to substitute exotic bearing balls of higher hardness. They will only damage the bearing shaft and compromise performance.
1981-2000 Gyro, Orbe
A Papst outer-rotor synchronous motor (similar to the ones on Studer tape decks) was in use for nearly two decades, until Papst discontinued this particular type in 1999 or so.
This motor ran on a bi-phase 19-24V supply which could be sourced from three types of power supplies.
Wall-wart transformer
The basic supply was an inline transformer with passive phase shift network. Two versions exist.
GyroPower
The GyroPower was a choke-filtered passive supply encased in a transparent acrylic box with all of the gory innards visible to the public. It was sold until the GyroPower QC took over in 1995 or so.
GyroPower QC
Or 'QC' in short. This was an active power supply, generating two sine waves from a quartz oscillator and amplifying them in two (audio) power amplifiers. The housing was like the Alecto power amplifiers, on a smaller scale. The QC was reputed to be a significant ('essential') upgrade to the Gyro. It came standard with the Orbe.
A rare mode of failure was the QC not being able to start a motor. The repair is simple: 1) ensure that the motor is in good condition, and 2) open the QC, and check if all output voltages (2 each for 33rpm and 45rpm) are 19Vrms. If necessary, adjust with the trimpots on the PCB.
Due to leakage currents on the three-wire cabling system compatible with the entry-level PSUs, it was recommended to switch the QC off when not in use.
Note: I believe that Orbes had four-wire QCs that did not suffer from leakage currents.
2000-... Gyro, Tecno
After the disappearance of the Papst and a long period of listening and reliability tests (during which a custom clone of the Papst was developed and then rejected!) a proprietary DC motor was specified. Sonically this motor, with basic PSU, is regarded to be almost of Papst+QC level of quality.
Despite this motor emitting a lot of acoustic noise, it came out as the best sounding of a large lot. The noise is contained by a more or less hermetic motor housing.
The motor runs off about 9Vdc, and no speed feedback control is provided,i.e. if the supply voltage is off, motor speed will be off too.
Wall-wart supply
The basic supply for the DC motor is an in-line transformer with LM317 voltage regulator. Internally is a blue trimpot with which motor speed can be set. Allow for a suitable warm-up time.
VC
Plugging the hole left by the QC, the VC was launched as a similarly-priced upgrade. The VC used the same Alecto-like sculpted housing as the QC, but internally had a large transformer linked to the same style of low-noise discrete regulator as in the Trichord Delphini and Orca preamplifiers. The VC was discontinued early in 2003.
HR
The HR replaced the VC in February 2003. Housed in a small grey box (like the Trichord Dino phonostage), it is cheaper than the VC. The circuit uses the novel Never Connected isolation concept, followed by a linear voltage regulator.
The HR has a speed trim potentiometer that is (user-)accessible on the back plate.
2000-2002 Orbe
The Orbe got the same DC motor as the Gyro/Tecno, now with a tachometer coil attached to it. The voltage induced into this coil my the motor's rotation is fed back to the VC Tacho power supply. This VC Tacho (which is not even remotely like the VC) has a tight speed control loop.
The VC Tacho also provides electronic switching between 33rpm and 45rpm.
2003-... Orbe
Same DC motor with tacho coil. The VC Tacho was renamed into 'Orbe Controller', and the 45rpm switch was dropped.
GYRODEC&ORBE AC MOTOR FAILURE MODES
Applies to pre-2000 GyroDec, Gyro SE, and Orbe (SE)
Runs too slow or doesn't run at all (Gyro only):
Older standard power supplies have a capacitor that is less than totally reliable. This capacitor can cause above defects. Michell claim that the new toroidal power supplies (since January 1999) are better in this respect.
Excessive motor vibration:
One can always feel a bit of vibration entering the motor housing. This is normal, and in fact the Papst fares a lot better than e.g. the Airpax motor used on many other turntables (only with the naked motor assembly of a Michell you can feel it yourself). Excessive vibration, however, should not be tolerated. The cause then is probably bad mains quality. The QC cures this, but at a cost. The Papst motor itself is virtually indestructible. You can lubricate the motor bearing:
Platter doesn't run planar to the subchassis:
Whoever did the assembly put the bearing wrongly into the subchassis.
GYRODEC/ORBE DC MOTOR FAILURE MODES
Applies to post-2000 Gyro/Orbe and TecnoDec
OFFICIAL UPGRADES TO GYRODEC AND GYRO SE
In most markets the Gyro SE is (foolishly) sold without the record clamp. So before anything else: buy the clamp. LPs should never be unclamped on a hard platter: the least bit of acoustic feedback will then shake the record up and down.
Frankly, there is not that much you can do to improve a modern-day GyroDec without turning it into an Orbe-like thing. But if you have an older turntable, say pre-1990, then there are quite a few upgrades possible:
First bring older GyroDecs up to spec with the inverted bearing, the black platter, and perhaps the Gyro SE-style suspension turrets.
Then the most important upgrade is the QC power supply, whose impact on the sound is not trivial. It also would be possible to damp the subchassis with blacktack, with children's plasticene, or with Michell's own DensoDamp (as with the Orbe). However, over-damping deadens the sound and should be avoided. If you buy DensoDamp, the amount supplied is just enough to do the job properly. What you need is a 6-10mm thick sausage applied to all internal corners of the aluminium casting, including the full perimeter of the armboard.
Some people have reported on better sound when the Gyro (or Orbe) is used without spring covers. I can not hear any difference. However, it is clear that the springs, together with the subchassis, exhibit a resonance at about 300Hz. Damping the springs lightly, for instance by very loosely filling them up with wool or cotton, may help here. I have tried this, but again, I can hear no difference.
A final upgrade would be to get the Orbe platter kit, which gives you the big black platter, a new bearing top and spindle, and the Orbe screw-down clamp. This upgrade is costly, and changes the Gyro's looks in a way you may or may not like, but the sonic advantages are obvious: there is a lot more detail and openness, deep but airy bass, and even less sensitivity to clicks and pops, moving the Gyro much closer to the Orbe than to its former self.
I suggest bugging Michell Engineering to make the Orbe clamp and bearing top available as a low-cost upgrade to GyroDec owners (post-1999 flat-platter GyroDecs only!). This would bring 60% of the Orbe platter sound, without the looks, and at a fraction of the cost.
UNOFFICIAL UPGRADES TO GYRODEC AND GYRO SE
Gert Pedersen GyroDec
Gert Perdersen of Denmark sells a comprehensive kit of replacement components and add-ons for the GyroDec (not Orbe, not SE) that address some weaknesses and add some different design philosophies.

The Pedersen mods are surprisingly affordable, but they require a great deal of DIY assembly, are partly irreversible, and afterwards your GyroDec is not a Gyro anymore.
Gert Pedersen Armboard damper
Based on an idea of mine, Gert now makes and sells acrylic/rubber damping discs to be inserted below the aluminium armboard, replacing the standard three aluminium or black PVC spacers.
I used such dampers on a Gyro/RB300/Denon DL103, and found the resultant sound to be quite a bit cleaner. Some people report similar gains. Other people report a serious drop in dynamics. The mod is cheap enoough to try it and use it only for those cartirdges and arms that benefit from it.
TNT has a similar report on damping between armboard and subchassis.
Others
It is also worth mentioning here the DIY Naim Armagedon-style power supply for the (AC-driven) GyroDec, as described by reviewer Geoff Husband at The Naked Truth. Please mind that this article only describes a basic idea, and that you yourself are responsible for the implementation.
Another note on a DIY Armageddon, now for the Linn turntable, can be found at Neil McBride's DIY hi-fi website. Perhaps technically-oriented readers can translate the concept to the 24V needed by the Papst motor.
Positive results have also been reported from using battery-powered DC motors. Origin Live and Scheu sell suitable types, although the easiest would be to enquire at Michell for conversion to the DC motor they have been using since 2001.
TWEAKS
Damp the clamp
The standard metal Gyro clamp, and to a lesser extent the delrin Orbe clamp, ring a bit when excited. Using thin sound-deadening bituminous pads for cars, e.g. from 3M, make a cirkular piece with a hole in the middle and stick it to the clamp's flat underside.
Damp the subchassis
Michell don't sell the Densodamp putty as used on the Orbe's subchassis separately (though it comes with the Orbe Platter Kit). You can probably use children's plasticene or any other dense non-hardening compound. (Note: silicone doesn't work.) Roll cm-tick sausages and apply these to the cavities in the subchassis, pressing hard. Do NOT fill up the cavities completely.
Take out the two lead counterweigths, and re-install them with a thin layer of Blu Tac or damping material sandwiched between them and the subchassis.
Increase the motor pulley diameter (DC motor only)
(Not confirmed)
The belt might have an easier time when riding on a larger pulley.
Have a pulley with diameter 10-20mm machined, install it, and lower the motor power supply voltage accordingly.
Cheap alternative: use the standard pulley on its 45rpm diameter and lower the supply voltage.
Note: a heavy pulley with flywheel effect might be better still, if it doesn't kill the motor's bearing.
REGA ARMS and VERTICAL TRACKING ANGLE (VTA)
The standard way of 'adjusting' Vertical Tracking Angle or arm height with Rega arms on a GyroDec or Orbe is by putting shims of carefully selected thickness between the arm base and the arm board. Normally the dealer or distributor stocks such shims, and knows which ones to use for which cartridges.
For those people wanting a more versatile solution, Michell offer a VTA sleeve for Rega arms which itself accepts the arm from above, and sits in (new-style, since January 1999) arm boards.
 The procedure for setting VTA with this sleeve is:
The sleeve has two major drawbacks: you have to reach under the arm board to fiddle with the big nut there. Perfectly possible with SEs, a bit harder to do with a full GyroDec or Orbe, as the chassis gets in the way then. And two: the sleeve itself adds to the minimal arm height so that it is not compatible with cartridges that want the back of the arm very low. The solution here is to used shorter armboard spacers, which can be ordered on special request from Michell.
GYRO GENERATIONS
While these are no official denominations, one can still distinguish more or less five GyroDec generations :
Anything below MkIII can easily be upgraded to MkIII status. However, the step from any older Gyro to the latest MkIV/V status requires some surgery to the acrylic plinth to accommodate the stand-alone motor. You can order the parts and find your own means of cutting the chassis. Alternatively, you can send your baseplate to Michell for the modification.
It is possible to buy a whole new plinth and motor, but such a step is not cheap. Alternatively, one could buy the spider, turrets, and motor of a Gyro SE (or Orbe SE), combine them with the subchassis, bearing, and platter of an old GyroDec, and so end up with a 'new' SE. Perhaps a handy DIY'er could make a sort of box with a DIY base and the GyroDec's dustcover, to put the SE into.
TECHNICAL INTRODUCTION
The Orbe is much like a GyroDec, but with all potential weaknesses ironed out. To achieve this the Orbe uses a double plinth construction, for better isolation, a fully isolated, well damped and extemely heavy motor housing, a massive platter, a new and more effective screw-down clamp, and a damped subchassis. The Orbe comes standard with the VC (QC) power supply, while the arms of choice are the SME V, Graham, Wheaton Triplanar and perhaps the Air Tangent.
SETTING UP THE ORBE AND ORBE SE
Locate the turntable plinth as per the GyroDec, then put on the inner plinth. Adjust the inner plinth height so that the space between the two plinths is about 2 mm. Now proceed with adding the subchassis, platter and armboard. Adjust the subchassis' settings (follow the GyroDec's procedure), and finally add the motor housing and belt.
ORBE (SE) GENERATIONS
TECHNICAL INTRODUCTION
The TecnoDec is a new entry-level turntable launched in February 2003. It is non-suspended, but uses the same DC motor as the GyroDec, in a similar standalone housing, and an inverted bearing adapted from the Mycro's. The chassis is acrylic, with an aluminium armboard. As far as I know only boards for Rega arms are available.
The platter is the Gyro platter, minus the gold weights, and with the three belt grooves flattened out, as on the Orbe platter. This may make the Tecno platter superior to the Gyro's as it avoids belt strain due to misalignment between motor height and platter!
An almost mandatory upgrade for this turntable is the GyroDec disc clamp, at $40 or so.
UPGRADING the TECNODEC
1.Clamp
2.HR power supply
TECHNICAL INTRODUCTION
The MYCRO and the older SYNCRO are Michell's (ex) entry level models. The Syncro is a simple three point suspended turntable, using compressing springs, and suitable for arms with Rega mountings. The platter is glass, with a felt mat.
The Mycro is a further development of the Syncro, with more modern looks (glass-green acrylic), the platter of the GyroDec, and a main bearing developed from the Gyro's. While the Mycro comes standard with the Rega RB-300 arm, more specific armboards are available upon special request. Note, however, that a Rega is the ideal arm for this turntable.
An almost mandatory upgrade for both turntables is the GyroDec disc clamp, at $40 or so.
IDENTIFYING THE MYCRO'S PARTS
SETTING UP THE MYCRO
1.
Follow the instructions for the Gyro when positioning the turntable.
2.
Put on the springs.
3.
Put on subchassis and platter.
4.
If the subchassis is not level (normally it will be), then disassemble the whole, and pull on the
shortest spring, to make it a bit longer. Rotating the springs around their
vertical
axis also may help getting things in balance. Reassemble the turntable.
5.
Clamp the arm cable.
UPGRADING MYCRO AND SYNCRO
Below modifications seem possible, but have not been tried. Please contact Michell before trying this at home.
Upgrading Syncro to Mycro
The essential differences between Syncro and Mycro are the use of a bronze inverted bearing (directly derivated from the GyroDec's) and a black vinyl platter on the Mycro. Probably both these components can be retrofitted to a Syncro, and are available in limited supply.
Upgrading a Mycro
Three upgrades seem more or less obvious:
1.
Use the clamp from the GyroDec. This should result in a more neutral sound
and less problems with warped records.
2.
Damp the subchassis internally with plasticine or blacktack. Michell can
supply you with the Densodamp putty used in the Orbe.
3.
Drive the motor with Hifi News & Record Review's (a UK hifi mag, widely
available) Flutterbuster supply for 240V (110V in the US) synchronous
motors. However, the possibility of this upgrade has not been confirmed, so
enquire at HFN&RR before you try it. (Sept.1999: this product seems to have
been discontinued.)
For information on or repairs of older Michell models (Hydraulic Reference, Electronic Reference, Prisma, Focus, Fluid arm, Focus arm) contact Michell Engineering at:
J.A.Michell Engineering
2 Theobald Street, Borehamwood
Hertsfordshire, WD6 4SE
tel.: (0181).953.0771
fax: (0181).207.4688
http://www.michell-engineering.co.uk
For information on or repairs of Transcriptors models (Hydraulic, Hydraulic Reference, Skeleton, Transcriber, Round, Fluid arm, Vestigal arm) contact Michael Gammon / Transcriptors.
MAINTENANCE and CLEANING
For cleaning acrylic we suggest to use ordinary Pledge spray for modern furniture. Apply it directly, in modest amounts, and immediately wipe it with soft surgical cotton balls to avoid leaving any stripes.
Before you start make sure that the acrylic surfaces already are fairly clean, i.e. no large dust or grit particles should be left, lest they produce scratches during the further cleaning.
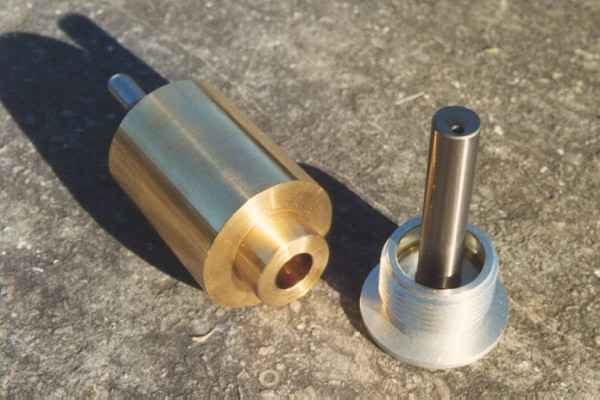
The AC Papst motor housings have a knurled nut of about 3 cm diameter right below the pulley. With DC motors, the pulley just protrudes from the top of the motor housing.
Mycro and Syncro only ever used AC motors. TecnoDec only ever used a DC motor.
Yes you can. If you have a recent GyroDec or any Gyro SE, i.e. with the standalone motor housing, you can send in the existing motor housing, and power supply, to Michell Engineering or your distributor, where it will be refitted with a DC motor. Note: don't send QC power supplies in!
If you have an older GyroDec with plinth-mounter motor, then you'll have to send in the whole plinth with motor and PSU to Michell Engineering. Please call or fax before for discussing details.
Note: not sure anymore if this service still exists.
Yes you can, but it is expensive. You have to buy a complete new motor assembly, together with the Orbe Controller power supply. There is no trade-in against your old motor and QC controller. Try to sell it to a GyroDec owner.
Michell used to offer this as an option, but quit doing so in 2001.
There are easy DIY solutions for older fixed-motor GyroDecs: move the motor to the left-front of the Dec, and follow the instructions after the next question.
For Orbe and recent GyroDecs, fitting a second arm would mean serious acrylic butchery. You may not want to try this yourself.
Note: the second arm tends to foul the dustcover and is in a less than elegant position.
Yes you can. Remove the lead weight that it attached to the subchassis' left side (motor side). Move the motor to the left-front position of the deck. Drill and tap the left-hand Mickey-ear for acceptance of a standard arm board.
The VC was created following in the footsteps of the QC AC-motor power supply, offering people the same style of product. Now, where the AC motor benefitted greatly from the QC circuit, the difference was less pronounced with the VC and DC motor, as DC motors are much easier to drive and work well already with a cheap supply. So the VC ended up being a very pretty thing with little sonic benefit.
Michell wisely decided to dump the VC and offer a DC motor upgrade supply in a simpler and cheaper housing, the HR.
No. The VC has a discrete low-noise voltage regulator, in fact the same regulator as used in the Trichord Orca and Delphini preamps.
The HR has a novel active rectifier followed with a normal single-chip voltage regulator.
The QC AC motor supply had a waveform synthesizer generating two sinewaves with precise phase-relationship. These two waves were then amplified to 19V RMS, before feeding the motor coils. In Linn-speak the circuit would be equivalent to the Lingo.
Essentially, yes. But some Orbes may have had a four-pin connector, while the Gyro motor had only three pins.
No. The Gyro VC was merely a low-noise voltage source. The Orbe VC makes use of the tacho coil on the Orbe DC motor to control the actual pulley speed in a feedback loop.
Essentially, yes. But the Orbe Controller dropped the electronic 33/45rpm switching that the VC had.
Static could make the VC switch erratically between 33rpm and 45rpm.
The tacho coil may come off, resulting in massively-wrong speeds.
Yes and no. The actual motors are identical, but the Orbe version has a tacho coil attached to it for feedback speed control.