Finishing Projects
Matts shop-
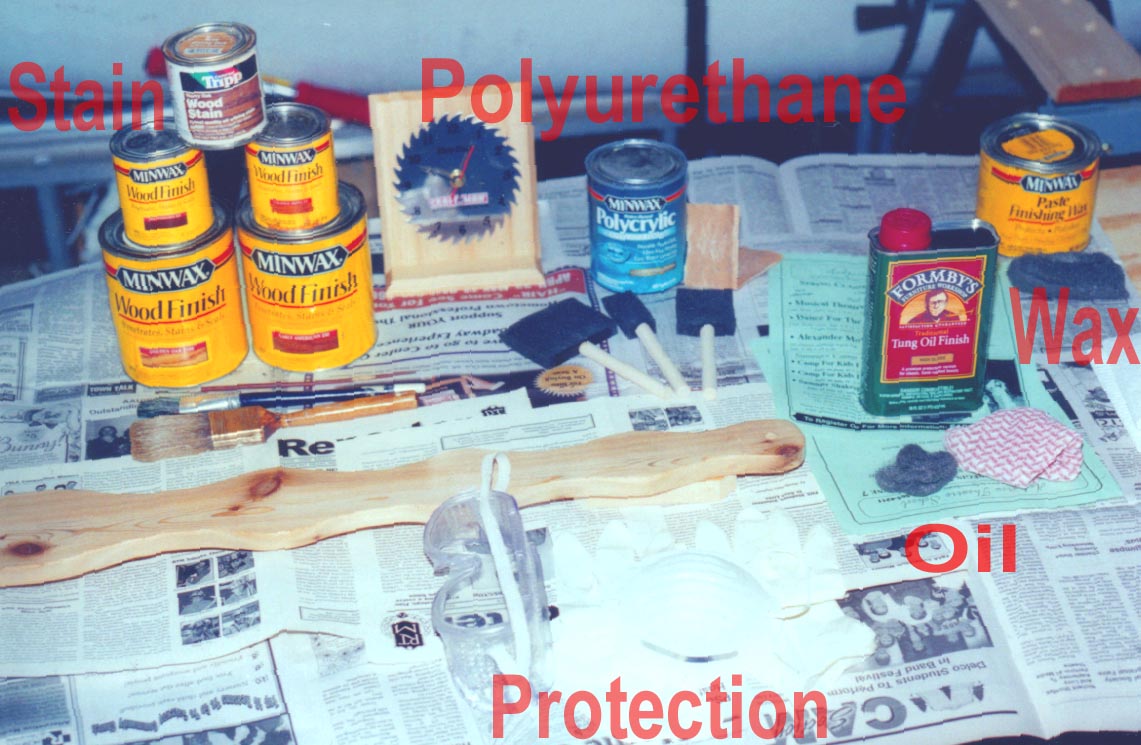
WOOD
Why finish wood? Well, The reason carpenters finish wood is because there is a natural moisture content in wood. The finish keeps that moisture in. If the wood wasn't finished, the wood would crack or split. If you don't know what I mean, go out to your fire wood pile and look at the end of a log that hasn't been split yet. If the wood is old enough, there should be tiny splits in the heart wood(center) of the log. Imagian the same thing happening to the project you created. There are many different ways to finish wood. Below are some ways to finish wood. Some finishes have down falls however, so be careful selecting your finish. Exapmle, Varnish creats a heavy blanket of protection, but can lift up over time. Make sure you read the lable of a product you are about to purchase. If you have any Questions, e-mail me at [email protected]
Protection
Staining wood
Polyurethaning wood
Oiling wood
Waxing wood
Steel Wool Finish
Protection
WOOD
While using chemicals to protect or finish wood, the fumes can
often damage your brain. The chemicals can burn or discolor
your hands. Sometimes the fumes can effect or make your eyes water
depending what you are using to finish the wood. To prevent
any of these things, take proper precautions. Wear latex gloves to protect your hands. If you use gloves like the medical gloves, the gloves may dissolve and ruin the wood. Wear a mask and work in a well ventilated area to avoid brain damage. Lastly, wear goggles to protect your eyes. Remember, always read the label on your product for further informanton and safety.
Top of page
Staining wood
WOOD
First I suggest you read the protection portion of this page for safety. Stain can change the color of wood to make it look like a different wood or wood color. Stain can really enrich the natural beauty of wood. But stain can magnify small imperfections like sanding scratches. Before you stain something, test the stain on a scrap of the same kind of wood you are going to stain. This ensures that you will be happy with the results. Before you stain, read the label on the can and carefully follow any safety procedures. Once you have chosen your stain, tested it, and understand the safety procedures, you are ready to stain.
- Lay down newspaper to protect your bench.
- Then place your project on wood scraps to get it off the paper. *Note, don't put scraps under a part you want to stain because the scraps you put your project on can absorb the stain and leave a light bloch that is irreversable.
- Open your can of stain.
- Use a paint stirer to mix stain to a uniform color.
- Use a brush or very soft cloth to spread stain evenly on wood surface.
- Once entire surface is covered by a uniform blanket of stain, let the stain soak into the wood for 10 to 15 minutes.
- After waiting 10 to 15 minutes, use a clean, nondusty, soft cloth to gently wipe the stain off the surface in the direction of the grain.
- Let the wood dry overnight or as long as the directions on the can of stain specify.
- Add as many coats of stain as you want until you find the shade you desire. *Note: each coat makes the wood darker.
- I advise to add a finish like polyurethane. on top of this stain for further protection.
Top of page