A Repair Scheme for the Dragon Spring Problems
By Mark A. Cole, September 8, 1999
Page 2
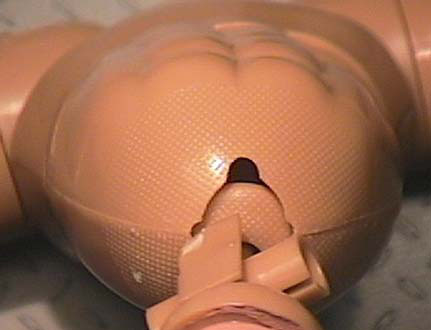
This photo shows the top of the abdomen piece and the oblong hole with the 4 added slots, that the lower washer(shown here) fits into. It is oblong so that the lower washer can be turned on it's side to go through long part of the hole.
Salvage both the neck and abdomen washers. First use hemostats or tweezers to nudge the Abdomen washer off of the cut post inside the abdomen. See that both the neck and abdomen ball joints have added slots so the washer can be grasped and turned on it's side and pulled out of the whole. Shake out the broken post, snap ring and spring and keep them as souvenirs. Next grasp the lower washer with the hemostats and bring it out of the abdomen. If the washer and spring are still in the neck piece, they too can be removed with this same method but it isn't necessary. Next cut a piece of 1/8th inch (or even better a 1/4") elastic 7 inches long. Fold it in half and thread it through the abdomen washer from top curved side to bottom flat side of washer (this is to make sure that the washer goes back into it correct position-with it's dome side up). Make a BIG tight knot (larger than the hole in the abdomen washer), then maneuver the knot and washer back down through the abdomen hole. Thread the elastic strips back up through the hole(shaft) and up through the neckpiece(drill a bit larger diameter hole in the top cap of the neck piece). Then pull up elastic as hard as you can and knot it at the top of the neck piece cap-again a BIG tight knot larger than the hole in the top of the neck piece. The hemostats are a big help here too. To get this really tight pull each piece of elastic up through the neck piece and clip them with the hemostats right against the neck piece cap. Then construct your knot against them. Then make a bigger knot around and under the first one and right as you give it it's final tug remove the hemostats (need a third hand, anyone?). As an option you could add metal washers with smaller hole diameters under each knot to spread out the force and to reduce the size of the knots.
If the lower washer is split, the only difference in this repair scheme is that you must make a lower washer. You can glue the halves of the original together to gauge size, shape and diameter. See Update Page.

Here is the finished repair. BIG knotted double strips of elastic running from the top of the neck piece down to the bottom side of the abdomen washer.
Then return the head to the top of the neck piece with a dab of super glue gel(more than a dab will make it tougher to get the head off if a future repair is needed) and when dry the repair is complete.
The success of this scheme requires the careful alignment and drilling of the hole/shaft, the reuse of the custom plastic washers and how tight the stretched elastic is pulled before tying it off at the top of the neck piece.
From beginning to end this repair should take about twenty minutes per figure to execute. That's it.
�