Last Updated: March 10, 2003
Note: This tutorial was written quite a while ago, and while the process still works, it uses some out of date apps as well as some classic apps. There is a very excellent OSX program called "forty-two" which can create a SVCD from a DVD in one step, and is surprisingly fast. It also features standard VCD creation as well as Divx encoding, which yields the best quality I've seen, while keeping the filesize below 700MB.
First of all, let me say that I am not an expert on SVCDs. I merely had an interest in converting some of my old VHS tapes to a digital format without spending several hudred (if not thousand) dollars on a DVD-burner and software. I have found that the SVCD format is the highest quality while still allowing a substantial amount of video per disc. Also, I have seen quite a few posts on messageboards asking if there is a way to make SVCDs on a Mac. Most SVCD tutorials simply tell you how to burn an already existing bin/cue image to a CD (usually using VirtualPC anyway). You can easily create your own SVCDs out of Quicktime movies using any G3 or G4 with a CD-RW drive running OSX. Obviously, the speed of your computer and the amount of RAM will make a difference in the time it takes to create one. This "tutorial" (if it can be called that) assumes that you already have a basic knowledge of Macs and some experience with Qicktime.
Although any computer capable of running OSX will work, it could take up to 2 days on slower computers for the MPEG-2 encoding and is therefore not recommended unless you have a lot of time (and no work) on your hands. Here is my idea of a minimum system for SVCD creation:
400MHz or faster G3 or G4 (500MHz or faster recommended)
256MB of RAM (512MB is better)
20GB Hard Disk (at least 40GB if you want to do segments more than 30 min long)
CD-RW drive (8x4x24 is good, although any speed will work)
Optional: DVD-ROM drive (for ripping DVDs)
Optional : VCD compatible DVD player for viewing SVCDs (most are VCD compatible these days)
Recommended tools for SVCD conversion, creation, and burning
There are several ways of getting digital video onto your hard disk in a format suitable for conversion to SVCD:
Transferring from DV camcorder
Capturing from a digital video capture device (i.e. Formac Studio, Hollywood DV Bridge, etc.)
Note: You must capture your video in a format that can be edited and encoded, such as a Quicktime .MOV file. For more info about choosing the best Quicktime Codec, see "Ripping a DVD".
An SVCD uses MPEG-2 compression for its audio/video stream, so you must purchase an MPEG-2 encoding program. I highly recommend M.Pack because of its quality and speed. Unfortunately, M.Pack is no longer available since Apple bought the rights to it, so you may have to look around eBay for a copy. Cleaner 5 also has MPEG-2 encoding, but it costs a fortune for the program itself and you need an upgrade (which costs another fortune) to unlock the full MPEG-2 options. Aternatively, you can use Virtual PC 5 to run TMPGEnc (not recommended for encoding because of slow emulated speed).
I use M.Pack for my converting, so I will use that in my example. I also have a pre-configured SVCD setting file for M.Pack that you can download.
MPEG-2 Encoding
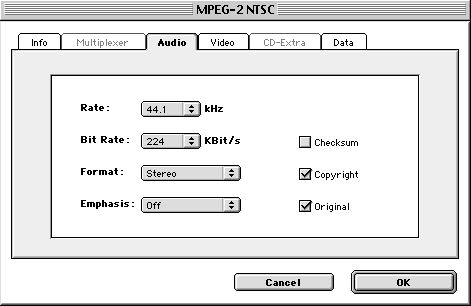
Start M.Pack and double-click on the setting called "MPEG-2 NTSC". Click on the "Audio" tab, change "Rate" to 44.1, and "Bit Rate" to 224.
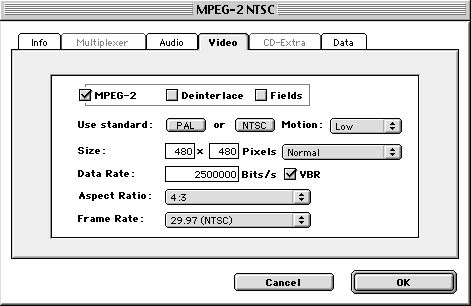
Now click on the "Video" tab, change "Size" to 480 x 480, change "Data Rate" to 2500000. Make sure the "VBR" box is checked.
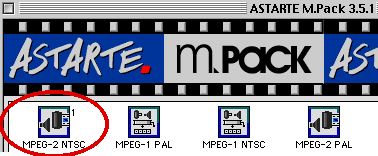
Click on the "Data" tab and add "Track08_00.m2v.mov" (or whatever your file is called, I will use this as an example file for the "tutorial"). Click the "OK" button. Now there should be a little "1" in the corner of the "MPEG-2 NTSC" setting.
Now all you have to do is Click the "Start" button in the lower right-hand corner of the M.Pack window. Encoding takes roughly 5 hours for 30 min of video on my 700Mhz G4.
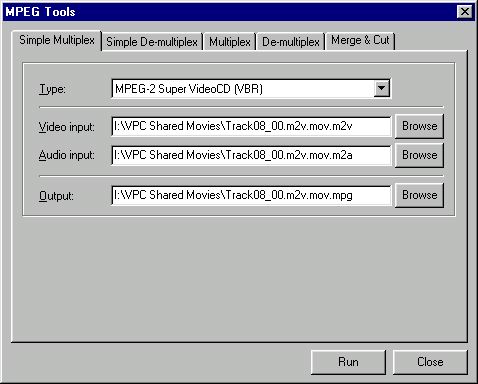
When M.Pack is finished encoding, there will be two files in the default destination (usually the same folder as M.Pack). One is the MPEG-2 encoded video stream ("Track08_00.m2v.mov.m2v"), and the other is the MPEG-2 encoded audio stream ("Track08_00.m2v.mov.m2a"). You will need to mux (multiplex) these streams into one MPEG stream before creating your SVCD. One way is to use WiredMux which comes with M.Pack (it comes with intructions so I won't explain it here). Another way is to use TMPGEnc's (running on Virtual PC 5) multiplex tool. Simply choose "MPEG Tools..." from the menu and change the setting to "MPEG-2 Super-VideoCD (VBR)". Place both streams into your shared folder (assuming you have a folder that is shared with Virtual PC) and select "Track08_00.m2v.mov.m2v" as "Video Input". The other fields should then be filled in automatically. Click the "Run" button and wait for it to multiplex (this shouldn't take more than 10 min).
You should now have a file called "Track08_00.m2v.mov.mpg". This is the final product that will be used to create your SVCD.
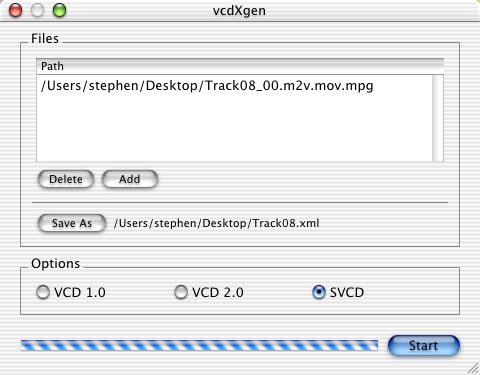
Start GNU vcdtoolsX and click on the vcdXgen tool. Make sure the dot next to "SVCD" is selected. Click the "Add" button and select "Track08_00.m2v.mov.mpg". Now click the "Save As" button and choose a name for the output. Click the "Start" button (it should finish almost instantly).
Close vcdXgen and click on the vcdXbuild tool. Click the "xml file" button and select "Track08.xml" (or whatever you called it). Click the "Save to" button and choose a destination for the images. Click the "Sart" button and wait while it builds the images (this should take about a minute).
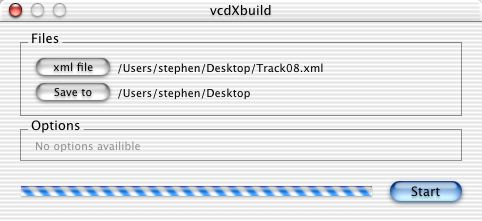
There are now several files on your desktop (or wherever you saved them) called "videocd.toc", "videocd_01.img", "videocd_02.img", and "videocd_02_pregap.img". The only ones you will need are "videocd_01.img" and "videocd_02.img".
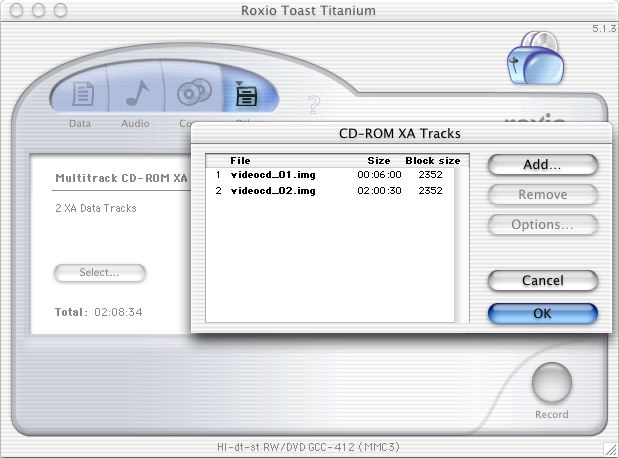
Start Toast and click and hold the "Other" tab. Select "Multitrack CD-ROM XA" from the menu that pops up. Drag "videocd_01.img" and "videocd_02.img" (in order) into the window. Click "Record" and then choose the speed you would like to burn it at ( you can use any speed that your burner is capable of, although less than 12x is recommended).
You have now successfully created an SVCD on a Mac, possibly in less than a day. If you have any further questions, comments, or suggestions, or have trouble in one of the steps, feel free to email me at [email protected]