To rip a DVD, you need several tools to (1) rip and demux the DVD tracks, (2) decode them into a suitable format, and (3) combine the tracks into a Quicktime movie.
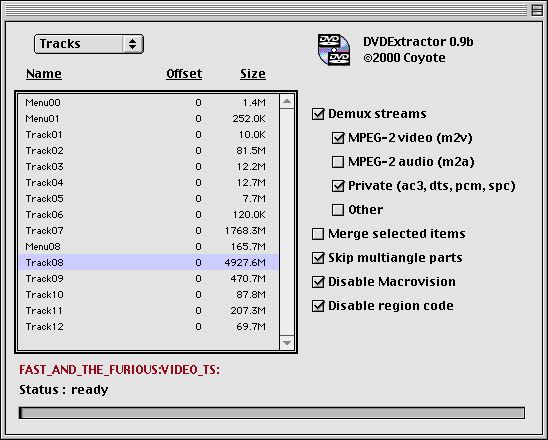
Start DVDExtractor and select the track you wish to rip (the biggest track is usually the movie). Make sure all the check boxes look exactly like the screenshot below.
Go to the "File" menu and choose "Save...". Choose a folder where you want to save the demuxed tracks. It will now begin ripping the track and will be done in 10-20 min depending on the speed of your DVD-ROM. Now you are done with the ripping aspect, and can move on to decoding.
You will notice that DVDExtractor has placed two or more files in whichever folder you selected in step one. In our example, there would be a track called "Track08_00.m2v" (this is the video stream), and one or more tracks (depending on how many languages the soundtrack is in) such as "Track08_00.ac3" or "Track08_00.dts" (the audio stream).
A. Decoding video stream
Start MacMPEG2Decoder and choose "Add to Decoder...". Select the video stream that you previously ripped (Track08_00.m2v). It will appear in the MacMPEG2Decoder window.
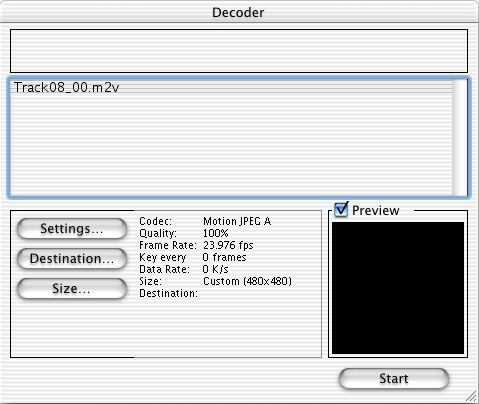
Click on the file's name in the window and click the "Settings..." button. Change the Codec from "Video" to "Motion JPEG A" and set Quality to "Best". Change the frame rate to 23.976 (or 29.97 if the DVD was made from an NTSC video source). You can also click "Options" and change field count to one, but this is optional.

Click on the "Size..." button and click on "Custom Size". Enter 480 for width and 480 for height. After you are done it should look just like the first screenshot. Click the "Start" button and wait while it decodes. Depending on the speed of your computer and the length of the movie, it should take 3-8 hours (2 hours on my 700MHz G4 for a 30 min segment). The output file should be in the same folder and should be called "Track08_00.m2v.mov".
B. Decoding audio stream
Start mAC3Dec and choose "Decode AC-3..." from the "File" menu. You will be prompted to Choose a filename and a location to save the file to. When it is done decoding, you will have a file called "Track08_00.aiff".
Open "Track08_00.aiff" in Quicktime and choose "Select All" or press command-A (the time bar should turn grey to show that the whole track is selected). Choose "Copy" or press command-C to copy the audio track and then open "Track08_00.m2v.mov". Choose "Add Scaled" from the "Edit" menu or press shift-command-option-V to add the audio track to the video. Now choose "Save" from the "File" menu and exit Quicktime. The file "Track08_00.m2v.mov" should now contain both audio and video and you should be able to watch it in Quicktime. WARNING: Do not delete "Track08_00.aiff" as it contains the data for the audio track that is now part of "Track08_00.m2v.mov".
You now have a Quicktime movie suitable for converting to SVCD. Please refer back to the main page for SVCD conversion instructions.
This guide is only for basic ripping of most simple DVDs, for a more complete guide to ripping DVDs plus all the tools necessary, you can check out Mac DVD Ripping Tutorial 2.5.1. This is a fuller explanation of the structure of DVDs and all the files found on them. It also explains how to rip and decode many more formats than are listed here.