BCU - Fire
Solar Oven Entrance
Why a Solar Oven?
Method 1
Method 2
Using Your Oven
Contact B.Howe
Solar Oven
Method 1: The Make-shift Oven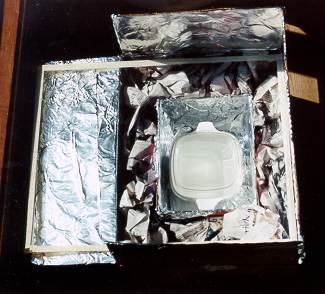 Many people laugh when I say that I cooked my lunch in a cardboard box, and I have to admit to having my doubts before I tried it. Since putting my first oven together I have found it to be an excellent way to prepare canned food or leftovers. It can achieve temperatures high enough to heat your food to the point that you need oven mitts to handle it, and costs absolutely nothing to operate. The materials can already be found in almost any house and can be assembled in minutes. There is no need to pre-make and store something wasting valuable space in your home.
Materials to find:
�tin foil,
�a couple of cardboard boxes, one should fit inside the other with at least one inch of clearance all the way around,
�masking tape,
�newspaper,
�a piece of glass, larger than your big box,
�glue or spray adhesive or an alternative,
�black metal plate.
Instructions:
 Step 1:
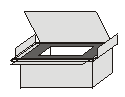
The first thing you will want to do is tape the edges of the glass so that you won't cut yourself when handling it. You will then need to fit the glass to the large box. I did this by bending the flaps at the ends to make a small shelf to support the glass. When you know that the glass will stay in place, remove it and line the inside of the box with tin foil so that the shiny side faces into the box. Use spray adhesive or glue to keep the foil in place.
Step 2:
Cut the top off of the small box so that it is at least one inch short than the large box and line the inside with tin foil in the same manner.. Crumple up pieces of the newspaper and place them in the bottom of the large box. When the small box is placed on top of the newspaper it's top should be level with the top of the large box. After you get the boxes to the same level, center the small box on top of the newspaper and fill the gap between the sides of the boxes with more crumpled paper.
 Step 3:
You want the reflector to be roughly the same size as the top of your large box. You can do this by taping the pieces of cardboard which you cut off earlier and the back flap of the large box, together into one large piece, or as I did, cut the side out of another box and tape it to the back flap of the large box. After the reflector is in place you will need to cover it with tin foil, shiny side out.
Step 4:
Now you need to place a black metal plate of some kind at the bottom of the small box. This plate will absorb the sun's heat and help carry it to the food being cooked. Some say that stove pipe covers work well, but I found a shallow roasting pan floating around my kitchen that just happened to fit perfectly.
 Step 5:
This is where it gets fun. Place some food (ie. a can of beans) into a black bowl or pot that will fit into your oven. If it doesn't have a well fitting lid, cover it with seran wrap. Place it in the center of your oven, and put the glass in place. The oven will work best if you seal the edges of the glass with masking tape to reduce heat loss.
Step 6:
All that is left to do is place the box outside, in direct sunlight. Adjust the reflector so that as much light as possible is reflected into the oven. Sit back and wait. It may be necessary to occasionally turn the box slightly to ensure that has the straightest angle to the sun.
My Notes and Observations:
In the winter this little oven loses it's heat fast. If there are small clouds drifting around they may be enough to keep the box from heating up fully. Don't despair, I found that it will still heat your food, but you may be eating it for dinner - not lunch.
Also, a consideration which is worth mentioning. I do not suggest attempting to cook raw meat or meat products in this oven. Some say that it is hot enough to kill the bacteria and parasites found in the meat, but I would prefer to remain on the side of caution. The highest temperature this oven can achieve is a little too close to the line for me. If you wish to try it, use an oven or meat thermometer to ensure that you are in fact getting enough heat. Canned or pre-cooked meats should be okay, and I have myself heated up a tin or two of Spam without suffering ill effects. Use your best judgement.
If you are using your oven to melt snow for drinking water, remember that it should boil for at least 10 minutes before drinking in order to purify it. I gave myself a mild burn by trying to lift the food out without oven mitts. The glass felt warm, but not hot, and the food had not yet started to boil, so I foolishly assumed it was only warm. Be very careful about this. On one particularly busy afternoon I started using the oven for melting wax and making candles using piles of snow as my molds. I was able to remelt the waste wax from the cooled candles in the oven in about 10 minutes and do another batch. It was a lot faster than I had anticipated.
Brett
Last Updated: March 19, 2001