BCU - Earth
Garden Entrance
Contact B.Howe
Hypertufa
Pictures Coming Soon!This is amazing stuff. It is a concrete mix which can be textured and stained to look like real rock, yet weighs considerably less. It can be poured into a mould, shaped by hand, or chiseled and carved after it has set up a little. Wonderfully versatile, attractive, and alive. The material is capable of retaining a small amount of moisture thus allowing mosses to grow, but allows most of the water to pass through (drain off) fairly quickly. It makes excellent troughs for alpine gardens, and with a little sealant it is an easy material to shape for custom waterfalls, birdbaths, or statuary.
Currently I use it as the base for my wire-sculpted trees. My intention is for the trees to be placed outdoors, where the environment will change the colour and textures of the metal. As well, I will be growing moss on the hypertufa base in order to lend the sculpture a more subtle sense of being alive than can be attained by appearance alone.
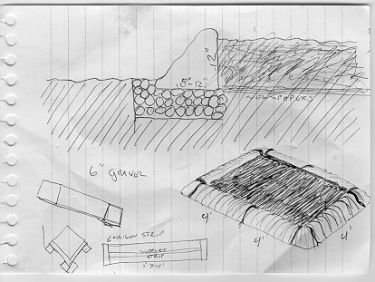 I am installing a raised vegetable garden this spring. The 1' sloped walls for the bed will be made from 5' long hypertufa sections. In the event that I wish to change the shape of the bed, I will be able to simply move the sections of the walls into the new arrangement.
The Mix
Here is the basic formula, which I am using for my hypertufa:
1 part coarse sand
(also called builders sand, or general purpose sand)
2 parts peat moss
water as desired
1) Mix cement and sand together, then add to peat. When all mixed up evenly, add water to get the desired consistancy. For pouring a mould I'll keep it a little on the wet side, drips a little when it's picked up with the hands. For hand-shaping I'll try for a mix that doesn't drip unless it's squeezed. Wear gloves and a breathing max when working with the cement. The dust can really do a number on your skin and lungs.
2) After your mould is poured, object is shaped, whatever method you used, cover the hypertufa lightly with plastic and let stand, undisturbed, in a warm place for a day or two. After it has set-up and can be handled, use a wire brush, knife, spoon, concrete dyes, or whatever else you can find to texture and colour the hypertufa to the look you want.
3) Depending on the size of the object it can take a few days to several months for it to cure completely. This is a judgment call on your part. If you make a bench and try to sit on it too early it may crack, so be careful and don't rush it.
The Finishing Touch
Moss:You can wait for moss to establish itself on your object or you can help it along with a quick 'moss paint'. Find some moss growing in your garden (similar conditions to where the object is going to be, ie. shade, sun...) take a small piece of it and throw it into a blender with some buttermilk. Use this mixture to paint the hypertufa. In a short time the moss paint will begin to grow out and you'll have a nice, lightweight, ancient looking object for decorating your garden.
Staining: There are many options for colouring concrete, so I'd suggest a field trip to the hardware store. Letting wet leaves lay on it for a while will stain it pretty good if your not looking for a consistent colour change.
Brett