12.) Layers/Merge/Merge Visible
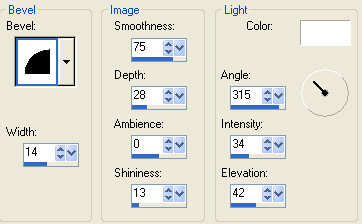
13.) Selections/Select all/Float, Effects/3D Effects/Cutout with these settings, Horizontal and Vertical 3, Opacity 80, Blur 5, Color Black.
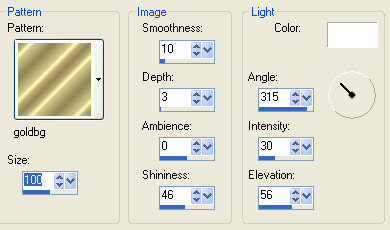
14.) Image/Add Borders 3 pixels, Symmetrical, Select with Magic Wand, then Fill with Goldbg pattern. Image/Add Borders 5 pixels, Highlight with Magic Wand, then fill with Foreground color.
15.) Image/Add Borders 3 pixels, Highlight with Magic Wand, then fill with Goldbg pattern.
16.) Image/Add Borders 5 pixels, Highlight with Magic Wand, then fill with Foreground color. Select all/Modify/Contract 3 pixels apply cutout as before. Selections/Select All. Apply Cutout again.
17.) Image/Add Borders 2 pixels, Highlight with Magic Wand, then fill with Foreground Color.
18.) Image/Add Borders 3 pixels, Highlight with Magic Wand, then fill with Goldbg pattern.
19) Image/Add Borders 5 pixels, Highlight with Magic Wand, then fill with Foreground Color.
20.) Image/Add Borders 13 pixels, Highlight with Magic Wand, then fill with Goldbg pattern. Keep Selected. Apply Cutout as before.
21.) Apply Displacement Map, Effects/Distortion Effects/ Displacement Map, same settings. Keep Selected, Apply Drop Shadow as before.
Thats it your done I hope you enjoyed this tutorial.
